This tutorial will demonstrate how to use Gmail on Slack. By default, you won’t find any option on Slack or in Gmail using which you can connect and use Gmail on Slack. But, there is a free Slack bot named, “Gmail for Slack” offered by MailClark can help you do that with ease. This bot can sync all your Gmail emails on a Slack channel. After you integrate this bot with Slack, you can access your Gmail inbox on Slack and read new emails, send replies, forward emails, and much more. It also allows you to choose which emails (like sent, deleted, received, etc.) you want to sync to Slack.
This bot can come in handy if you’re using Slack to communicate with your team, but at the same time, you also want to send emails. So, you don’t have to switch to Gmail anymore, as you can now do that from Slack directly. MailClark also offers another “Email” bot which you can use to send emails from Slack. But, if you want to access your entire Gmail inbox and options on Slack, then this bot is what you need.
Note: The free version of Gmail bot by MailClark has a limitation of 100 emails (including sent/received) per month.
How to Use Gmail on Slack:
To get started, the first thing you need to do is go to the homepage of “Gmail for Slack” and then click on the “Add to Slack” button. After that, authorize this bot to integrate with your Slack workspace. Once you do that, it will open up a list of supported services among which you would need to select “Gmail” and then login to your account.
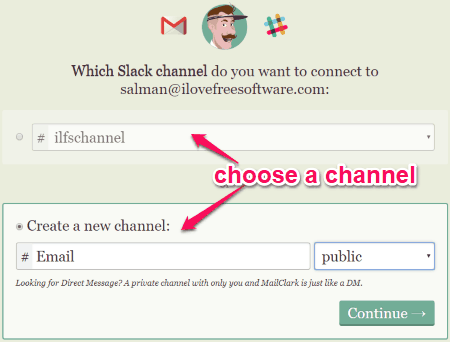
Once you’re done with that, it will ask you to choose a Slack channel to which you want to add Gmail. You can either select any of the existing channels or create a new (private or public) channel on Slack for using Gmail.
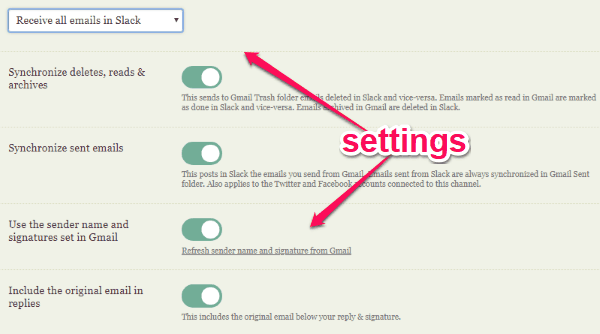
After you do that, the MailClark Gmail bot will be integrated with Slack and you can start using it for accessing your inbox, send email, read emails, etc. Before that, you can configure the email sync settings on MailClark. For that, open MailClark and go to the “Connectors” settings. After that, click on the “Edit” option associated with your Gmail email. Then it will open up various settings using which you can choose which emails you want to sync on Slack like (sent emails, deleted emails, etc.), use the sender name and signature, original email in replies, and more.
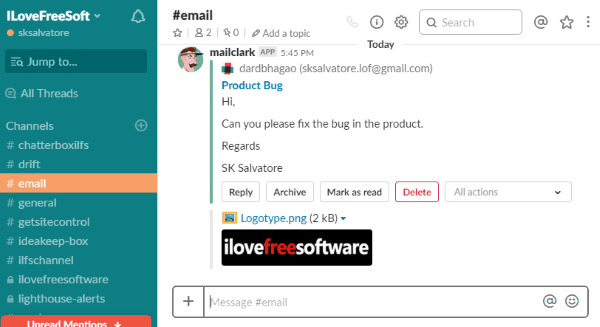
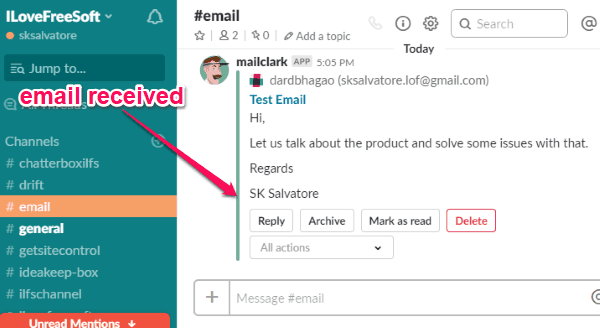
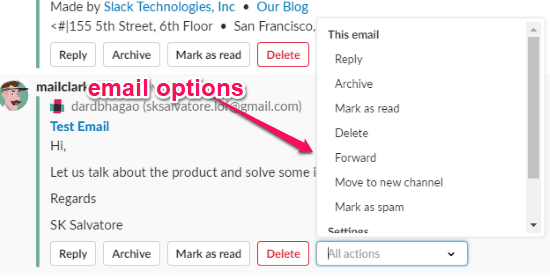
Now, go to the new channel which you have created on Slack and then you can see the all the new emails you receive on Gmail. Do note that the emails you can see on Slack totally depends on the settings you have configured. When someone sends you an email, it will directly popup as a new message on Slack channel. In the email, you can see the sender’s email, subject, the email body, attachment, etc. At the bottom, you will see various options like Reply, Archive, Mark as read, and Delete using which you can now interact with the email. For example, if you want to reply to an email, then all you gotta do is click on the “Reply” option and then send whatever reply you want to send directly from Slack.
Not just these option, you can also see other useful options from the “All Actions” menu. When you click on this menu, it will open a list of option including Forward, Mark as Spam, etc. From the “All Actions” menu you can also access the channel settings along with the MailClark settings.
Closing Words:
So, this is how you can use Gmail on Slack to read your inbox emails, reply to emails, forward emails, and do more. The MailClark Gmail bot makes it very simple to connect Gmail to Slack and access your entire inbox with ease. No more switching applications to send emails while working on Slack. The only thing which may concern you is the limitations of 100 emails in the free version. Otherwise, this bot is awesome to use.