In this tutorial, I’m going to show you how to automatically empty the Recycle Bin on Windows 10. Everything you delete from the internal drive on Windows is not actually gone instantly. Instead, it goes to the Recycle Bin and stays there. Although the content is no longer in its original location, it keeps on taking the space on your internal drive, unless you empty the Recycle Bin manually or use the “Shift+Del” short key to delete the file(s) permanently.
A Windows 10 update brought a feature that can automatically scan the drive and free up space when needed. This feature is called “Storage Sense”. When enabled, it gets rid of unnecessary files (like temporary data, etc.) to free up space whenever the system is running low on space. This feature also, lets you set to pick a time frame to automatically empty the Recycle Bin at regular intervals. Let’s see how it’s done.
Also read: How to Backup/Restore Quick Access Pinned Folders in Windows 10
Automatically Empty the Recycle Bin on Windows 10
This “Storage Sense” feature is available in Windows 10 feature update (build 17720 and later). Before going any further, press the Windows key on your computer and type ‘winver’. Open the command application to check the build number. Make sure you are having Windows 10 build 17720 or later, if not, go to the Windows Updates and update your system.

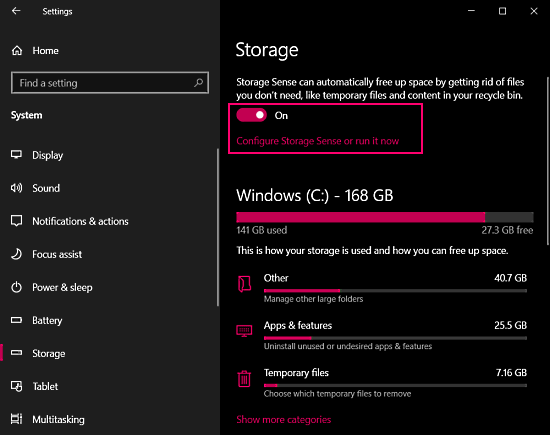
After checking/getting the suitable build, you can find this feature under the Storage settings. For that, go to the Settings app on Windows 10 and then go to the System -> Storage section. There you get a toggle right on the top with an option to “Configure Storage Sense or run it now“. Click on that option.

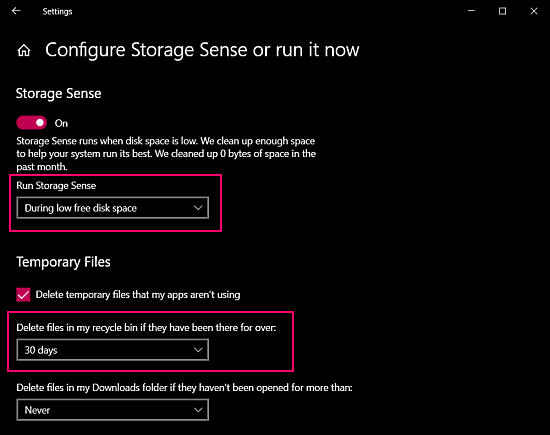
Under the Storage Sense configuration, there is a checkbox to delete the temporary files. There you can pick a time interval to automatically clean the Recycle Bin. You can set the time interval to 1 day, 14 days, 30 days, or 40 days. After that, turn the Storage Sense toggle to On. Now, the Storage Sense will automatically empty the Recycle Bin after the interval you have selected.
Closing Words
This is how you can automatically empty the Recycle Bin on Windows 10. This is a handy feature, that frees up space by deleting the content of Recycle Bin at regular intervals just like cloud storage services. And one good about this one is that you can set the interval and can also toggle it off when needed.