This tutorial explains how to change icons of programs pinned to Windows 10 start menu.
You must have noticed that when you pin a program to Start Menu, its default icon or program logo is visible. Windows 10 has no option to change that icon. However, this doesn’t mean that it is impossible. There is a free software, called “Win10Tile“, that lets you change icons of any installed program or software pinned to the Start Menu of Windows 10. You can set images for both small and medium sizes. Apart from this, you can also hide or show label (program name), if needed. You don’t have to select images of a particular size. It automatically fits the selected images for both sizes.
The software is also able to change the icons of some native applications like Windows Media Player. However, this software can’t change icons of apps installed from Store and some other native applications like Notepad.
![]()
In the screenshot above, you can see icons of some programs changed by me using this software.
You may also read some other tutorials:
- How To Lock Tiles In Windows 10 Start Menu.
- How To Change Color of Tiles In Windows 10 Start Menu.
- How To Turn Off Individual Live Tiles In Windows 10?
How To Change Icons of Programs Pinned To Windows 10 Start Menu?
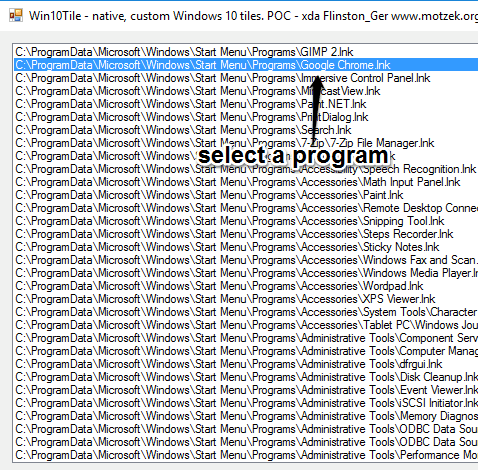
Step 1: Grab the rar file of this software and execute its portable application file. Its interface is not so cool but we have no choice in that. You can’t change the theme or skin. The interface shows the list of all the Start Menu programs and other programs. Another thing that you won’t like is that there is no search option to quickly find a particular program. So, you need to carefully look for the LNK file of a particular program and select it.

Step 2: After selecting a program, come to the bottom part of this software. There you have two add the image: 150*150 which is for medium image and 70*70 for the small image. Add images of your choice and you will be able to see the preview of selected images one by one. An option to add color hex code to set the image background is also available, but it didn’t work for me. You can give it a try.

Step 3: This is an optional step but important. If you don’t want to show label or program name on the tile, simply uncheck “show label” option.
Step 4: Click Save button and open Start Menu. Changes are visible immediately. You will find that the tile or program is now showing the image(s) added by you. Repeat the same to change images of other programs.
To get back the default icon, you need to use Delete Tile button.
The Verdict:
The software is good enough to easily change the default icons of 3rd party applications and some native programs installed on your Windows 10 PC. However, it has limitations also. For example, there is no search option and it can’t change icons of Store apps. Still, if this doesn’t bother you, then you should definitely use this software.
via gHacks.