This tutorial explains how to batch password protect Word, Excel, PowerPoint, and PDF files. You will be able to set read as well as write protection for all these files. You will also have the choice to set only read or only write protection. Depending on your needs, you can add read-write, read only, or write only protection for your important documents. Also, you can remove password protection for all your files at once, whenever you need. For doing this, I have used a free software, which is known as “ExcelPass“.
This is a very simple software available in portable as well as installer versions. It lets you set the password protection for DOC, DOCX, XLS, XLSX, PPT, PPTX, and PDF formats. So, for Microsoft Office files, it supports both old as well as new formats. On its user-friendly interface, you can drag n drop all the supported files that you want to protect and then add read-write, write-only, or read only protection.

This software is also able to password protect ZIP files but only read-only password protection can be set for ZIP files. I guess this is also a good feature so you can try it.
How To Batch Password Protect Word, Excel, PowerPoint, and PDF Files?
As I mentioned above, the software is very simple so you won’t find any difficulty while using it. You can either download its portable or installer version. The download link is available at the end of this tutorial.
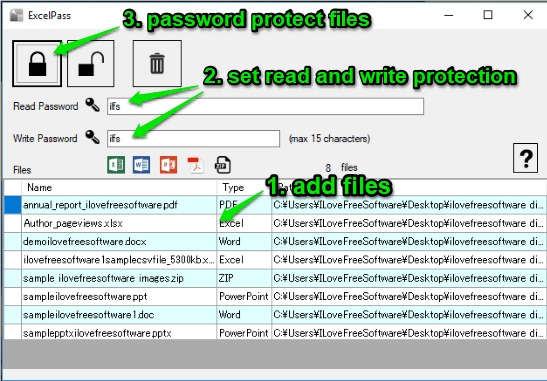
On its interface, you need to drag n drop Word, Excel, PDF, and PowerPoint files that you want to protect. You can also drop a folder containing all these or other format files. The software will automatically exclude the unsupported files and add only the supported files. You can see the list of files along with their name, type, and path.
On the top part of its interface, you will see Read and Write boxes. Here, you need to enter the passwords of your choice. The passwords are not hidden behind asterisks or bullets. So, you should be careful while entering the passwords.

When you have added read and/or write passwords, click on the “Lock” button. The software will start processing the input files. Depending on the total number of files, the whole process will complete.
That’s it! You have password protected your MS Office and PDF documents.
Whenever you want to remove password protection from all those files, add them on its interface. Enter the same read and/or write passwords that you set, and click on “Unlock” button. This will process all those files and unlock them.
The Conclusion:
There are other software also available that can password protect folders, or PDF/Word/Excel/PPT files separately. Even MS Office comes with built-in password protection feature but you need to open Word, Excel, PPT files one by one to set the password protection. Therefore, if you are looking for a software that instead of password protecting an entire folder or individual files, lets you password protect PDF, PPTX, XLS, XLSX, DOC, PPT, DOCX format files together, then this software is worth trying. The good thing is it also lets you remove password protection from all files. So, you will have full control.