This tutorial explains how to disable right-click menu of Windows 10 Taskbar. For doing this, you can use Local Group Policy and Registry Editor. Both are the native options of Windows 10. For both the methods, step by step process is covered in this tutorial.
When you have applied this tweak, then right-clicking on Windows 10 Taskbar won’t show anything. By default, right-clicking on Taskbar shows options to hide search box, access taskbar settings, Task Manager etc. But when this tweak is applied, all those options won’t be visible. You can also enable right click menu of Windows 10 taskbar again using these options. So there would be no problem after using this tweak.
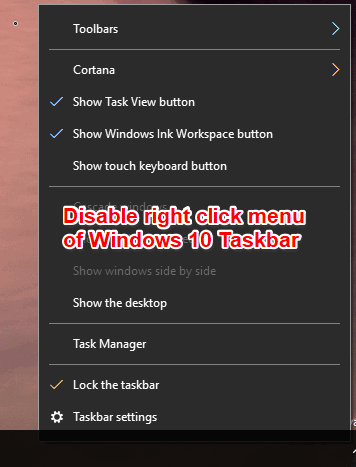
Before using this tweak, do note that this tweak won’t disable taskbar settings, which is used to lock taskbar, use small taskbar buttons, use peek preview, etc. If you want to disable all these taskbar settings, then you can use check this tutorial.
Let’s see the first method.
Method 1: How To Disable Right Click Menu of Taskbar In Windows 10 Education, Pro, and Enterprise Editions
Step 1: In the Search box, enter gpedit. This will be helpful to open Local Policy Editor (LGPO).
Step 2: This is one of the important steps. In this step, follow this path: Local Computer Policy, then double-click the User Configuration folder, expand Administrative Templates, and then Start Menu and Taskbar folder can be accessed.
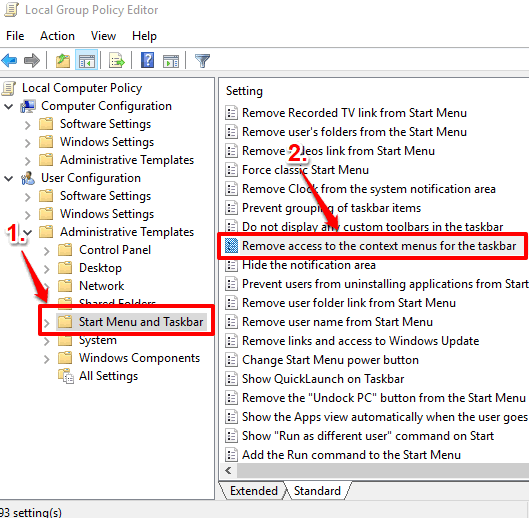
Step 3: Now you have to find and double-click “Remove access to the context menus for the taskbar“. You can see this option highlighted in the screenshot above.
Step 4: A new window related to “Remove access to the context menus….” option will visible. That window has “Enabled” option that you can see on top left side. Select that particular option and save this change.

This will immediately disable right click menu of taskbar in Windows 10.
When you have to access right click menu of taskbar again, you can use the same window and choose either Disabled or Not Configured option and save your changes.
Method 2: How To Disable Right Click Menu of Taskbar In Home Edition or Any Other Edition of Windows 10
Step 1: It’s a very simple step. You have to open Registry of your Windows 10 PC. It is quite easy. You can write regedit in Search or Run Command box and use Enter key to open it.
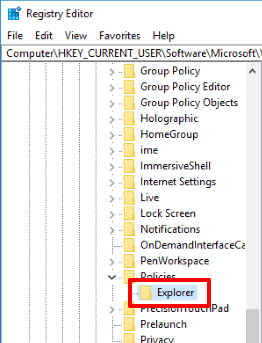
Step 2: Now it is a very important step. Find the “Explorer” key that is available under the Policies key. For accessing it, expand the main HKEY_CURRENT_USER root key, then Software key, expand Microsoft key, Windows key, explore CurrentVersion key, then Policies key, and finally Explorer key can be accessed.
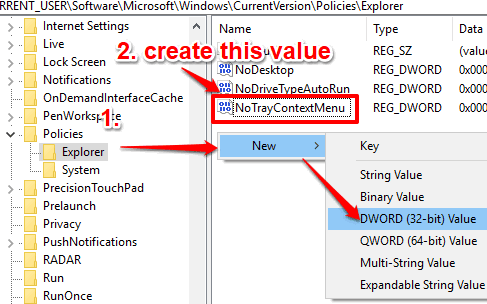
Step 3: Explorer key has a NoTrayContextMenu DWORD value. If this DWORD value is not present, then you can manually create it. Right-click the empty area available on the right-side, New, and click the DWORD (32-bit) option. This will create a DWORD value. After that, set its name as “NoTrayContextMenu“.
Step 4: It’s the final step. Double-click on this key and change Value data. Enter ‘1’ in the data as visible in screenshot below and save changes.
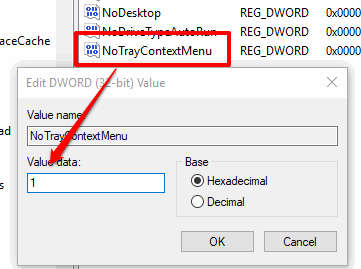
Now you have to restart the File Explorer or PC. This will apply the changes and right-click menu of taskbar will be disabled.
To enable Windows 10 taskbar right-click context menu again, you can put “0” in Value data of above DWORD value and save your changes. After that, again restart PC or File Explorer to access taskbar context menu again in Windows 10.
The Verdict:
If you can’t access first method because you are using Home edition of Windows 10, then method 2 is helpful to disable right-click context menu of Windows 10 taskbar. Other users like me who are using Pro or some other edition of Windows 10, I will suggest you use method 1 because it is easier than method 2.