How to Show Lock Screen on both Displays in Dual Monitor Set Up

0 Comments
[yasr_overall_rating] [yasr_visitor_votes]


Wintermelon is a C# Program that emulates the Lock Screen on multiple displays connected to Windows 10 / 11 systems.

The Lock Screen is displayed when you lock your system by pressing ‘Windows Key + L’ combination or by pressing ‘Ctrl + Alt + Del’ and selecting ‘Lock’ on the menu that pops up.

Earlier, Lock Screens were always emulated on multiple monitors in Windows 7 based systems, but the feature has since been discontinued. In Windows 10 / 11 systems, the Lock Screen appears on multiple displays only if the projection mode (Win + P) is set to ‘Duplicate’. If the projection mode is set to ‘Extend’, the Lock Screen is displayed only on the Primary or the Main display and all the other Secondary displays go black.

How it Works?

Wintermelon provides a workaround for this issue. It schedules the following two tasks namely that monitor your system for Lock / Unlock events.

Lock save window position clone display: When it detects a Lock event, the projection mode is switched to ‘Duplicate’ so that the Lock Screen is displayed across all the Secondary Displays. At the same time, the position of all the active application windows on the desktop is recorded so that it can be restored later.

Unlock extend display restore window: When an Unlock event is triggered, the projection mode reverts to ‘Extend’ and the positions of the running application windows that that was recorded earlier, are retrieved so that all of them can return to their original state.

Technical Details:

It listens for Windows log on and log off events in the even viewer with IDs 4800 and 48001 respectively.

Steps for Installing/Setting Up Wintermelon:

Enabling Auditing of Windows Log on and Log Off Events:

Wintermelon listens for log on and log off events which are not audited by default. You need to first enable their auditing. To do that, you can use Group Policy Editor. Here are the steps to enable it.

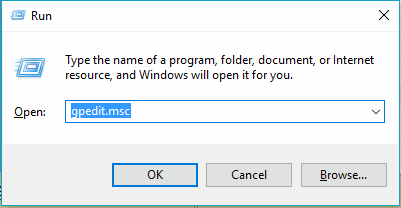
  1. In Run, type gpedit.msc or, you can search for Group Policy Editor in the Start.
    open gpedit
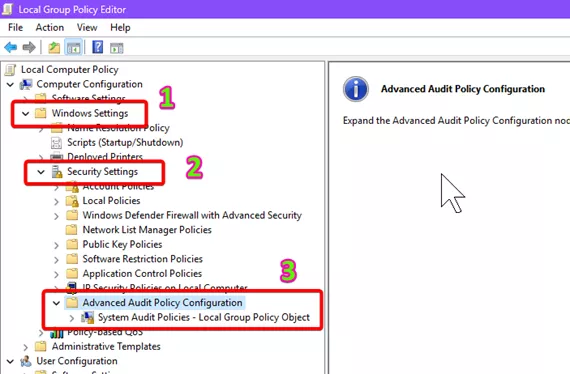
  2. Go to Windows Settings > Security Settings > Advanced Audit Policy Configuration. Expand this advanced audit policy configuration.
    open system audit policies
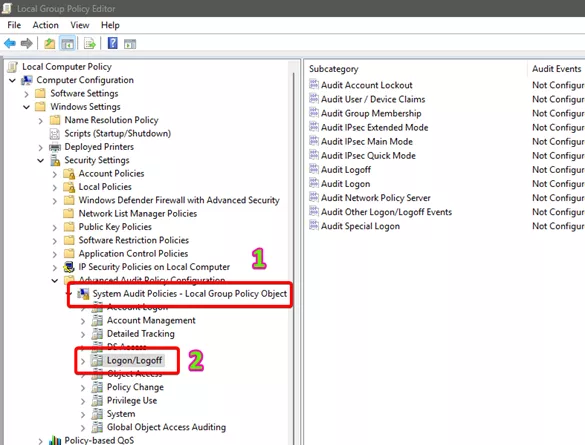
  3. Go to System Audit Policies –  Local Group Policy Object. Click Logon/Logoff.
    Logon Logoff policies
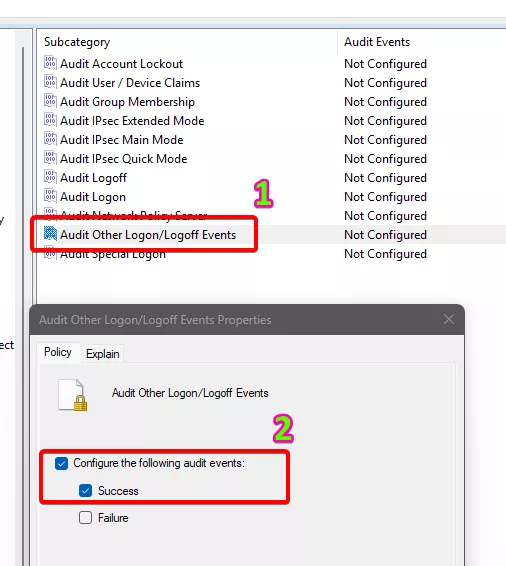
  4. Double click Audit Other Logon/Logoff Events and then check “Configure the following events” and then check “Success“.
    Enable Logon Logoff events auditing
  5. Done.

Running the Installation Script:

1. Download the program from the links provided at the end of this article. You must download Wintermelon.zip as well as Source code (Zip) and unzip both of them in some folder.

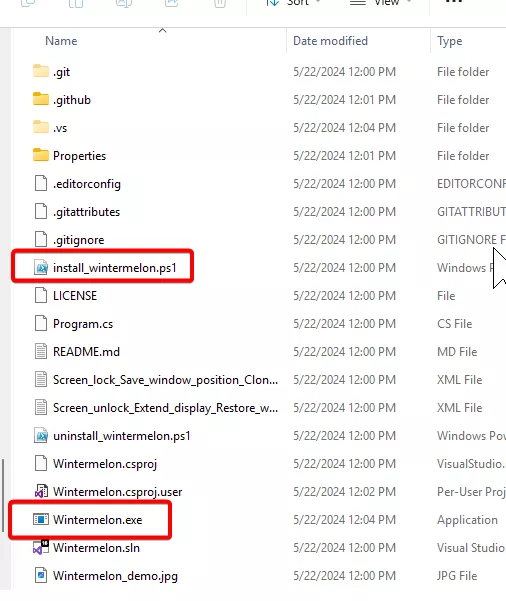
2. Move all the files from the source code to the unzipped/extracted Wintermelon folder. The folder structure now will look like this. It has all the scripts as well as Wintermelon.exe file.

Wintermelon Directory Structure

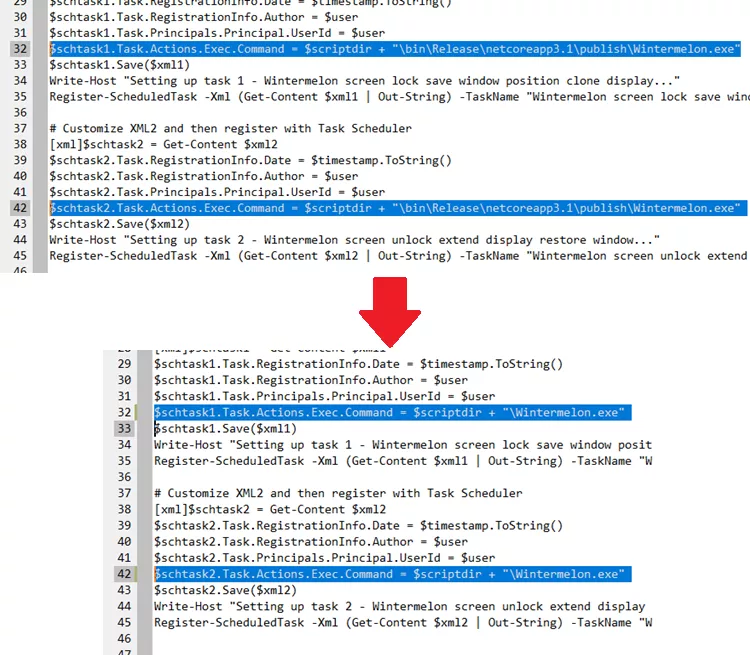
3. Now, with any code/text editor, you need to edit the install_wintermelon.ps1 file. In the line 32 as well 42, you have to make some changes. Edit the path in the double quotes from “\bin\Release\netcoreapp3.1\publish\Wintermelon.exe” to just “/Wintermelon.exe”. You can see this in the screenshot below.

Change the PATH to EXE

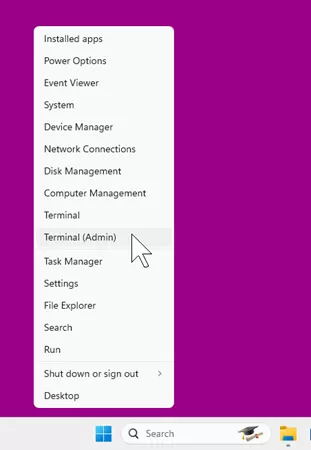
4. Run PowerShell as administrator. For that, just right click on Start and run Terminal(Admin).

Open Windows Terminal as Admin

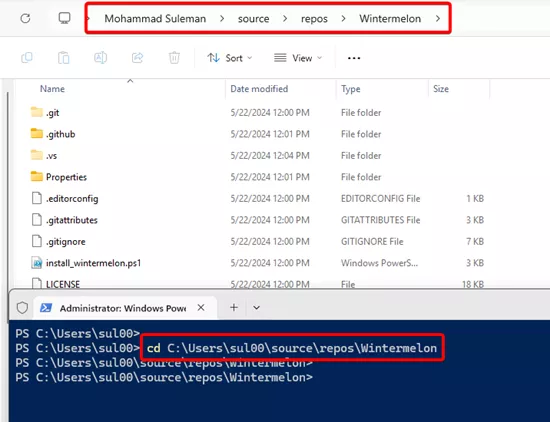
5. In Terminal, change directory to the folder where Wintermelon.exe is.

Change Directory to Wintermelon

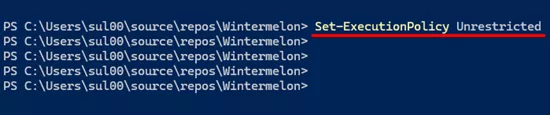
6. In terminal, issue this command: Set-ExecutionPolicy Unrestricted

set execution policy

7. Now, run the installation script. Just type this and press enter: ./install_wintermelon.ps1

Wintermelon Installtion Script

Press R if it asks for running the task once otherwise, just proceed as you are done.

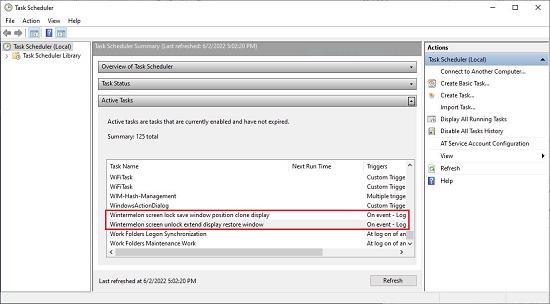
8. Run Task Scheduler and verify the occurrences of the two tasks in the list of Active Tasks.

Task Scheduler

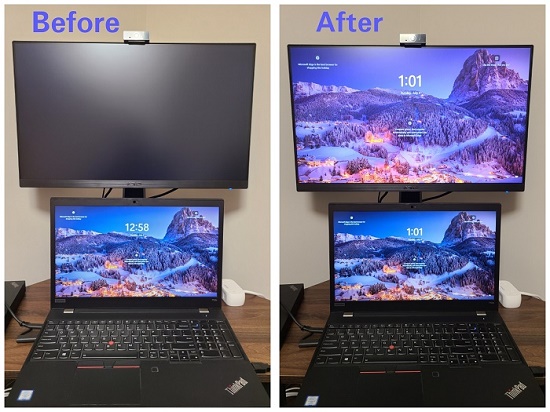
9. Now, Lock your system and the Lock Screen will be visible on all the Secondary Displays. Unlock your PC and all the running Application windows will be restored to their original locations on the multiple monitors.

Lock Screen display emulated on monitors

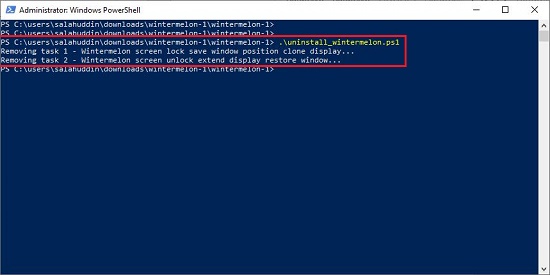
10. To remove the tasks from the scheduler, use the command .\uninstall_wintermelon.ps1

Uninstall

Verdict:

After testing Wintermelon, I found that it works successfully, and the Lock Screen is displayed on all the Secondary Displays apart from the Primary one.

Go ahead and give it a try. Click here to download Wintermelon.zip and Source code (Zip). Remember to unzip both of them in a specified folder.

[yasr_overall_rating]
[yasr_visitor_votes]
Free/Paid: Free

Leave A Reply

What do you think?
  • 0
  • 0
  • 0
  • 0
  • 0
  • 0
20 Comments
  • Latest
  • Oldest
  • Hottest
felipecss2024-11-07

One of my monitors is a laptop and I use it with inverted landscape. WHEN I lock the screen everyone else gets the lock screen except him, and when I come back I’m losing all the settings of my monitors.

Mixture2024-10-20

it does not work on windows 10 (10.0.19045)

PT152024-10-11

I have followed the above process multiple times but still only showing background on single screen.

Any ideas on a fix?

Not seeing any errors during install

Shivang2024-08-29

Hi There,
I do hope you are well and good while reading this.

I actually tried this latest guide on this topic. the tasks even appeared in the task scheduler but all in vain. I wasn’t able to get this thing done on my external monitor. Looking forward for any possible resolution.

Thanking you in advance.
Best Regards

SulemanAdmin2024-11-15

@Shivang:

Sorry for late reply. But it is hard to see what’s wrong with your setup from mere description. I can only say please follow the guide again carefully 😃

Shawn2024-05-17

Mine isnt working either via windows 11

SulemanAdmin2024-05-22

@Shawn:

I have updated the post. Please try again now. I have tested and it works.

Acceloratn92024-03-08

Windows 11 Pro 22H2 (version 22621.3155)
Already changed the script and verified the occurrences of the two tasks in the list of Active Tasks.
But lock screen is still only on main monitor.

SulemanAdmin2024-05-22

@Acceloratn9:

The guide has been updated in 2024. Please follow the tutorial again. We have tried and tested it on Windows 11.

Nicras2023-12-22

You need to correct script if you need to work’s it in Windows 11

Find this line:
auditpol /set /subcategory:“Other Logon/Logoff Events” /success:enable /failure:enable

And change to these values:
auditpol /set /category:“{69979849-797A-11D9-BED3-505054503030}” /success:enable /failure:enable

IT WORKS!

SulemanAdmin2023-12-23

@Nicras:

Thank you for your inputs.

Senne2024-01-24

@Nicras:

@Nicras: Where should I search for this lines?

SulemanAdmin2024-05-22

@Senne:

The guide has been updated in 2024. Please follow the tutorial again closely 😃

JeepWillys582023-02-20

Hi dear Mahoammad!
First, I hope you and all yours are healthy always!

I tried using WinterMelon as you explained, but there is an error in the script being reported right at the beginning when executing the autipol set command.

Follow below for you to see and if possible return the correction.

"PS D:AdminWintermelon> Set-ExecutionPolicy Bypass -scope Process -Force
PS D:AdminWintermelon> powershell -File install_wintermelon.ps1
Error 0x00000057:
Incorrect parameter.

Usage: AuditPol command []

Commands (only one command is allowed per execution)
? Help (contextual)
get Displays the current audit policy.
set Sets the audit policy.
list Displays selectable policy elements.
backup Saves the audit policy to a file.
restore Restores audit policy from a file.
clear Clears the audit policy.
remove Removes the per-user audit policy for an account
of user.
resourceSACL Configures global resource SACLs

Use AuditPol ? for details about each command"

Thanks in advanced.
@JeepWillys58

SulemanAdmin2024-05-22

@JeepWillys58:

You can just comment out this line in the screen by adding # in the beginning.

Also, The guide has been updated in 2024. Please follow the tutorial again.

Thank you

Mike Blogg2023-02-09

Same here. Rolling back the changes now, not sure I like the idea of having my execution policy set to “unrestricted”.

Felix Sifuri2022-11-08

Tried it twice on win11 22H2, unfortunately it didn’t work

Suleman2024-05-22

@Felix Sifuri:

The guide has been updated in 2024. Please follow the tutorial again. We have tried and tested it on Windows 11.

Powered by Waline v3.5.4