Here are 5 free time lapse video maker for Windows. Using this software, you can easily create stunning time lapse videos. These software allow you to import image sequences (with unlimited images) and then change the frame rate to convert them into time lapse videos. All these software lets you adjust the frame rate from 1 FPS to 30 FPS. Some of them even allow you to use 60 FPS and higher value of frame rate to create time lapse videos. One thing which you need to keep in mind while creating time lapse videos using these software is the name of the images. They need to be sequentially-named or else these time lapse video maker might not be able to detect the image sequences.
Some of the core video editors also come with the option to change video speed and create time lapse videos. But, if you’re looking for simple software, then using any of these software is probably the best option for you to create time lapse videos.

Now, let us take a look at the time lapse video maker and see how to use them.
Time-Lapse Tool:
Time-Lapse Tool is one of the best free time lapse video maker for Windows. You can use this software to import an image sequence (with unlimited images), change the video frame rate, and then create a timelapse video out of it. Additionally, it also allows you to apply various filters (like Hue, Mirror, Pixelate, etc.), rotate, change the color tone of the video, and more. This time lapse software is completely free to use. But, there are some limitations in the free version like no GIF export, maximum resolution of 480P, etc.
How to Create Time Lapse Video using Time-Lapse Tool:
Step 1: To get started, simply install and open Time-Lapse Tool on your PC. After that, create a new project and then choose the source folder where you have the image sequence on the left panel. As soon as you choose the folder, it will automatically detect the image sequence and assemble them together.
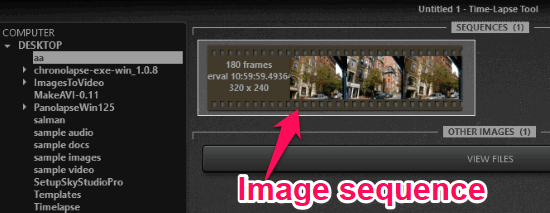
Step 2: Then you can simply select the image sequence, and then click on the “Import as Sequence” button at the bottom right corner to open the editor. Now, to create a time lapse video, you can simply change the frame rate of the video. To do this, you can use the frame rate slider visible on the right of the timeline at the bottom of the editor. This software allows you to change the frame rate from 1 FPS to 60 FPS.
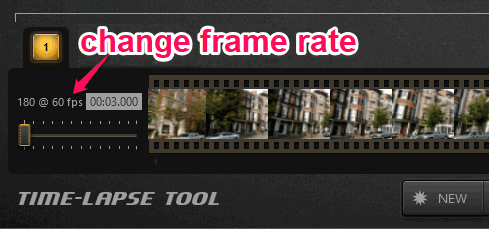
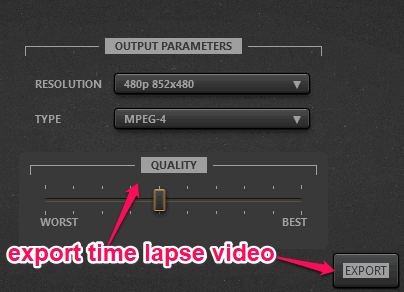
Step 3: After you’re done changing the frame rate, you can go ahead and click on the “Export” button. Then you will be able to choose the video resolution, video type, and video quality. Once you do that, hit the “Export” button to save the time lapse video on your PC.
MakeAVI:
MakeAVI is another free time lapse video maker which you can use to create time lapse videos from image sequences. It allows you to choose an image sequence, adjust the frame rate to any value, and then it will convert the video into a time lapse video. While creating a time lapse video using this software, you can also crop the video to any area you want.
How to Make Time Lapse Videos using MakeAVI:
Step 1: To start, simply open MakeAVI on your PC and click on the “Add Files” button on the right. As soon as you do that, select all the images from the image sequence folder and import them.
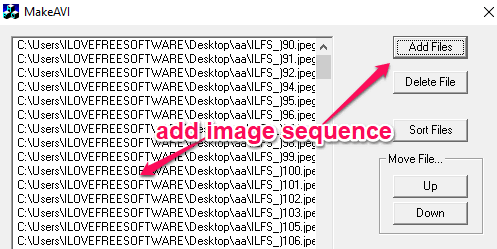
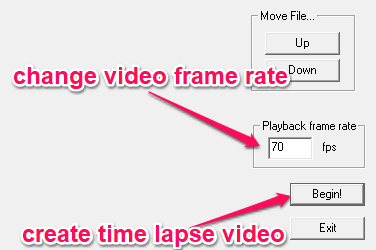
Step 2: After that, you can adjust the frame rate of the video to make it a time lapse video. To do this, enter any FPS value in the “Playback Frame Rate” field and then hit the “Begin” button. Once you do that, you can choose the destination folder and then this software will automatically convert the video into a time lapse video and save it.
Virtual Dub:
VirtualDub is actually a free and open source video editing software which can be used to create time lapse videos with ease. It allows you to choose any image sequence and then convert them into a time lapse video. For this, you can change the video frame rate to any value you want. Apart from that, you can also apply video filters, resize, change the color depth of videos, compression, and so on.
How to Create Time Lapse Video with VirtualDub:
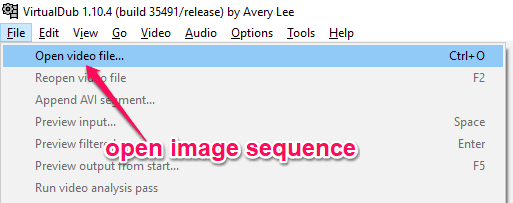
Step 1: After installing and opening VirtualDub, click on the “File” menu at the top and then select “Open Video File”. Then browse the folder containing the image sequence and select the first image from the sequence to import. After that, all the other images from the sequence will be imported automatically.
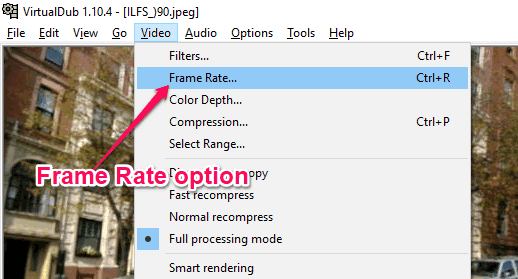
Step 2: When you’re done with that, you will be able to play the image sequence as a video. Now, to convert it into a time lapse video, simply click on the “Video” menu at the top and select the “Frame Rate” option.
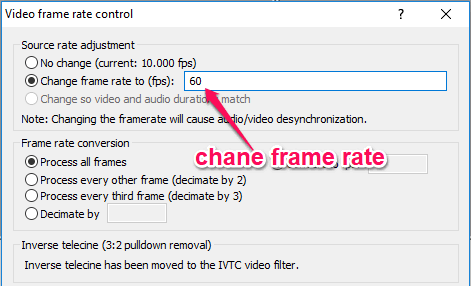
Step 3: After you do that, you will be able to change the frame rate of the video. To do this, enable the “Change frame rate to” option and enter any FPS value you want in the input field. Once you’re done, simply click OK and then you can export the time lapse video as an AVI video file.
FFmpeg:
FFmpeg is actually a command line video/audio encoder which allows you to perform various actions on videos including crop, trim, resize, rotate, and so on. Apart from that, it can also be used to create time lapse videos from image sequences with ease. All you need is a simple command and you will have your time lapse video ready in no time.
Do note that, to create a time-lapse video using FFmpeg, you would need to have the images name in a specific manner so that FFmpeg command can process them from inside the image sequence folder. For example, if you have 100 images, then the images must have the names like [imagename_1], [imagename_2], [imagename_3], and so on.
How to Use FFmpeg to Create Time Lapse Videos:
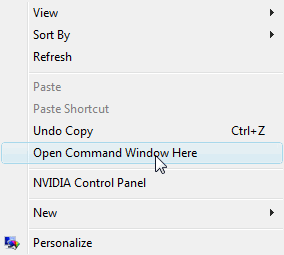
Step 1: First, you need to install FFmpeg on your PC. After that, go to the image sequence folder and then open the command prompt inside the folder. You can do that by holding the Shift key and then choose the “Open Command Window Here” option from the context menu.
Step 2: As soon as you do that, you would need to enter the following command on the command line.
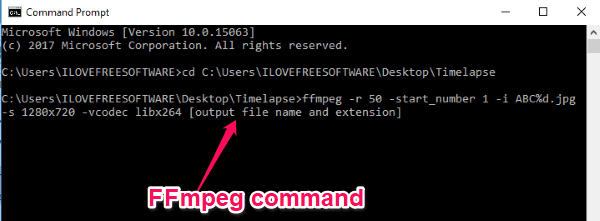
ffmpeg -r 50 -start_number [first image number]-i [first image name%d.image extension]-s 1280x720 -vcodec libx264 [output filename and extension].
Now, let’s say you have images with names like ABC_1.jpg, ABC_2.jpg, ABC_3.jpg, and so on. Then the command which you need to enter will be like as follows:
ffmpeg -r 50 -start_number 1 -i ABC%d.jpg -s 1280x720 -vcodec libx264 [output filename and extension].
Here, the value after -r will be the frame rate, the value of -s will be the video resolution. As an example of the command, you can see the below image.
Step 3: As soon as you’re done entering the command, simply press the “Enter” key to execute it. Now, FFmpeg will automatically process all the images from the image sequence and create a timelapse video using the images.
PhotoLapse:
PhotoLapse is another simple software to create time lapse videos from image sequences. Unlike other software in this list, it allows you to change the frame rate of the video from 1 FPS to 30 FPS only. So, if you want to create a timelapse video with 3o of maximum frame rate, then this software can be helpful.
How to Make Time Lapse Videos with PhotoLapse:
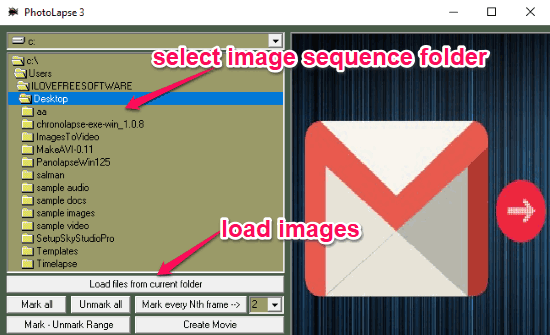
Step 1: When you open PhotoLapse, simply select the image sequence folder from the left panel. After that, click on the “Load files from current folder” button to import all the images.
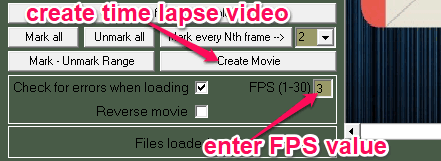
Step 2: After you’re done importing images, you can change the frame rate to create a timelapse video. For this, simply enter a value between 1 and 30 in the “FPS” field at the bottom of the left panel. As soon as you do that, click on the “Create Movie” button and then it will automatically create the time lapse video with the images.
Closing Words:
These are some of the best free time lapse video maker which you can use to create stunning time lapse videos on Windows. All these software are very effective and create flawless time lapse videos. Personally, I like Time-Lapse Tool the most as it is very easy to use and doesn’t have any other complex functionality except the option to create time lapse videos.
Try them out and let me know which time lapse video maker you liked the most.