This tutorial demonstrates how to rename MP3 files using ID3 (v1 & v2) tags like artists, track number, album, track title, genre, year, composer, comment, bitrate, cover art, etc.
In this tutorial, I am going to use 5 free and simple tools to rename batch MP3 files based on their ID3 tags. These lightweight tools support almost all the basic tags included in ID3 v1 and ID3 v2. For renaming, you can simply add your MP3 files, choose the tags using which you want to rename files, and start renaming.
You might have come across various file renaming software, but the tools used in this tutorial are probably the simplest ones to rename MP3 files using ID3 tags.
BatchRename:
BatchRename is a free tool that lets you easily rename bulk files like images, music, videos, etc. You can also use this tool to rename MP3 files using their ID3 tags. It supports tags like the year, title, comment, artist, album, genre bitrate, frequency, signature, recording time, composer, and more. Let us discuss the steps for renaming MP3 files using ID3 tags.
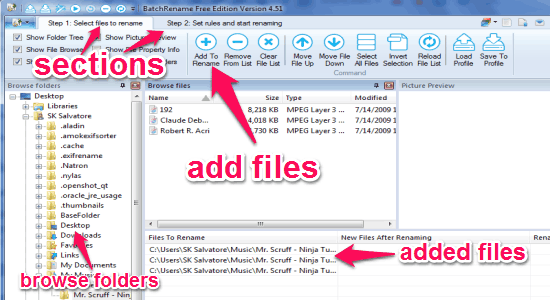
Step 1: As soon as you open BatchRename, you will see two different sections at the top. The first section is for adding MP3 files which you want to rename. Simply browse the folders on the left and click the “Add To Rename ” button at the top to add files.
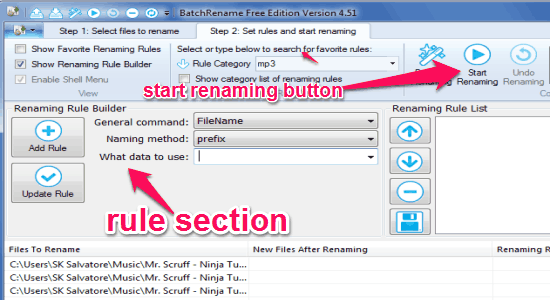
Step 2: When you’re done with adding MP3 files, go to the next section to create a rule. Creating a rule allows you to assign ID3 tags before renaming files. You’ll see a “Renaming Rule Builder” section on the left. At first, from the “General Command” menu select “Filename” to proceed further. After that, you can select “Naming Methods” like suffix, prefix, and insert, as ID3 tags only work with these methods.
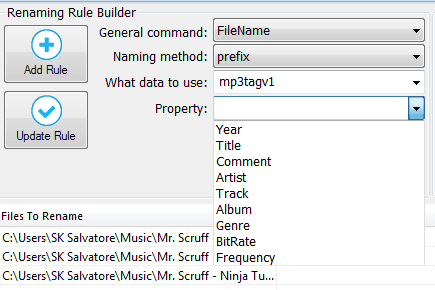
Step 3: After that, a new menu called “What Data To Use” will appear where you can select the ID3 tag versions either as “mp3tagv1” or “mp3tagv2”. Each version comes with various ID3 tags like title, track number, comment, album, artist, composer, and much more. Select any of the tags from “Property” menu and click the “Add Rule” button on the left. In the same manner, you can create multiple rules with different ID3 tags which you want to include while renaming files.
Step 4: As soon as you’re done with creating rules, simply hit the “Start renaming” button at the top and all your MP3 files will be renamed in their original folders.
Advanced Renamer:
Advanced Renamer is another useful tool to rename MP3 files using their embedded ID3 tags. Bring out all your favorite MP3 files together and rename them in no time. This tool supports renaming files with ID3 tags like album, artist, title, track, genre, year, bitrate, and audio play time. To rename MP3 files, all you need to do is select files, create a method, and execute the method, as simple as that.
Step 1: When you open this tool, you will see the main window is divided into two sections. The section on the right is for adding MP3 files, whereas the other section is for creating rename methods. Click the “Add” button on the right and import all the files which you want to rename.
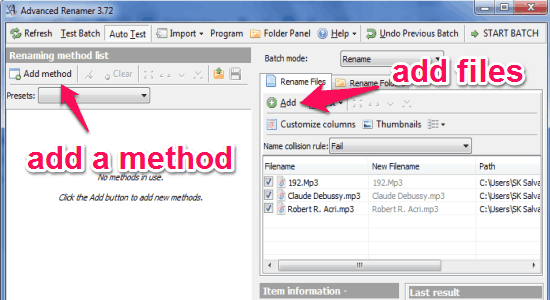
Step 2: After importing files, click the “Add method” button and select ” New Name” option to create a renaming method. Then from the menu select “ID3/MP3 Tags” to add ID3 tags for renaming MP3 files. After that, you will see all the supported properties which you can select with a single click.
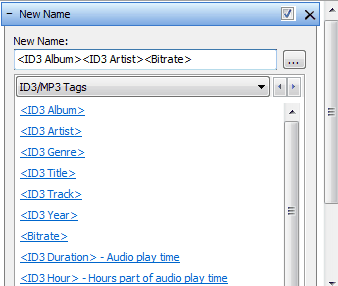
Step 3: Once you’re done with selecting ID3 tags, simply click the “Start Batch” button at the top corner to rename all your files. It simply replaces the name of MP3 files with the added tags in their source folder instantly.
ID3 Renamer:
Another simple tool that allows you to rename MP3 files using their ID3 tags is ID3 Renamer. In this tool, you have to create a renaming formula before proceeding to rename files. By default, it comes with 3 simple formulas with ID3 tags like artist, title, and track number. But, you can create your own formula with other tags as it supports all the ID3 v1 and ID3 v2 properties. Apart from that, you can also rename the source folder with ID3 tags.
Step 1: Simply open the tool and go to the “Renaming” tab. If you’re using this tool for the first time, then you might find it difficult to figure out the option for adding files. They have integrated the option vertically on the left as you can see in the below image.
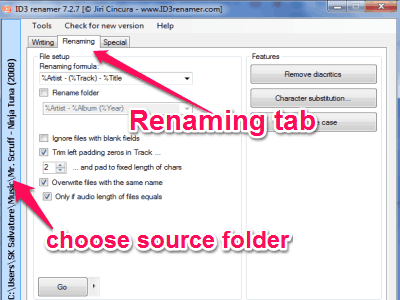
Step 2: This tool doesn’t allow you add files from different folders. That means you have to add an entire directory with MP3 files on it. Click on the vertical option to select the source folder for MP3 files.
Step 3: After that, move to the top of the window to use default formula or create new formulas with different ID3 tags. Initially, there will be 3 formulas with tags like artist, title, and track number, but do not worry as you can also create your own formulas. It supports almost all the ID3 tags including artist, album, title, composer, comment, etc.
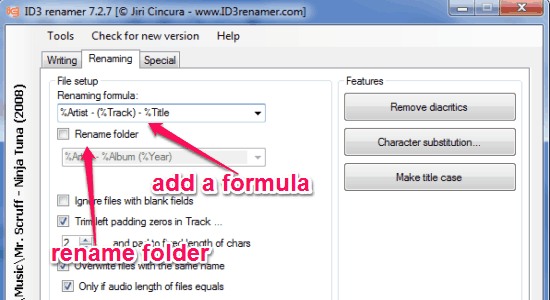
Step 4: Let’s say, you want to create a new rule with tags like the composer, comment, and track number, then in the formula field type “%Composer – %Comment – (%Track)”. In the same manner, you can create as many formulas as you want with different ID3 tags. When you’re done with creating a formula, hit the “GO” button at the bottom to rename the MP3 files residing in the source folder.
Mp3Tag:
Mp3tag is another powerful tool to edit metadata of various audio files. One of the best features of this tool is that it allows you to rename MP3 files based on the ID3 properties or tags. Mp3tag also supports various tags from both the version of ID3 tags like composer, disc number, album, artist, and so on.
Let me explain how you can use this tool to rename all your MP3 files using ID3 tags.
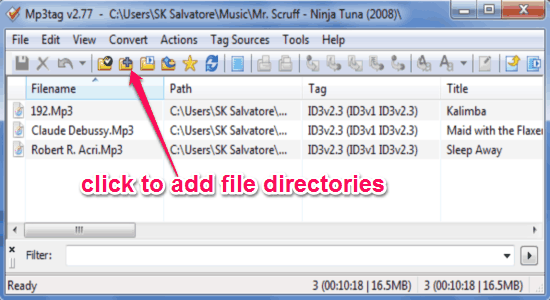
Step 1: When you open this tool, click the “+” icon on the toolbar to browse directories and import audio (MP3) files.
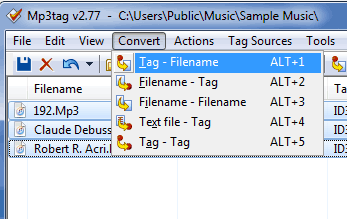
Step 2: When you’ve added the files, simply click the “Convert” menu item at the top and select “Tag-Filename”. Additionally, it also has the options to replace tag with filename, replace filenames with filename, etc.
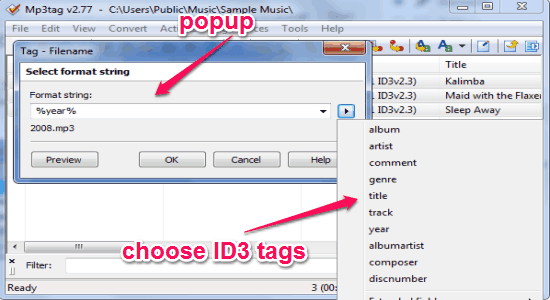
Step 3: As soon as you do that, a new popup will appear where you can choose the format string (ID3 tags) which you want for renaming files. Click the arrow icon adjacent to the format string field to choose the tags as shown below. After adding ID3 tags, simply click the “OK” button and your MP3 files will be renamed according to the added ID3 tags.
MP3 Rename:
The last tool in this tutorial is MP3 Renamer which can also be used to rename MP3 files using ID3 tags. Using this tool, you can rename all your MP3 files based on ID3 tags like artist, album, track, title, year, comment, composer, original artist, copyright, URL, and EncodedBy. The interface is pretty intuitive and doesn’t require much effort to rename files.
Step 1: After opening the tool, the first thing you need to do is import MP3 files. Simply click the “Files” button at the top of the window or drag & drop files to add them for renaming.
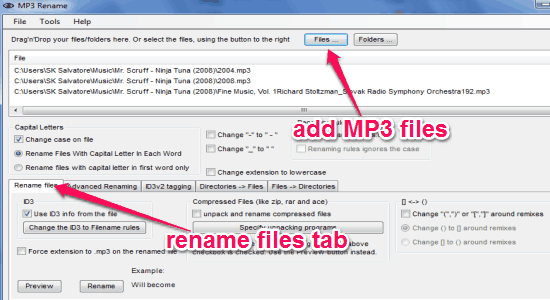
Step 2: At the bottom, you will see different tabs like Rename Files, Advanced Renaming, Directories-Files, etc. Select the “Rename Files” tab and click “Change the ID3 to Filename Rules” button to add ID3 tags before renaming the MP3 files.
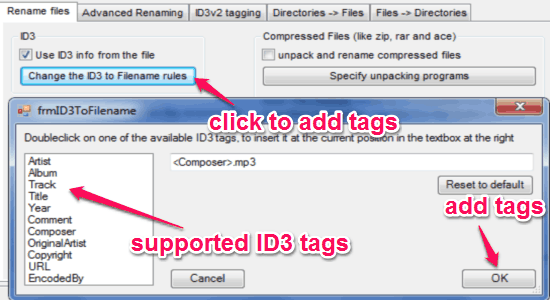
Step 3: After you click the button, a new window will appear with all the supported ID3 properties. Simply double-click on the tags which you want to use for renaming files. Once done click the “OK” button and close the window.
Step 4: After that, you can either preview the changes or simply hit the “Rename” button to replace the file names with the new ones.

My Final Verdict:
If you’re looking for tools which can rename your MP3 files using ID3 tags, then all the listed tools in this tutorial can help you do that. These tools support tags from both the version of ID3 tags (v1 & v2) such as composer, comment, title, track, album, artist, disc number, genre, and more. You can import all your MP3 files and rename them in no time.
I hope you find this tutorial helpful.