[yasr_overall_rating] [yasr_visitor_votes]
Here, is a simple ‘How to’ that will explain you with the step-by-step process to create a partition in Windows 8. After this tutorial you will be able to create a partition with ease and simplicity in Windows 8.
How to create a partition in Windows 8:
- To start with this tutorial lets open up the control panel. To so so, just start typing Control panel on the start screen. Now when Control panel will come up as shown in the screenshot below; just click on it as shown below to open control panel.

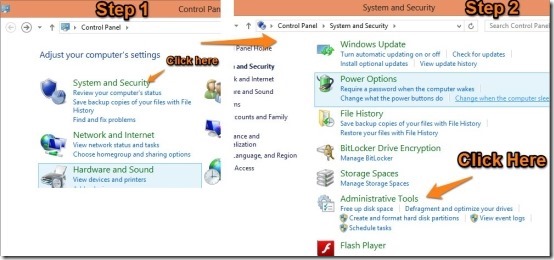
- Now control panel window will open up as shown in the step 1, just click on the System and Security. This step will open up System and Security windows as shown in step 2; Now just click Administrative Tools as pointed out in the screenshot in orange.
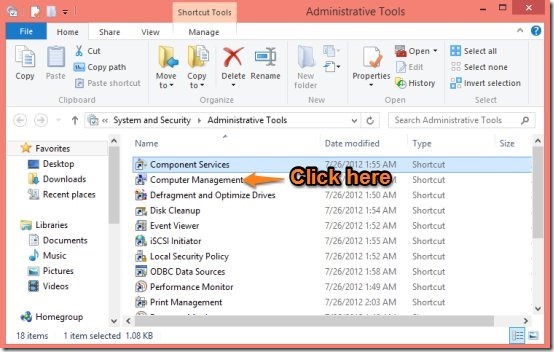
- The next step of this tutorial, is to click on the computer management option out of the list as shown below.
- Now the computer management Window will come up showing three options; select Storage from the three options, then disk management options will show up. Click on it. After this long and boring process you will be at the required place as shown in the screenshot below from where you can create a partition in Windows 8.
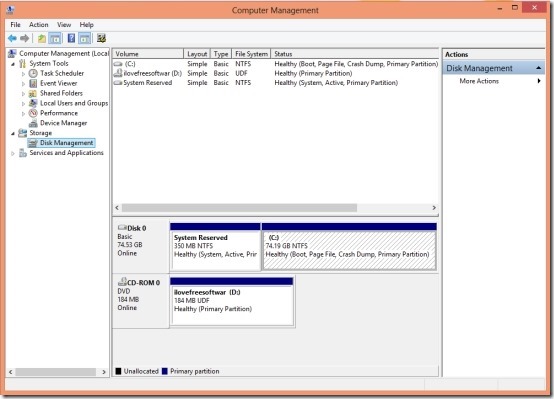
- Now, we are going to create a new partition in Windows 8 of 350 some MB from the (C:) drive. Because we do not have any unallocated space, we will have to shrink the (C:) to get some space. If you get a new laptop with Windows 8 pre-installed on it; then most probably you also have to shrink a drive to create a new partition in Windows 8.
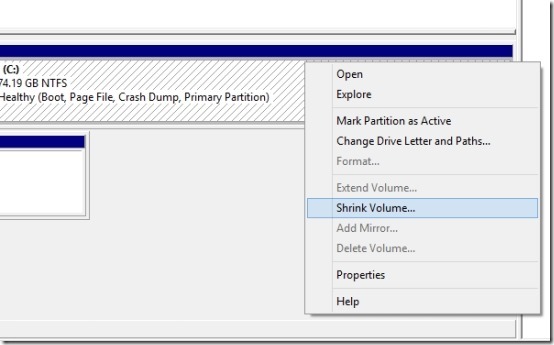
- First step to do here is so right-click on the drive that you want to shrink as shown in the screenshot below a context menu will open up. Now just select the Shrink Volume option from the context menu.
- Now a window will open up a shown below; it will ask you by how much you want to shrink the drive. Enter whatever you want in Megabits and click on shrink button.
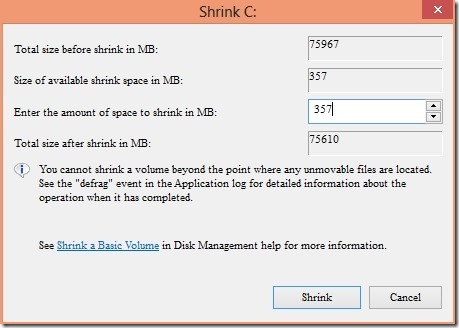
- After you have clicked on the shrink button it will take a while and then you will be presented with the amount as unallocated volume as shown below. Now just right-click on the unallocated drive as shown below.
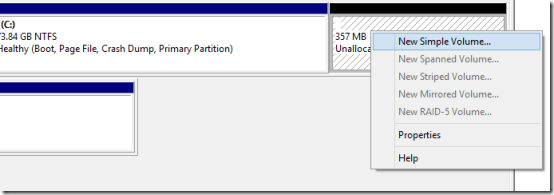
- Now a window as shown below will come up that will guide you through the whole process of creating a new drive, just follow the wizard and in the end you will have a new drive in your Windows 8 computer.
Here are some other interesting tutorials for Windows 8:
How To Use Task Manager In Windows 8
How To Get Start Menu In Windows 8