Screen Shot is a handy screen capture software that is used to take screenshots and save them as bmp, jpeg, tiff, png, and gif image. For saving screenshot in jpeg format, you could also set the quality level. It can capture full screen, rectangle part, an object, active window, and a webpage. For each capturing mode, it provides hotkeys as well. These hotkeys can be customized easily.
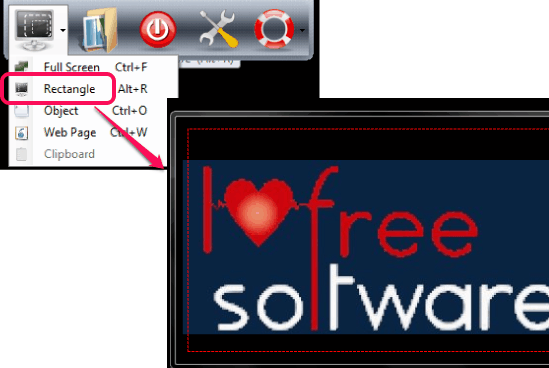
Apart from using hotkeys, it provides an instant menu to easily capture screenshots. This instant menu remains hidden on top middle part of your desktop screen. You can make it visible by moving the mouse cursor to that part. In screenshot below, you could see its instant menu that shows all capture modes.
It is more valuable than Windows default PrintScreen key and other simple screen capture software. However, it doesn’t let you add annotations to screenshot.
You can also try these 7 free screenshot capture software with annotation tools.
How To Work With This Free Screen Capture Software?
To use this freeware, download its setup file. Its download link can be found at the end of this review. Setup file is just 1.06 MB in size. Once the download is complete, start the installation wizard. It provides ad-free installation, so you can install it without any problem. After this, run this software using the desktop icon.
This software runs in system tray and also provide its instant menu. Using its instant menu, you can select the required capture mode, and can take screenshots. Available screenshot modes are:
- Full Screen mode: This helps to capture full desktop screen. Its default hotkey is Ctrl+F.
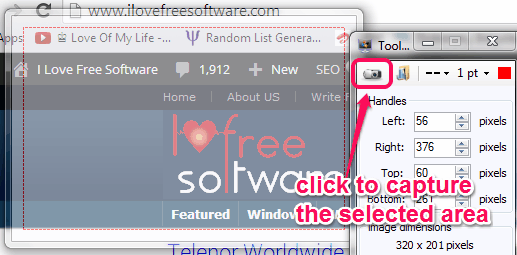
- Rectangle mode: To capture a specific area of your desktop screen, use this mode. When this mode is activated, you will find a rectangle on desktop screen, like it is visible in below screenshot. You can resize this rectangle to set the required area. After this, click the camera icon to capture the screenshot.
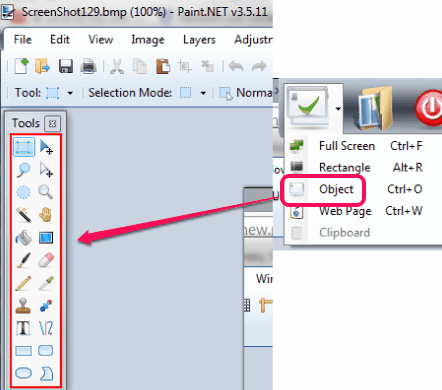
- Object mode: To capture objects, say menu bar or tool bar of a window, you can use this mode. Placing mouse cursor on an object will automatically cover that area with rectangular part. This gives you an idea about what you are going to capture.
- Web Page mode: When this mode is activated, a new window is opened. In that window, you can enter address of any website, and can capture the webpage with Camera icon. But there is a bug in this mode. It sometimes captures the screenshot with all the visible content of webpage and sometimes shows only white page. You need to try it to see if it can really work. For me, it didn’t work most of the times.
All captured images are stored in default folder which you can access in single click. To access the destination folder, use Folder icon available just next to capture modes in instant menu.
Customize Settings:
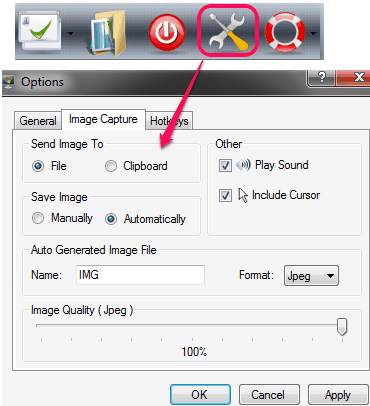
Customizing this software settings will let you:
- enable/disable instant menu.
- include exclude mouse cursor in screenshot.
- set destination location for saving the screenshot.
- set save image type: manual or automatic. If manual option is used, then it will ask for destination location by opening the save as window, after each capture. File type to save screenshot can also be chosen in save as window. If automatic mode is selected, then you can set format to save screenshot. After this, it will automatically save the screenshot to selected destination folder.
- customize hotkeys for each capture mode.
Conclusion:
Screen Shot is handy to use as it comes with different capture modes and instant menu. Its instant menu makes it quite easy and quick to take screenshots. But webpage mode is not working perfectly, that needs to be fixed immediately by the developers.
Also check these 5 best free screen capture software.


