This tutorial explains how to add file attributes options to Windows 10 context menu. At the end of this tutorial, you will be able to add various file attributes options to the Windows 10 context menu in order to access them with ease. If you’re aware of the term “File Attributes” then this tutorial will be a cakewalk for you, if not then do not worry as I will explain it briefly for you. File Attributes are actually some settings (metadata) which are associated with a file that allows or denies certain access rights to how the operating system or a user can access that particular file.
For example, the most commonly used file attributes of any file in Windows PC are Read-Only, System, Hidden, Not Content Indexed, Directory, and Archive. The file attributes have two different values i.e. Set and Cleared which work as a flag and can be easily turned ON or OFF from file properties. So, in this tutorial, I will explain how you can add the “File Attributes” options to Windows 10 context menu to set or clear the attributes of files with ease, instead of opening the file (or folder) properties to do the same.

How to Add File Attributes Options to Windows 10 Context Menu:
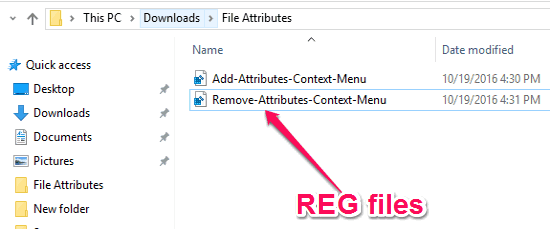
Step 1: To get started, the first thing you need to do is download this ZIP file which includes two different REG files. I have created these REG files to help you easily add or remove the “File Attributes” options from Windows 10 context menu with just a click, instead of creating these registry hacks manually.
Step 2: After downloading the ZIP file, simply extract it and you’ll see both the REG files named, “Add-Attributes-Context-Menu” and “Remove-Attributes-Context-Menu”.

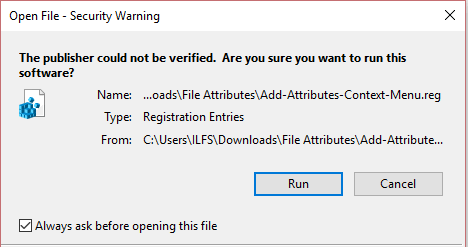
Step 3: Now, if you would like to add the “File Attributes” options to the Windows 10 context menu, then simply double-click on the “Add-Attributes-Context-Menu” file and then hit “Run” on the popup dialog.

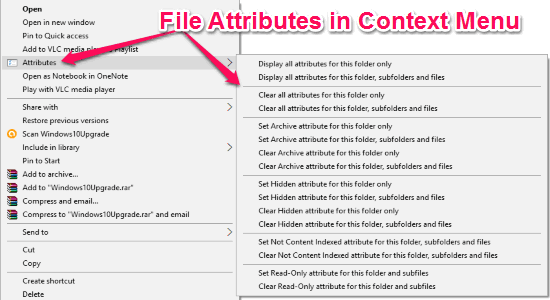
Step 4: As soon as you do that, the REG file will be added in the registry editor and you can now see the “File Attributes” options on the context menu. For this, simply right-click on any file and then hover your mouse cursor over the “Attributes” option on the context menu to see the “File Attributes” options. Using these options, you will be able to easily set and clear different file attributes of the selected file.

The REG file which I have created includes the following commonly used file attributes:
- Read-Only – This file attribute will stop other programs or PC users from making any changes or permanent modifications to a file.
- System – Enabling this attribute of any file will turn it into a system file, which can’t be deleted or modified.
- Hidden – If you enable this attribute for any file or folder, then they will be hidden from the normal Windows File Explorer view. You can later make them visible by choosing the option to display all the hidden files and folders.
- Not Content Indexed – If you don’t want any file to appear in the Windows search result, then enabling this attribute will do the job.
- Directory – The “Directory” file attribute can be used to separate the folders (or subfolders) from the files.
- Archive – This file attribute can help you tell Windows Backup function to backup the file or take an incremental backup.
If you would like to remove the “File Attributes” options from the Windows 10 context menu, then all you got to do is double-click on the “Remove-Attributes-Context-Menu” file and hit “RUN”.
My Final Verdict:
If you’re looking for a simple way to access the “File Attributes” options with ease, then this tutorial can help you do that. After following this tutorial, I was able to easily add the “File Attributes” options to the context menu of my Windows 10 PC. So, you can do the same by following the simple steps explained in this tutorial and set or clear the file attributes of any file in a flash.
I hope you find this tutorial useful.