In this tutorial, I will explain how to bulk download attachments for selected users in Gmail. This tutorial will demonstrate 2 ways by which you can automatically download attachments from selected users.
In the first method, you can bulk download attachments and keep them organized in folders named as per Sender’s email on your PC. For this I will use Desktop Sync from Odrive, and its best part is that it is free and cross-platform. In this method you will integrate Gmail with odrive and download its desktop client which will then create a folder named odrive>>Gmail in C:/Users/User_name directory. It then creates a folder for each of your Gmail contact (folder name=Contact’s email). You can download all attachments from a particular user by syncing it with odrive.
You can also use odrive to access multiple Google Drives from same PC and manage multiple cloud storage accounts.
You can do the same task of bulk download attachments from a particular user through a Thunderbird plugin named Attachment Extractor. If you are not familiar with Thunderbird, you can read its review from here. This plugin will let you extract attachments from selected emails in bulk. But in this method, you have to manually select emails from which you want to extract attachments, which can be saved to a custom location specified by you.
So let’s see the steps included in downloading attachments in bulk from selected users in Gmail.
Bulk download attachments from selected users in Gmail using Desktop Sync:
This method totally solves your problem of downloading all attachments from a particular sender at once and not just download all of them at once but it will automatically organize them into sender’s folders. For it, you’ll need to first integrate your Gmail account with odrive and then download Desktop sync, a desktop client of odrive. As I mentioned above, to let you download all attachments from a particular user/sender, it creates multiple folders for each of your Gmail contact. It does not download all of the attachments from any user itself; it will only download all attachments when you’ll open that folder or choose it to sync with odrive.
So let’s see the steps to bulk download attachments from selected users:
Step 1: To perform this task, you need to first login to odrive using any of your existing accounts from Facebook, Google, Dropbox, etc.

To integrate with Gmail account with odrive click on link storage and select Gmail from the list of icons displayed in the pop-up Window and authorize odrive to access Gmail.
Step 2: Download Desktop Sync from here and install it. It is available for Windows, Mac, and Linux. After you have installed it, it will create the following subdirectory: odrive>>Gmail>>Contacts>>Multiple user’s folders. Now to download all of the attachments from a user or sender, suppose abc@xyz.com, right click on its folder and select Sync. It will then download all of the attachments from that user and save them inside that folder itself.

If you don’t wish to download all of the attachments in bulk then you can open the folder of a particular user and then select which attachments to be downloaded at once.
Bulk download attachments from selected users using Thunderbird plugin:
Another way to bulk download attachments from selected users is by using a Thunderbird plugin named Attachment Extractor. If you don’t have Thunderbird installed on your PC, then you can get it from here. After installing Thunderbird, download Attachment Extractor plugin for Thunderbird from here. This plugin lets you select multiple emails in Thunderbird email client and then download all of their underlying attachments in a custom location specified by you.
But first, let’s see the steps for integrating/installing Attachment Extractor plugin:
Step 1: Download the Attachment Extractor plugin from the link provided above.
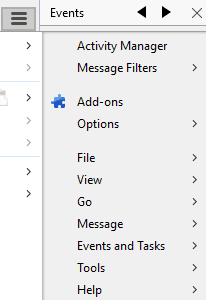
Step 2: Open Thunderbird email client and select Add-ons from Thunderbird menu.

Step 3: Click on Settings button on top and select Install Add-on From File which will open up a dialog box to choose a plugin file. Now, select the downloaded plugin file in Step 1 and click on Install button.

Now that Attachment Extractor has been successfully installed in Thunderbird, we are now ready to batch download attachments from selected users in Gmail. You can do it by simply following these steps:
Step 1: Go to All Mail and filter the emails by a sender’s name. You can filter the emails by pressing Control+Shift+K hotkey. Suppose you have to download all email attachments from a guy named Tom, then you can type in Tom in the filter textbox and it will then just display Tom’s emails.
![]()
Step 2: Next steps begin with selecting emails whose attachment you want to download. If you want to download all the attachments, then select all emails at once by pressing Control + A hotkey. To download all attachments from the selected emails to a custom location on your PC, right-click on any of the emails and select “Extract from Selected Messages to”>>Browse option.

Verdict:
This tutorial explains how to bulk download attachments from selected users in Gmail. I hope it might have helped and solved your problem. Both of these methods are equally efficient in batch downloading attachments, but I personally like Desktop Sync from odrive as it automatically keeps downloaded attachments organized through sender’s folder. But you can’t use it to download attachments sent by you to any users; if you want to download sent attachments to then you can surely use the second method explained in this tutorial i.e. Attachment Extractor for Thunderbird (only for Windows).