This tutorial explains how to stop disk sleep in Windows. Here I will talk about three different methods to do the same. After using all of these methods, hard disk of your PC will never go into the sleep mode. Some of these methods rely on some third-party software while some of them uses native Windows features to do the same. All of these methods use different techniques to stop hard internal, external drive of your PC from sleep mode. Using these methods, you can not only prevent internal, but these methods can also stop an external hard drive from going to sleep.
Modern PCs and Laptops put the hard ware components like processor and hard disk to sleep when they are idle. They do this to save power. But in some cases, you may need to keep these devices up always. Especially, to prevent hard disk sleep mode, these methods will help you. The activity of hard disk can be detected with the help of some hard disk activity indicator software. And if you often see your hard disk going to sleep then, you can use any of these methods to prevent that.
How to Stop Hard Disk Sleep in Windows?
In this tutorial, you will see different methods to stop hard disk sleep. And these methods work with internal as well as external hard drive. There are many ways to prevent HDD from sleep and one of the best is to keep writing a temporary text file to hard disk. And that is what most of these software do. Also, apart from that, if you want to prevent CPU from sleep, then you can try a free CPU Core Parking Tweaker to do it.
Method 1: Prevent Hard Disk Sleep in Windows by Configuring Power Options
The very first method to prevent hard disk sleep is by configuring the power options. In your current power plan, you will find option to change the time interval for putting the hard drive to sleep. All you have to do is disable it and then your PC will never put your hard disk to sleep. If you are familiar with the Power options in Windows, then it will be very easy for you to do it. However, this method may not work for external hard drive connected to your PC.
Here are some steps to prevent hard disk sleep in Windows using Power options.
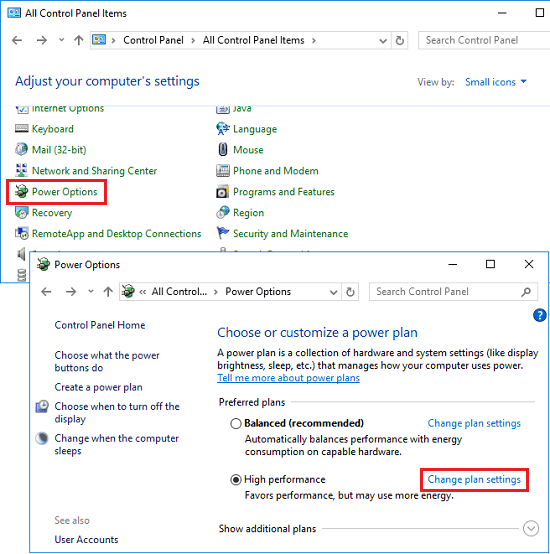
Step 1: Open Power Options from Control Panel. After that, open current power plan settings which appear there.
Step 2: Now, click on Change advanced power settings and then another window will appear. Here, expand the Hard Disk node and in the Setting (Minute), specify time to “0”.
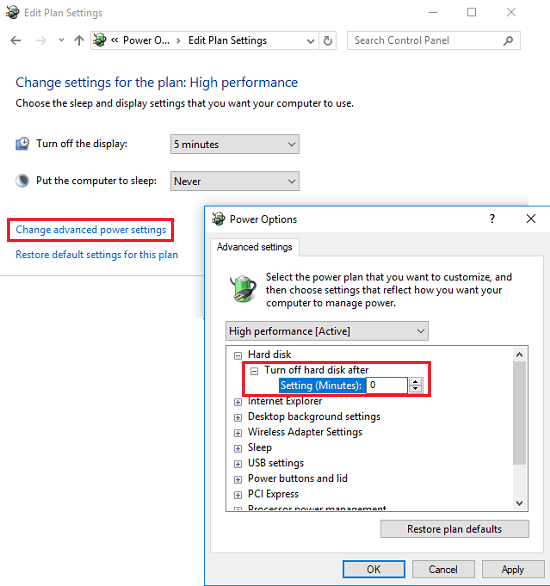
That’s all you have to do. After this setting, your hard drive will never go in sleep. And if in future, you want, you can re-enable this by just specifying the time to put hard disk in sleep.
Method 2: Use a Free software, NoSleepHD to Stop Hard Disk Sleep Mode
The above method of stopping hard disk sleep is a good one as it doesn’t rely on any external tool. However, the limitation is that, it will not work on an external hard drive. And if you use an external drive very often, then you will have to use a free software called NoSleepHD to prevent it from sleeping.
The software keeps writing a text file to an external hard drive, thus preventing it from the sleep mode. It writes an empty text file after a fixed time interval to the hard disk. You can customize the timer to write text file and it will do that pretty easily. Using this software, you can keep up to 5 hard drive busy. And they will never go in sleep mode while you are using this software.
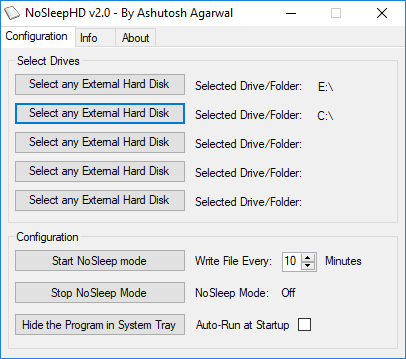
Above, you can see the interface of NoSleepHD freeware. The software lets you specify a hard drive. After that, it will take care of the rest. However one thing I would like to tell you about this software is that to run this software, you will have to run it as administrator. For that, right-click on its EXE and then click “Run as administrator”. The software will keep running in the system tray and you can access it anytime you want and you can make this software run at startup.
Method 3: Another Freeware to Stop Hard Disk Sleep in Windows
KeepAliveHD is another free software you can use to stop hard disk sleep. The software is quite advanced and you can use it to prevent both, external and internal hard drive sleep. You can also prevent multiple hard drives from sleep by writing an empty text file to them continuously. And the best part about this software is that you can specify the time for separate hard disks. So that it will write text files to the specified hard disks at the specified time interval.
After installing this software, you can start using it. Click on the Add drive button from its main interface and then you can specify the time interval to write a file to it. You can choose any drive and specify the time interval to write a text file to it. Similarly, you can add another hard drive in it that you want to stop from sleep. After configuring the software, it keeps running in the system tray of windows.
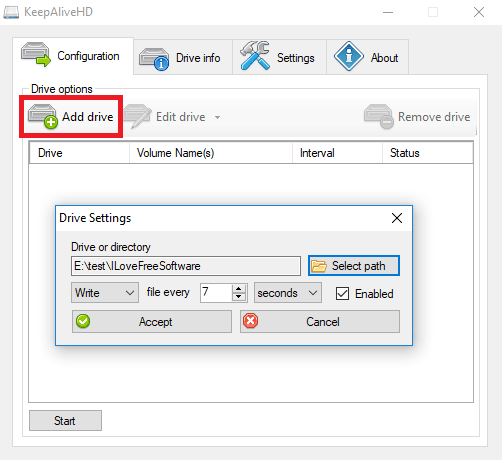
Above, you can see the snapshot of the main interface of KeepAliveHD. The software allows you to opt for certain options. For example, you can make this software run at Windows start-up. Also, there is an option in it to delete the text the file that it writes to the hard drive.
Now, with the help of these mentioned methods, you can easily stop hard disk sleep in Windows.
Final Thoughts
These are the best methods to stop hard disk sleep in Windows. Using any of the methods, you will be able to stop your internal as well as external hard drive from sleeping mode. All these methods worked fine for me and should work for you too. Personally, I really like preventing hard disk from sleep using KeepAliveHD freeware. You can tell me which method you like in the comments down below.