In this short tutorial, you will learn how to access Cloud Storage Accounts in Android File Manager apps. You can easily add your Box, Dropbox, Google Drive, Onedrive and quite a few other Cloud Storage Accounts to your Android file manager. You can Cut, Copy, Rename, and perform various operations to your Cloud Folders and Files. You will learn the procedure to do this in ES File Explorer here, but the same method can be followed in any other File Manager as well, if it has this feature built-in. Most of the popular file managers with support for sharing over LAN, also have Cloud Storage support. Keep up with me and you will learn that.
How To Access Cloud Storage Accounts in Android File Manager
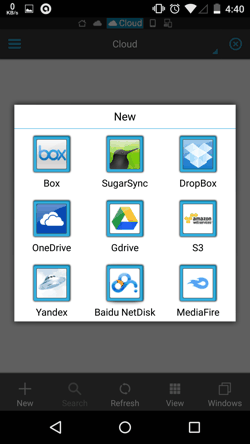
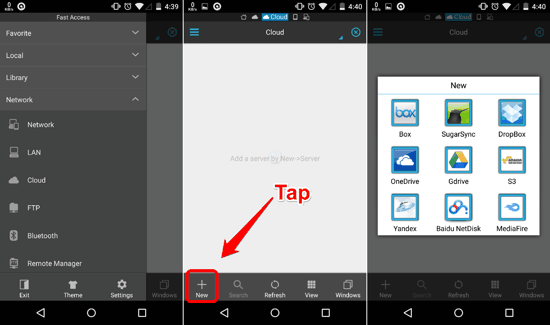
Firstly, check your existing File Manager to confirm whether it supports Cloud Storage Accounts, and if it does, then which ones. Otherwise, you can always head over to the Play Store to get any free alternative. I will be using the popular ES File Explorer in this tutorial. To add a Cloud Storage Account to your File Manager, you first need to find the Cloud Connection option within your file manager (this might just be named as ‘Cloud’ on your device). Then open it and tap the ‘+ New’ icon on the toolbar (shown in the second screenshot below). You will now see all the available Cloud Accounts. As can be seen in the screenshot on top, ES File Explorer can connect with 9 popular Cloud Storage Services which are Box, Sugarsync, Dropbox, Onedrive, Google Drive, S3, Yandex, Baidu Netdisk, and Mediafire. Let’s now see how I added my Google Drive account to ES File Explorer. The method for any other Cloud Storage Service shall remain exactly the same.
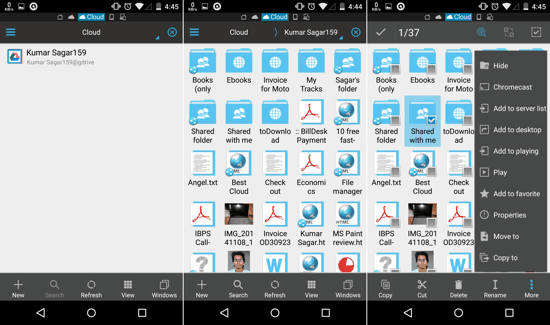
Tapping on the GDrive icon instantly opens up a webview pop-up where you can login to your favorite service by entering your Username and Password for your Google Account. You will also have to grant access to ES File Explorer. Once done, you will see that the Drive account will be added to Cloud Services screen, as can be seen in the first screenshot below. Just tap on it and you will be able to see all files stored in that Cloud Storage Account in the same way that the locally stored files are shown.
Want to see additional operations for a file or folder? Just touch-‘n-hold on it and you will be shown additional options which will allow you to Cut, Copy and Paste any file to a cloud folder or a local folder of your choosing(see the 3rd screenshot below).
You can easily Cut or copy any cloud file to your Local Internal Storage, and it will be downloaded and stored locally in the folder that you pasted it in. Oh, and if you have set up multiple Cloud Accounts, you can add specific ones to your ‘Favorites’ for quick access from the sidebar drawer. This can be also accessed from the ES File Explorer Home.
So that concludes the tutorial and accessing any cloud storage accounts shall be a breeze now.
Okay now, which cloud Accounts did you add to your File Manager? How did you like the fact that you don’t need the standalone apps for accessing your Cloud Accounts? The comments section is all yours!


