Biblionasium is an amazing free educational web based service, geared towards parents, educators and students alike. Biblionasium lets you teach reading skills to students in a fun and interactive way. You can create virtual classrooms, reading groups, or even entire grades, and add students to them. Once that’s done, you can assign activities like reading exercises and book reviews to either a selected group of students, or the entire grade. Apart from that, Biblionasium lets you directly search for, and add freely available eBooks on a variety of topics (Elementary English, Comics etc.) which can be then assigned to the virtual class. You can even create virtual reading challenges and set goals for the students. Students also need to login via their own accounts, and their reading progress is logged, which can be viewed through the educator’s interface. The educator can also send messages to the class members, and view their reading reports.
Biblionasium: Sign Up and Primary Web UI
(Note: Biblionasium, as mentioned before, is intended for educators, students and parents alike. However, this article is focused more towards how educators can benefit from this amazing web service).
Like most web based services, you need to create a free account with Biblionasium to get started. Signing up is easy. All you have to do is click the join us button on the top of the homepage, and select the account type (Educator, in this case). On the sign-up form presented next, enter your account details (name, country, email, class’ name etc.) and hit the Create Account button. After this, Biblionasium sends an activation mail to your registered email address. Click the link in the activation mail, and you’re instantly logged in to your Biblionasium account. Here’s how the main web UI looks like:
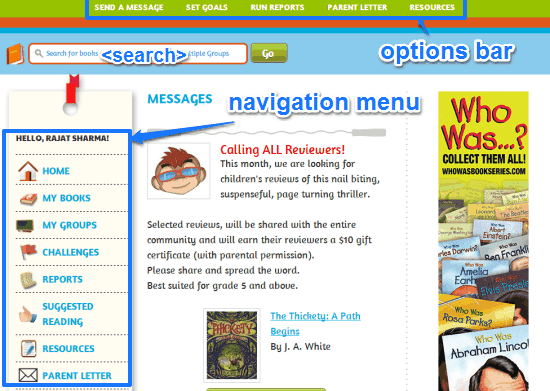
Pretty colorful, don’t you think? As illustrated by the above screenshot, Biblionasium’s main user interface is quite a busy one. It’s filled with options and informative text of all kinds. But it’s intuitive nonetheless. The left pane is essentially the navigation menu, having a couple of options. These are briefly mentioned below:
- Home: The default landing page.
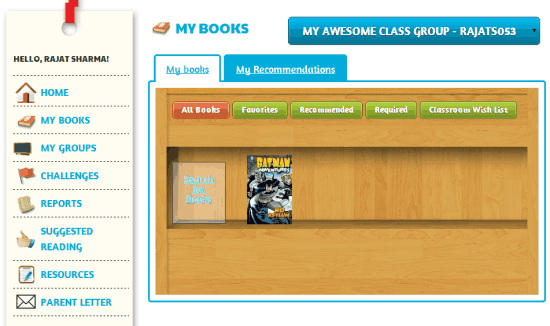
- My Books: This section consists of all the eBooks that you’ve added for the students.
- My Groups: You can divide the students into groups. All of your created groups are listed here.
- Challenges: This section lists all the reading related challenges issued to the students.
- Reports: You can view the reading reports of all the students added in your class here.
- Suggested Reading: This section lists automatic book recommendations. You can add the books with one click here.
- Resources: This section lists excerpts of notable web articles about the benefits of reading (also consists of direct links to the articles).
- Parent Letter: This section lists some important advice from Biblionasium to the parents, regarding the usage of the site.
Apart from these, there’s also a bar up-top, having a couple of handy options, as mentioned below:
- Send Message: Send any important message to all (or some) of the students added in your class.
- Set Goals: Under this section, you can assign reading challenges for the students.
- Run Reports: The logged reading reports of the students can be viewed here.
Also see: 5 Free Spelling Websites To Teach Spelling To Kids
How to Create a Class/Group, and Add Students to it?
With Biblionasium, you can create classes or groups, and then add students to them. Creating a class or group is quite easy. Here’s a step by step tutorial on how to do it:
Step 1.1: Select My Groups from the left navigation menu. Once you do that, the class/group creation screen comes up.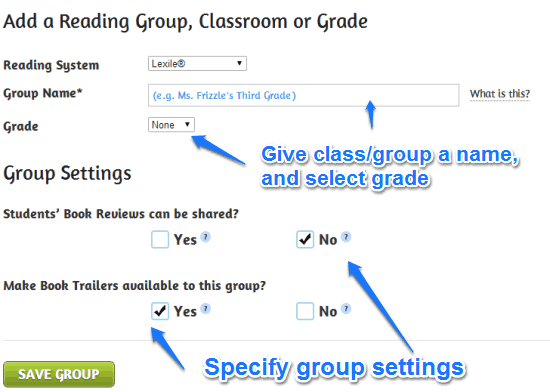
Step 1.2: As illustrated above, the class/group creation screen lets you give your Group a name, as well as specify the target Grade. You can also specify whether students can share book reviews amongst them, and some other settings. Once you’re done, click Save Group.
That’s it. Once your group has been created, you can start adding students to it. Here’s how to do it:
Step 2.1: After creating a group, you get the following summary screen, which can be used to add students to your created group.
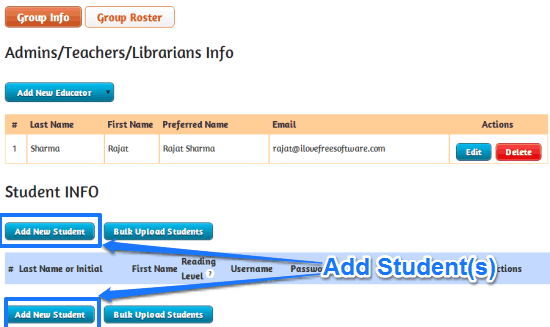
Step 2.2: To add a new student to the created group, simply click on the Add New Student button (You can also use the Bulk Upload option to add up to 50 students to the group at a time, via a CSV file). The student addition screen comes up, that lets you specify important details about the students (name, reading skill level, username etc.). Only the First and Last name is required, and all other information can be randomly assigned by Biblionasium itself. Once done, click Save.
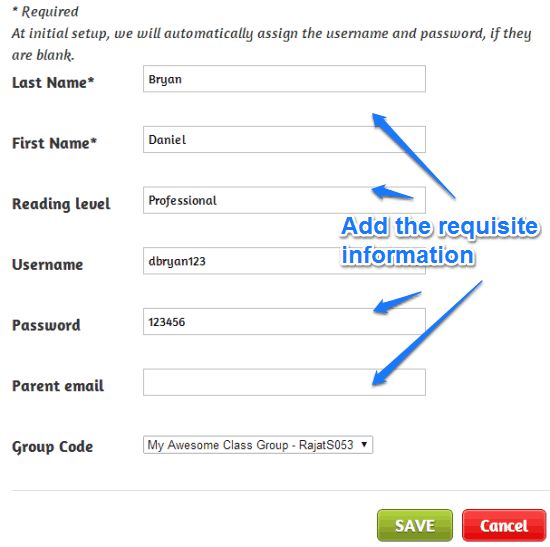
That’s it. Your student’s record is saved. You can use the same process to add as many students as you like to your Biblionasium account.
How to Create Reading Challenges for your Students?
Once you’ve added students to your virtual reading group or class, you can create reading challenges for them (However, do note that each student needs to have a Biblionasium account as well, before he/she can take the reading challenges. Furthermore, each student needs to create an account with a parent’s email approval). Here’s how to do it:
Step 1: Click the Challenges option from the left navigation menu, and select the Start a new Challenge tab. Once you do that, the following challenge creation screen should come up.
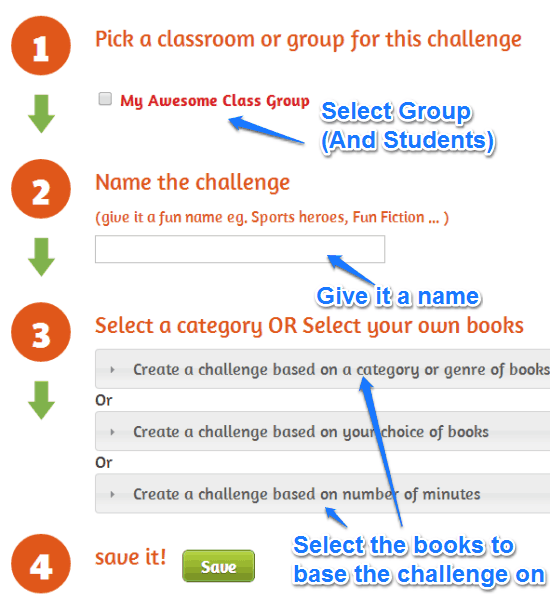
Step 2: As illustrated by the screenshot, the challenge creation screen lets you create the challenge over a series of steps. First, you can select the class for whom you want to create the book reading challenge. You can either select the entire group, or only some students for the challenge (selectable via a pop-up window). The next steps let you give your challenge a name, and select the genre of books to base the challenge on. You can even specify your own choice of books. Once done, click the Save button.
That’s it. Your reading challenge will now appear in your students’ Biblionasium profile section. (However, for this to work, the students need to log the book in the Reading Log section of their accounts).
How to View Students’ Reading Reports?
Biblionasium also lets you track your students’ reading progress through reading reports. These contain a summary of multiple reading related activities logged in by the students (time, pages read etc.). Viewing the reading reports of students is really easy. To do so, simply select Reports from the left navigation menu. Once you do that, a pop-up window lets you select the students whose reading reports you want to view (You can view either the reading reports of some students, or the entire group). Apart from this, you can also select the duration (starting and ending dates) for which you want to view the reports. Here’s how a sample student reading report looks like:
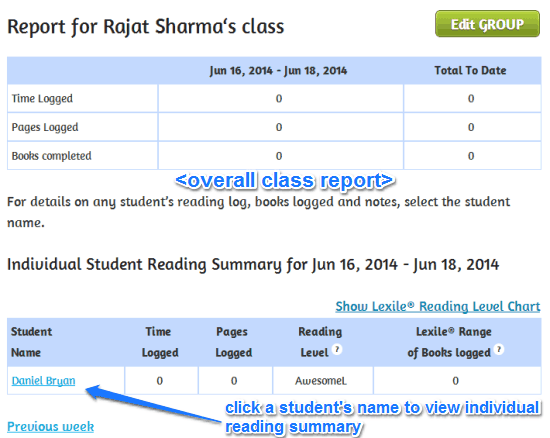
As illustrated by the above screenshot, the reading report details the overall book reading related activities logged in by the group/class. If you want to view the report on a per-student basis, simply click on the student’s name whose reading report you want to view. That’s all there’s to it.
Conclusion
Biblionasium is an amazing resource for educators, kids and parents. It’s a simple yet feature-filled web service that makes teaching reading skills to the students really easy and fun-filled. The ability to add students, log their progress, send messages to the entire group or class etc., are all awesome. Add to it features like individual accounts for educators, students and parents, automatic book suggestions, the ability to add free eBooks to your profile, and Biblionasium becomes a must use service. If you’re an educator looking towards teaching reading skills to your students, this is one web service you should definitely try. You’ll love it