BitLocker is a feature of Windows 8 that lets you encrypt data in Windows 8. This tutorial will explain how to use Bitlocker.
If you think that having a password on your computer protects the data stored on it; well you are wrong. Any intruder can gain access to all the files that are stored on your computer, by booting into Linux using a live disc or bootable USB drive or the person might just connect your drive to his/her computer and simply copy all the data. Or, the intruder might just reset password of Windows 8 to one of his/her choice and do anything with your computer that the intruder wants.
The best way to protect the sensitive data that is stored on the computer is to encrypt the data. You can do this by using a third-party software to encrypt files that you want to protect. But this process can be a little annoying and lengthy. If you want to add another level security then Microsoft provides with a nice integrated solution called Bitlocker. The BitLocker is simple and easy because this enables you to encrypt the whole hard disk in one go. This makes the process of protecting your system more streamlined and simple.
Bitlocker was added as a feature, when Windows Vista was introduced. The process to enable Bitlocker in Windows 8, pretty much remains the same; but this ‘How to’ will guide you through the new interface of Windows 8 to enable BitLocker in Windows 8 with ease. You can use this method to encrypt a single drive or multiple drives that are on your Windows computer.
Steps to enable BitLocker in windows 8:
- The process to enable BitLocker in Windows 8 is simple; first step of this process is to open up the control panel. To do so, just start typing control panel on the start screen in Windows 8, till it comes up as seen below. Just click on it to open the control panel in Windows 8.

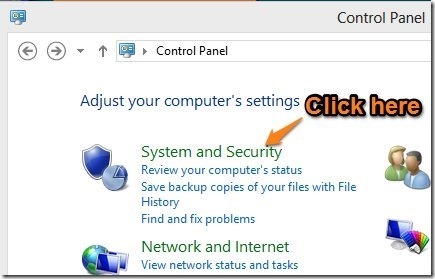
- When the control panel opens up as shown in the screenshot below, just click on the System and Security option as pointed out below.

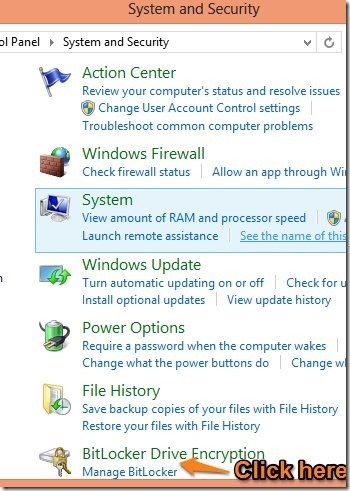
- Now a list of options will open up as shown below; just select the option that says BitLocker Drive Encryption.

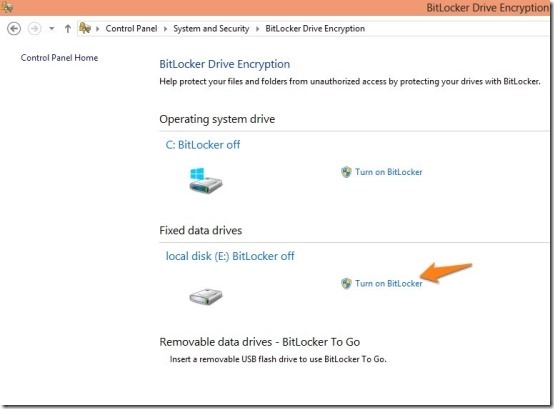
- After you have clicked, a new Window will come up as shown below. This window will list all the drives for which BitLocker can be turned on; including Removable devices. Here, in the example, I am going turn on BitLocker on a local drive by clicking on the option; as pointed out in the screenshot below.

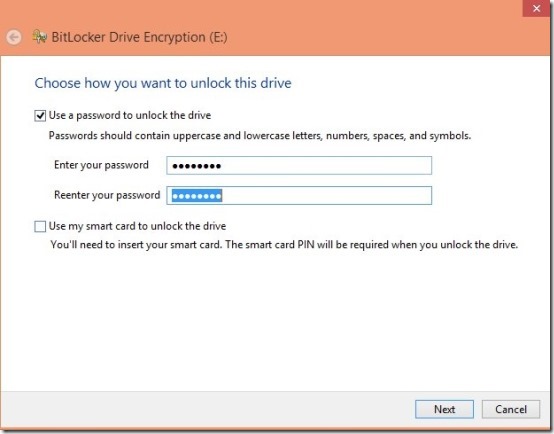
- Now a window will come up as shown in the screenshot below, asking you which method do you want to use to unlock the drive. Here in this example, we are going to use the password method. Enter the password that you would like to have and confirm it by re-typing and now click on the Next button.

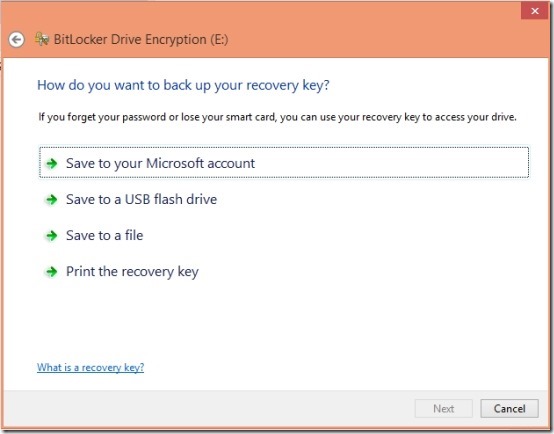
- Before the BitLocker for Windows encrypts the drive, it will ask you for the way you would like to backup the recovery key. This step is important because you can recover files from a disk only if you have a backup recovery key; in case you forget your password.

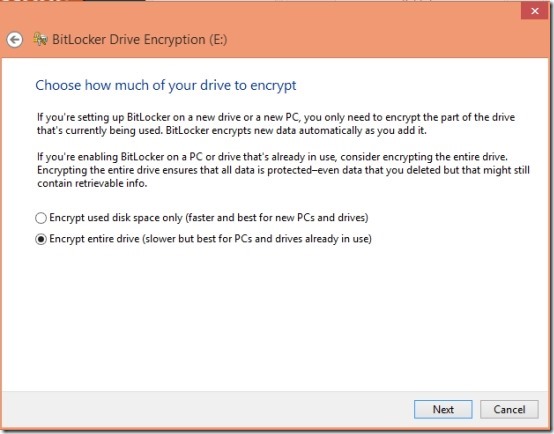
- Now Windows will ask you how you would like to encrypt the drive, I prefer the encryption of the whole drive because it provides more security. Anyway you can select whatever option that suits you.

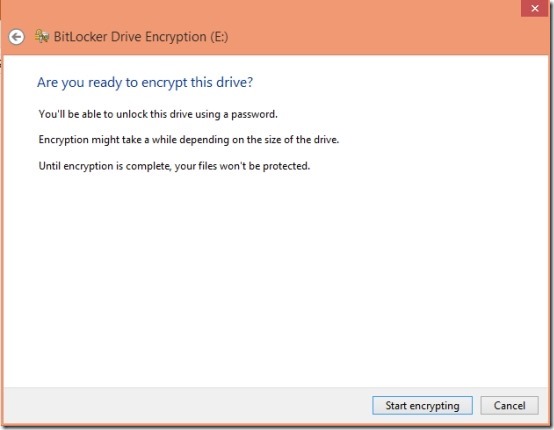
- Now just click on the Start encrypting option, to start the process of encryption. The time taken here will depend on the size of your drive that you are encrypting.

- Every time when you start the your computer, the drive will be locked as shown in the screenshot. And you will have to enter the password to unlock the drive. In this manner people can boot into the computer but will not be able to unlock the drive or access it’s data; even when the drive is connected to another computer.

Here are some other interesting tutorials for Windows 8:
How To Use Task Manager In Windows 8
