This tutorial explains how to check your shared folders on network in Windows 10.
Sharing the folders on network in Windows 10 is an easy task, but to remember the list of those shared folders is probably not so easy. It is also possible that you might have forgotten which folders you have shared with others in the network. So, to check the list of your shared folders on network in Windows 10, I have covered multiple methods in this tutorial. You can choose any method as per your need.
Let’s start with the first method to check shared folders on network in Windows 10 PC.
Check Your Shared Folders On Network In Windows 10 Using Computer Management:
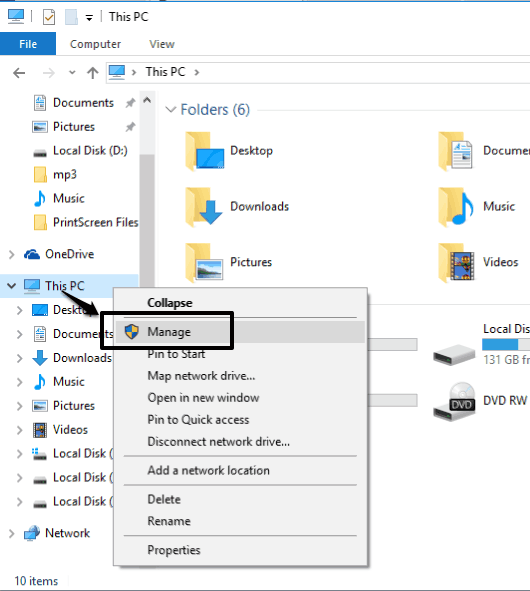
Step 1: Open File Explorer. Right-click on This PC and click on Manage option. It will open Computer Management window.
If you have added This PC to the desktop, you can also use that shortcut to open Computer Management window.
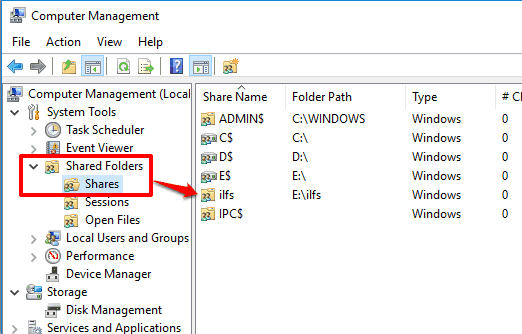
Step 2: Computer Management window includes Shared Folders section. Clicking on that section will explore its sub-sections. Now you can click on ‘Shares‘ to see the list of shared folders in your Windows 10 PC. You will also be able to see the Folder Path, Type, the number of clients connected to folders, etc. Moreover, you can also right-click on any folder to stop sharing.
Apart from viewing what you have shared on the network, you can also see the default shares created automatically on Windows 10, such as ADMIN$, C$, etc.
Step 3: This is an optional step, but handy. You can access Sessions to check the total number of user sessions that are connected to your computer. Apart from this, accessing the Open Files will show you the list of files opened by other users in the network.
Check Your Shared Folders On Network In Windows 10 Using Command Prompt:
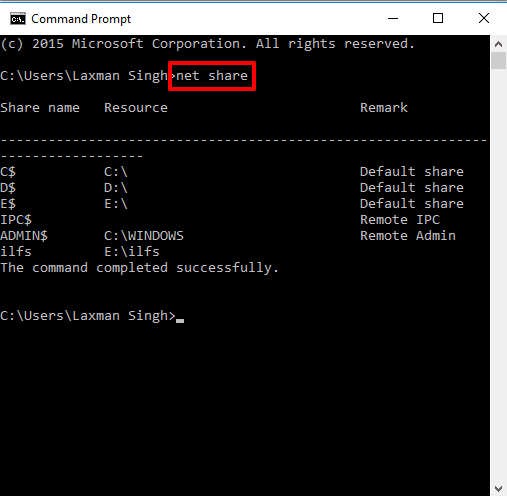
Step 1: Open Command Prompt window, type “net share“, and execute the command.
Step 2: It will generate the list of shared folders and their path. The default shared folders of Windows 10 are also visible. Actually, this method is nearly similar to Computer Management window, but you can’t stop the sharing using this method.
View The List of Shared Folders In Windows 10 Using A Free SoftPerfect Network Scanner Software:
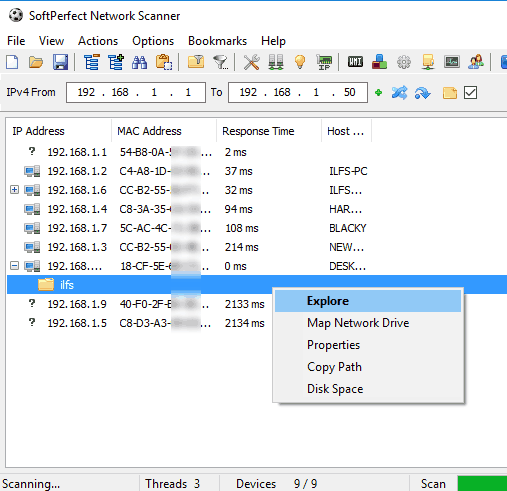
SoftPerfect Network Scanner software for Windows 10 is a very useful software. Apart from showing the list of your shared folders, you can check shared folders of other users connected to that network. You can also right-click on a particular folder to copy its path, explore the content, properties, etc.
Using this software is also very easy. All you have to do is specify the ‘From’ and ‘To’ range of IP addresses for scanning. Once the scanning is completed, you can see the IP addresses of other users, shared folders of your and other users, MAC Addresses, etc.
You may also read the full review of this software.
Conclusion:
Which method would you prefer if you have to check how many shared folders are present in your Windows 10 PC? Probably, the first method is all what you need. It gives a detailed information related to the shared folders and also gives the options to stop the sharing for any shared folder.
