Here is a simple tutorial that explains how to create price quotes in Microsoft Excel.
If you are working in retail or manufacturing sales then creating and sending out price quotes is an important, but tedious part of your day. The good news is you can eliminate a major part of the work involved in this process by using some Excel magic!
Most vendors have a price quote or a price proposal template where they enter a product Id, the price and the amount of for each product requested. Usually that template will also produce the total price for the proposal automatically.
Today we will show you how to set up a template in Excel that will also automatically fill in the price of the products and save you the trouble of looking up the price of each and every product.
You can perform this magic by maintaining a product catalog (most businesses will already have one) and have the price quote template automatically look up the price from that catalog.
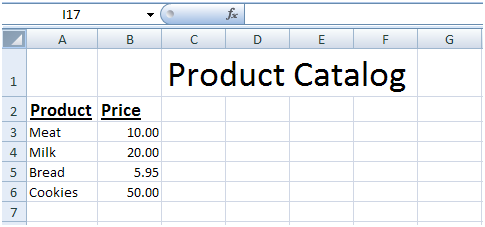
Here is a very simplified sample of a product catalog:
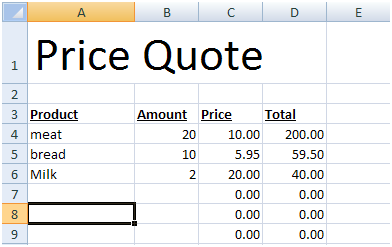
And here is a very simplified version of a price quote template:
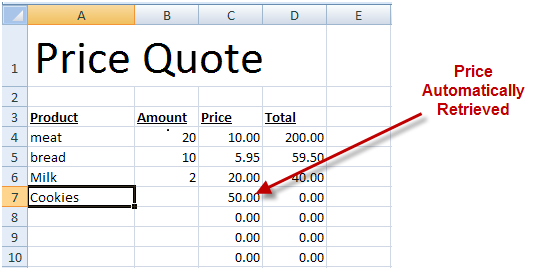
What we want to happen is that if we add a new product, the price will automatically be filled in. Like so…
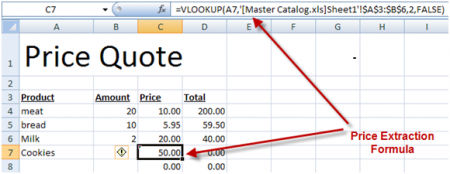
This magic happens with the help of this formula:
This formula uses two Excel techniques. The first is the VLOOKUP() function. This function allows you to search an Excel table, like the product catalog we saw earlier, for a row that meets a certain criteria.
In our case, we are searching the area where the product prices are listed within the product catalog for a row whose first column is equal to A7 – which is the product name.
To put it in even simpler terms, we are looking for the row in the product catalog that contains ‘Cookies’ in column A.
Once the lookup function finds that row, it returns the second column in the area we specified.
The VLOOKUP function is a very useful function. You can learn more about the vlookup function here.
The second piece of magic lies in how we indicate to Excel where the data is found in another Excel file.
This is called a cell reference, and if you’ve ever written a formula, you’ve used references before. Whenever you wrote a formula like:
=A1
However, you might have not referenced a cell in another file or in another sheet before. Fortunately enough this is easy to do.
To reference a cell in another sheet but in the same workbook, simply put the sheet name followed by an exclamation mark before the cell name.
=Sheet2!B1
Means cell B1 in sheet2.
To reference a cell in another file, put the file name followed by the sheet name in square brackets followed by an exclamation mark before the cell name.
Note: If the filename or the sheet’s name contains a space then the filename and sheet’s name must be surrounded by single quotes.
='test file.xls[Sheet2]'!B1
Means cell B1 in sheet2 in file test file.xls.
And so, by referencing a range in the Main Catalog file…
'[Master Catalog.xls]Sheet1'!$A$3:$B$6
We tell the VLOOKUP function to look for the product price on another file.
Summary
We all know the popular phrase ‘time is money’, well in sales this is definitely something to keep in mind – the faster you can respond to price enquiries the more business you can deliver! Hopefully this Excel trick can help you work through more orders, and with less hassle than before.
About the author
Yoav Ezer co-authors the technology and productivity blog Codswallop. He is also the CEO of a company that produces PDF to Excel conversion software. Some of the articles he wrote earlier include Microsoft Excel alternatives, create lookup function in Google docs, and how to protect cells in OpenOffice.
For more Excel tips from Yoav, join him on Facebook or Twitter


