This is a short tutorial that explains 3 different ways to disable User Account Control (UAC) in Windows 8.
User Account Control is a security feature of Windows 8. It helps you to prevent users from changing some specific administrative settings and also prevent some applications from installation. Although it is very recommended to keep it enabled, many users find it annoying as they regularly need to install applications and change administrative settings. In Windows 7 and previous versions, disabling User Account Control was quite easier. We have already covered an article, that lets you temporarily disable different User Account Control in Windows 7 and previous versions using Windows UAC Manager.
In this tutorial, you will learn 3 different ways to disable UAC in Windows 8, without installing any additional software.
Caveat: However, disabling the UAC leads to a serious consequence. You won’t be able to launch the modern apps after disabling the User Account Control. If you are OK with this consequence, only then disable it.
Disabling UAC Using Local Security Policy In Windows 8:
To completely disable the UAC, you need to disable it using Local Security Policy. But remember, you won’t be able to launch the modern apps, after this.
To disable the User Account Control using Local Security Policy, follow the instructions given below:
Step 1: The very first thing that you need to do is open the Control Panel. You can open control panel from Windows 8 Hidden Start Menu by pressing Windows key + X (as I have explained in my previous article “5 hidden secrets of Windows 8“). Alternatively, you can use Windows 8 Charm Bar to open Control Panel.
Step 2: After opening the Control Panel, click on “System and Security” option. From the “System and Security” , click on Administrative Tools.
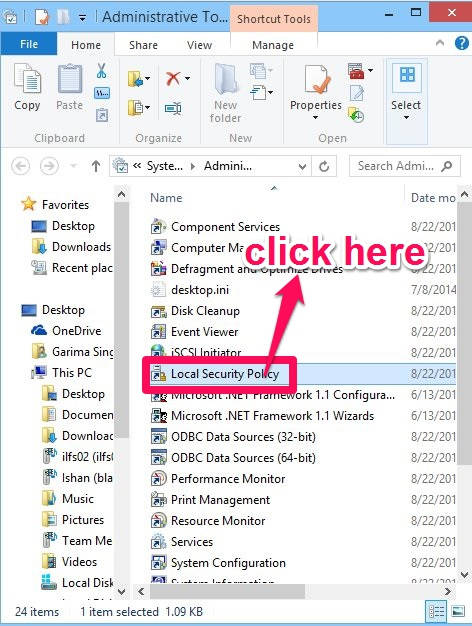
Step 3: An Administrative Tools window will appear. It contains a list shortcuts of different tools. From the list, find out Local Security Policy and click on it.
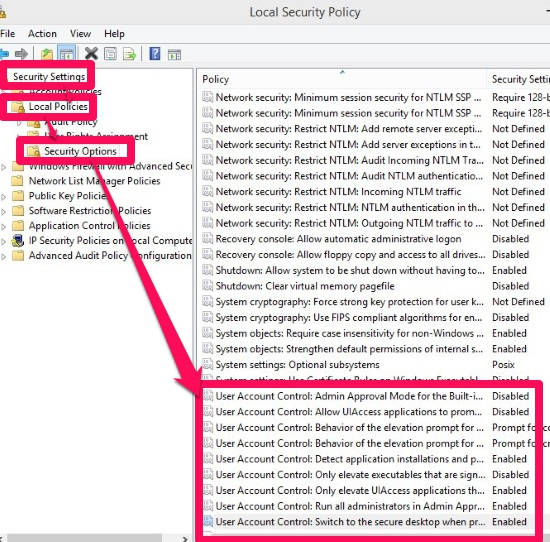
Step 4: In Local Security Policy, navigate to Security Options folder by using the path given below:
Security Settings -> Local Policies -> Security Options
Step 5: In Security Options, scroll to the bottom of the right side panel. You will find 11 different UAC setting options. Disable all of them one by one. To disable, double click on the option and then click on the radio button that says “Disable”.
This will disable the User Account Control completely.
Disabling UAC using Action Center In Windows 8:
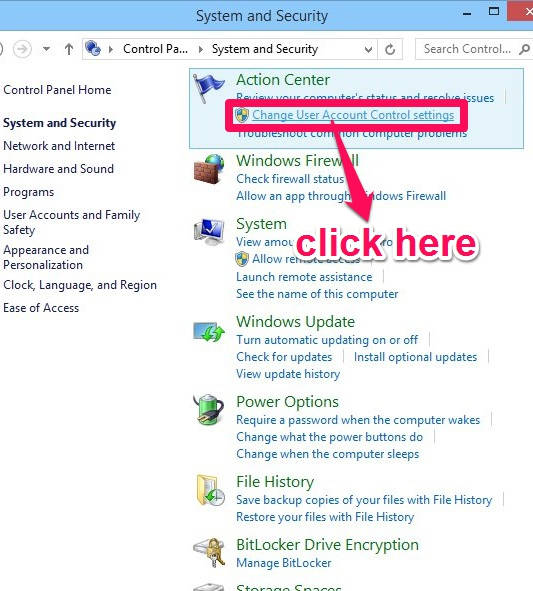
You can also disable the User Account Control using the Action Center as well. To Disable UAC using Action Center, Go to Control Panel, and click on “System and Security”. Below the Action Center in System and Security window, you will find Action Center on the top.
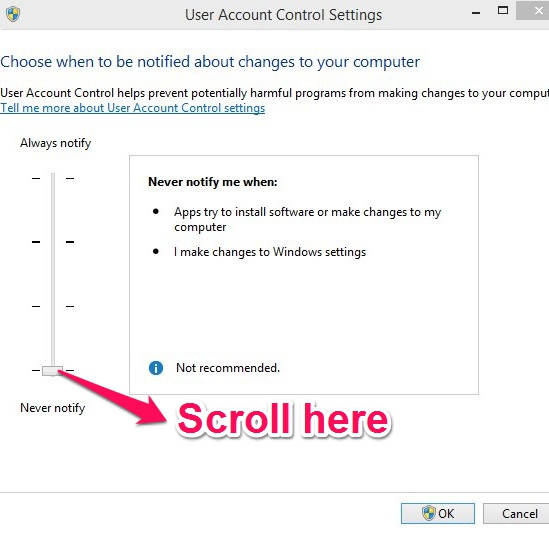
Click on option that says “Change User Account Control Setting”. It will open ” User Account Control Setting” window. Scroll the button to the bottom of the scroll which says “Never Notify”. It will disable the UAC as well, but not completely.
Disabling UAC using Registry In Windows 8:
The another alternative to disable the User Account Control is Registry Editor. It also completely disables the UAC. To disable using registry, follow the below mentioned instructions:
Step1: The very first thing that you need to do is open Run. For that, press Windows Key + R. In the Run box, type regedit. It will open the registry editor.
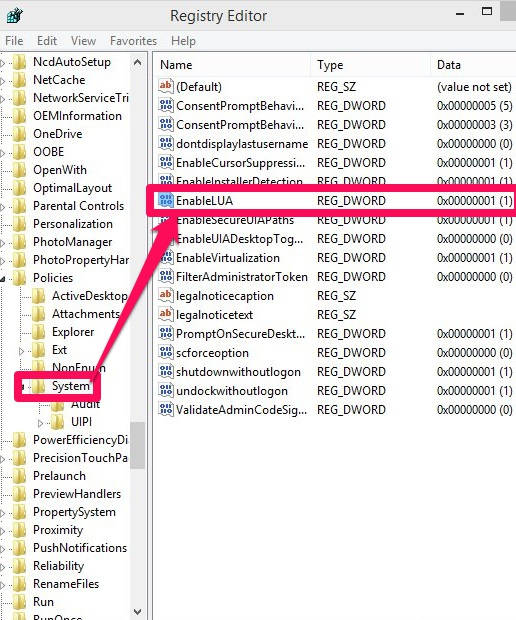
Step 2: In registry Editor, navigate to the System folder, by using the below mentioned path:
HKEY_LOCAL_MACHINE/Software/Microsoft/Windows/Current Version/Policies/System
Step 3: From the System, click on the DWORD that says “EnableLUA“. Set the value of EnableLUA as 0 (by default the value is set to 1).
You need to restart your PC, after disabling the UAC to see the changes.
Conclusion:
This tutorial contains 3 different ways to disable UAC in Windows 8. You don’t need to install any third party software to disable it. If you want to completely disable UAC, then go for the first or third option. If you don’t want to disable the UAC completely, then go for second option.
If you know any other way, then do let me know in comment below.

