Here, is a simple tutorial that explains how to prevent uninstalling and disabling Firefox add-ons.
Firefox provides an easy way to uninstall add-ons that you add manually; through the Add-On Manager. However, sometimes you don’t want some add-ons to be disabled or uninstalled without your wish. Like in case when you install a Firefox parental control add-on to prevent your children from accessing inappropriate web contents in your absence; but they can easily disable or uninstall the extension, and later silently re-enable them, ruining your whole motive of keeping them away from adult web contents.
These kinds of situations make it necessary to find some solution to prevent disabling or uninstalling Mozilla Firefox add-ons so easily. And that’s why we have found a way that lets you remove each possibility to uninstall Firefox add-ons through its Add-On Manager.
We have recently covered a tutorial on how to prevent uninstalling Google Chrome extensions. The idea seems much similar for Firefox as well; but, with slight differences. The basic process revolves around adding Firefox add-ons using Windows Registry. This removes the “Uninstall” option against the extension’s name in add-On Manager. However, in case of Firefox, just adding add-ons through Windows Registry is not sufficient; In addition to removing “Uninstall button”, you need to gray out the “Disable” button as well, to ensure that no one can block the add-on from Firefox without your permission.
Lets have a look on step-by-step procedure of how to prevent uninstalling and disabling Mozilla Firefox add-ons.
- First of all, open Windows Registry Editor. You can open the Registry Editor simply by opening Command Prompt, typing “regedit”, and pressing enter.
Note: You can open Registry Editor using Administrative privilege only.
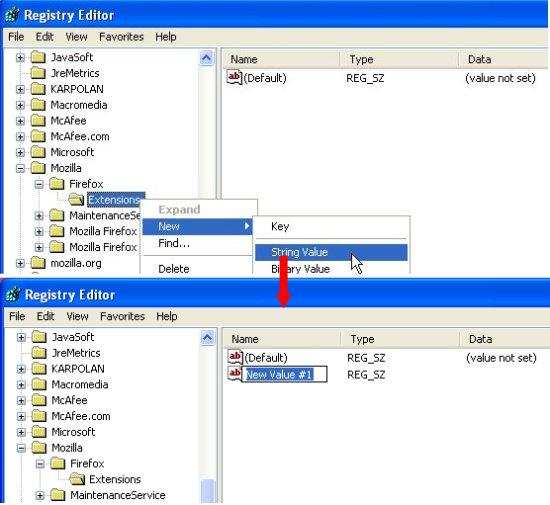
- This will open the Registry Editor window. There you will see a list of folders on the left panel. Navigate to HKEY_CURRENT_USER > Software > Mozilla > Firefox > Extensions.
Note: if you have Windows 7 (x64), navigate to HKEY_LOCAL_MACHINE > Software > Wow6432Node> Mozilla > Firefox > Extensions. - Here you have to create a registry entry for the extension you want to prevent from uninstalling. Just make a right-click on Extensions folder and select “New > String Value” option. A new registry entry will appear on the right panel. You have to rename it to the extension’s ID and modify its value to the exact location of the extension’s XPI file.
- To find the ID of the extension, just follow these simple steps listed below:
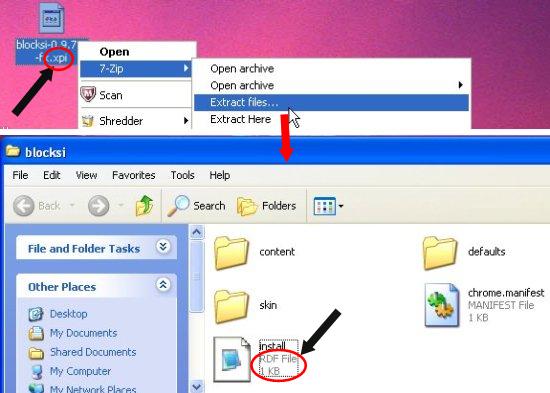
- Go to the add-on download page. Right click on the “Download” button and select “Save Link As” option. This will save “.xpi” file of the extension on your computer.

- This is a zip file that contains the extension to be installed. Unzip file contents and open the “RDF” file in your text editor.

- There you will find the extension’s ID. Tip: If you open the RDF file in an XML Viewer, it will be more convenient for you to locate the extension ID.

- Go to the add-on download page. Right click on the “Download” button and select “Save Link As” option. This will save “.xpi” file of the extension on your computer.
- Copy this ID and paste it to the registry entry’s name you have created. (Use “Rename” option from the Right-Click menu.)
- Now copy the unzipped XPI file to the following location: C:\Program Files\Mozilla Firefox\extensions. Rename the folder to the extension’s ID.
- Now you have to modify the value of the registry entry. For this, copy the location of the unpacked XPI file, make a right-click on the registry key and choose “Modify”, and paste the location to the “Value data” field.
Note: You are strictly advised not to mess with other registry entries; otherwise your system may run into serious problems.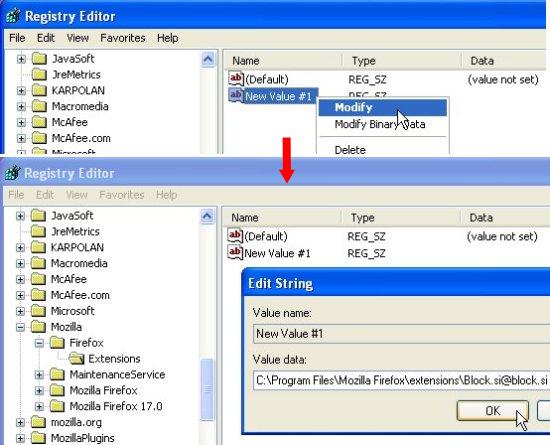
- Now you are all done. Close everything and restart your Firefox browser. It will show a pop-up confirming installation of the extension you have added through Registry Editor. Click confirm and next time you will open Add-on Manager, you will notice that the “Uninstall” button will be deactivated or removed from the Add-ons page.
This is how you can prevent uninstalling Firefox add-ons. However, this won’t prevent others from disabling the extensions. Though we are constantly trying to find some good solution for this also, however, you can rely on an easy method we are going to describe here, which doesn’t actually blocks the “Disable” button from the Add-ons page, but indirectly prevent users from disabling Firefox add-ons. Lets see how:
There is an extension named Public Fox available in Firefox Add-on store, which provides a way to prevent users from accessing Add-on manager. It blocks the Add-on manager using a password, and opens it only if you enter the correct password. Thus, by installing this Add-on to your Firefox browser, you can indirectly prevent users from accessing Add-on Manager and making changes to it.
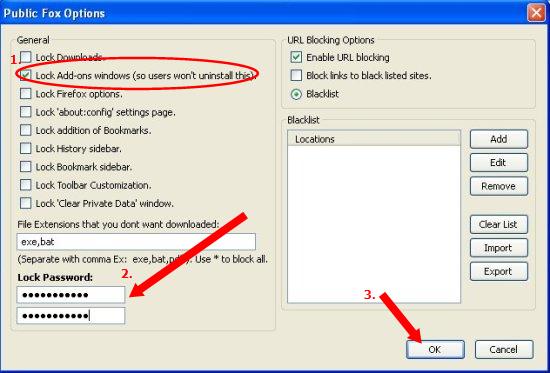
You can get the download link of the extension here, and install it like you install any other extension on your Firefox browser. After that, open the Add-on Manager and open “Options” window of Public Fox. There you will see check boxes to lock many things on Firefox, including the Add-on Manager. Click on the corresponding check box, enter a secret password, and press OK.
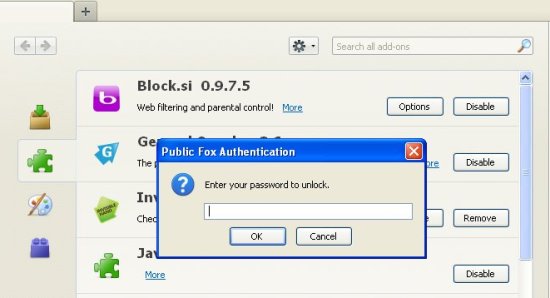
Next time you try to access Add-on Manager, you will be prompt to enter the secret password. The Add-on Manager will be accessible to those only who will enter the correct password.
This is how you can indirectly prevent users from reaching the Add-on Manager in your Firefox browser. But as I have said earlier, this is just an indirect way to prevent users from disabling or uninstalling Firefox extensions (and for this, you don’t even have to add the extensions through Windows Registry, you can directly add them through Firefox). Still you can use it till we find a better way to prevent disabling Firefox extensions.
Till then, keep reading our articles for more free software and other useful “How to”s.

