This tutorial explains how to manually optimize disk drives in Windows 10. Being the primary system software installed on any computer, an Operating System has to perform a whole range of duties, such as managing the files (and the file system), allocating and de-allocating hardware and software resources, and things like that. As such, the OS is also responsible for ensuring that the connected peripherals (hard disk, mouse etc.) are in perfect condition and working the way they’re supposed to. Due to this, virtually all modern Operating Systems include built-in utilities that can not only detect some common problems in the hardware, but also rectify them.
One such feature of Windows 10 is Automatic Disk Optimization. As the name pretty much sums it up, Automatic Disk Optimization regularly monitors your computer’s hard disk drive (or its partitions) for problems such as fragmentation, and automatically fixes them up on a scheduled basis. Now that’s totally great, but what if you want to do that manually (perhaps because the hard disk suddenly starts acting up weird?)
Piece of cake, fellas. That’s because Windows 10 lets you optimize the disk drive(s) whenever you want. Sounds fun? Let’s find out how you can manually optimize disk drives in Windows 10.

How To Manually Optimize Disk Drives In Windows 10?
Optimizing disk drives (or disk partitions, if you prefer to call ‘em that!) on a manual basis is pretty simple in Windows 10. Here’s an illustrative walkthrough to get things off to a smooth start:
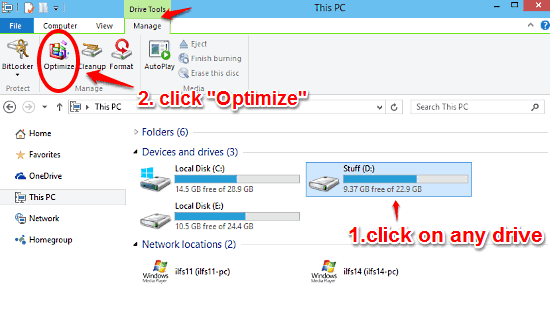
Step 1: Open up This PC (the erstwhile My Computer), and select any of the disk drives. Now go to the Ribbon Menu and click on the Manage tab under the Drive Tools section. When the tab’s options show up, click on Optimize.

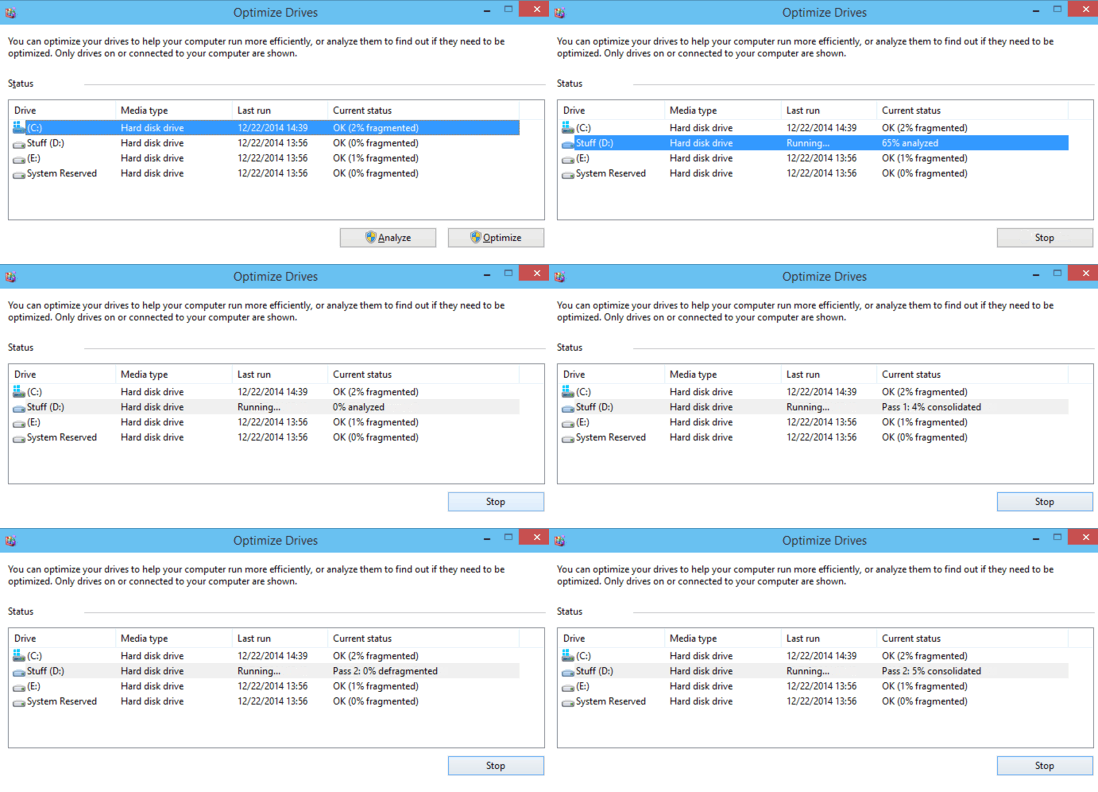
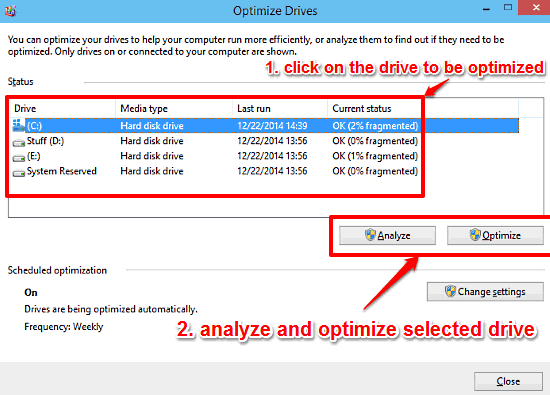
Step 2: This should launch the built-in Windows disk drive optimization utility. It lists all the disk drives currently connected to the computer. In addition to that, it also displays information like last optimization date, fragmentation status etc., in separate columns. To get started, click on the drive that you want to optimize, and click on Analyze (requires administrator permissions). The utility will quickly scan the selected drive and report its fragmentation status. If you want to go ahead with the Optimization, click the Optimize button (again, requires administrator permissions). The selected drive will now be optimized. You can safely minimize the window when optimization is going on, to continue with your work. Here’s a screenshot:

That’s all there’s to it. You can use the same procedure to optimize all the other disk drives as well. Bet it can’t get any easier than that!
See Also: How To Schedule Automatic System Maintenance In Windows 10?
Wrapping It Up
The ability to manually optimize the disk drives is a simple but pretty handy feature of Windows 10. You can use it to quickly find (and correct) common problems with the disk drives. Try it out and let me know what you think in the comments below.