This tutorial explains how to enable controlled folder access in Windows 10 to protect your files and folders. This is a new feature provided by Windows Defender in Windows 10 and very effective also. Whenever some unauthorized app or software will try to modify or do some changes in your protected folder/file, controlled folder access protection will show an error. As a result, your files and folders will remain safe. The feature is also helpful to protect your important folders from ransomware attacks.
In the screenshot below, you can see the error when some software was trying to add changes in a file added in the controlled folder access protection in Windows 10. I was actually compressing the size of that file using some software, but when I tried to compress it, the software was not able to do that because it was not in the authorized app list. Controlled folder access can be enabled in Windows 10, through Windows Defender Security Center and then add the folder(s) of your choice to the protected folder list.
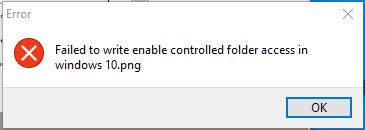
So, as you can see, this feature is really helpful.
Note: Controlled folder access is provided by Windows Defender in Windows 10 Fall Creators Update (1709). So, you need to update your Windows 10 PC to Fall Creators Update to use this feature. Also, this feature works only if Windows Defender is set as your Antivirus program. If you are using some other antivirus software, then you need to uninstall that software and use Windows Defender Antivirus in your Windows 10 PC.
How To Enable Controlled Folder Access In Windows 10 To Protect Files and Folders?
Step 1: Make sure you are using Windows 10 Fall Creators Update and Windows Defender is turned on.
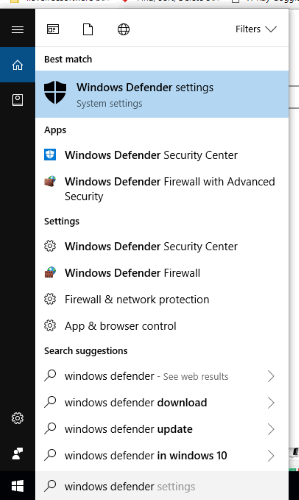
Step 2: Type ‘Windows Defender settings’ in the Search box of Windows 10 and press “Enter“.
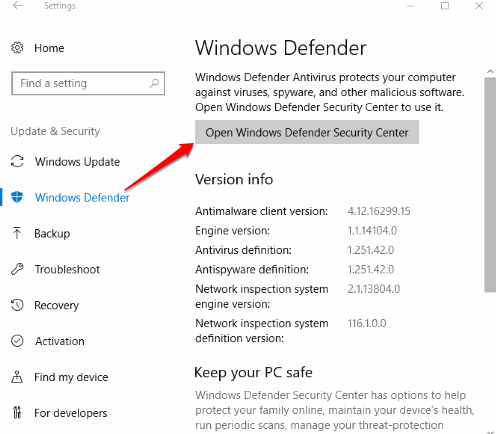
Step 3: It will open Settings app with “Windows Defender” page. There you will see “Open Windows Defender Security Center” button. Click on that button.
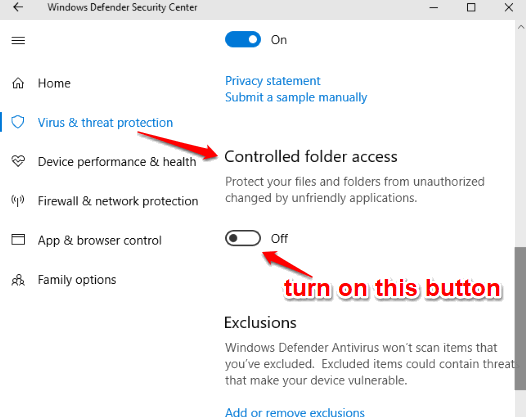
Step 4: Windows Defender Security Center window will open. Here, you need to access “Virus & threat protection” category and then select “Virus & threat protection settings” option visible at the right section. Once you have done that, you will see “Controlled folder access” section. It remains turned off by default. Turn it on.
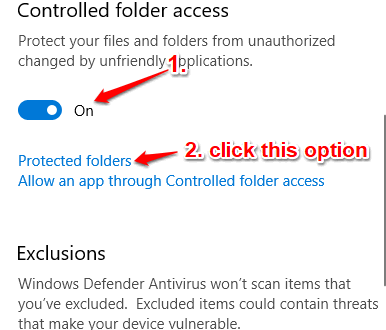
Step 5: When Controlled folder access is turned on, you will see “Protected folders” option under that section. Select that option.
Step 6: Now, you will see an “Add a protected folder” button. Using that button, you can select any folder available in your PC to the protected folders list. By default, Desktop, Documents, Pictures, Music, and other Windows folders are already added to protected folders list. You can’t remove them from that list. But, you can add as well as remove any other folder from that list.
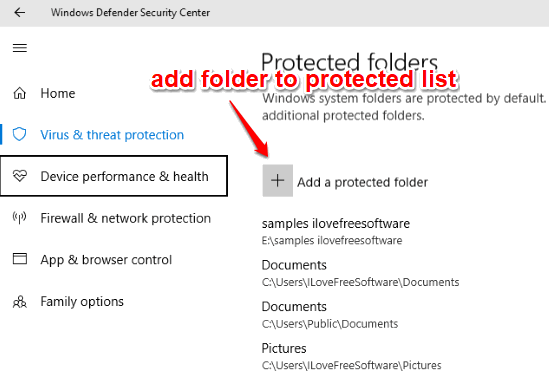
That’s it! When the folder is added to the list, it will be monitored and protected from unauthorized apps and software, including its files and sub-folders.
You can remove any protected folder added by you. For this, you can click on that folder and use Remove button.
You may also check how to Protect privacy, Improve security, Update setting in Windows 10.
The Conclusion:
It seems like Microsoft is really serious about security and protection of its users. It has improved Windows Defender and brought this controlled access folder protection to help users protect their files and folders from unauthorized apps. Try it.