Here is a guide that explains how to setup a Free WordPress blog with Free Amazon EC2.
Amazon AWS had launched a free tier sometime back that gives you 1 full year of limited access to some of Amazon’s AWS services. One of these services include an Amazon EC2 instance, which in simple terms is a VPS. So, basically, you get 1 full year of access to VPS. This ECS instance is “Mini”, and comes with 613 MB of RAM.
This is quite a small VPS, but actually it is good enough for basic WordPress websites which do not get lot of visitors. If you are just starting with a blog, and somehow did not like my earlier article about free wordpress hosting, then this free VPS setup from Amazon would work pretty well for you. And if you somehow exceed the resources available in this EC2 instance, that would mean you are making enough money to spend on a decent hosting package :)
Here is a simple tutorial that shows how easy it is to setup WordPress with Amazon EC2 for free:
-
- You need to sign up for an Amazon AWS account, if you do not have one. Note: Free tier is available for new accounts only, so you would want to sign up a new account. Even though you are signing up for a free tier, you will need to provide your credit card, as any overage will be charged to that.
- After that, go to to Amazon EC2 page.
- In this, click on “Sign Up for Amazon EC2”, and just follow the instructions there. During the process, Amazon will also make a call to your phone number to confirm your account.
- Once all that is done, click on “Account” option in the menu at top, then select “Amazon EC2” from drop-down, and click Go.
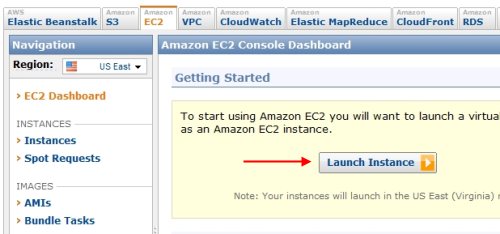
- At this point, you are on Amazon EC2 management console, as in the screenshot below. Now the fun part starts :)
- In this console, click on the button of “Launch Instance”.
-
- Once you click this, a pop-up window will come that will guide you through the setup process. Just keep following the steps that I mention here closely, and you will be all set.
- The first step here is to choose AMI or Amazon Machine Image that you want to install on your server. In simple terms, you basically choose the OS. However, there are lot of customized images available here which come with other software also pre-configured. In our case, we are going to install WordPress, so we’ll use an image that is customized for WordPress. I chose a Bitnami WordPress image for this, as that is the most simple to install (IMHO). To see which image you need, go to the Bitnami link that I posted earlier, and scroll to the bottom of page. It will show images for latest version of WordPress. I am writing this article at the time when 3.0.5 is the latest version. So, I chose Bitnami image “ami-76bb481f”. Note: choose the image version that mentions “EBS” in “Root Device'” column.
-
- Just copy the image name, and go back to the Amazon EC2 pop-up window that we were working on. In the pop-up window, click on the “Community AMIs” tab, and enter the Bitnami image name that we copied above in the blank text box. Amazon will show AMI for that in a few seconds. Just click on “Select” button with the AMI.
-
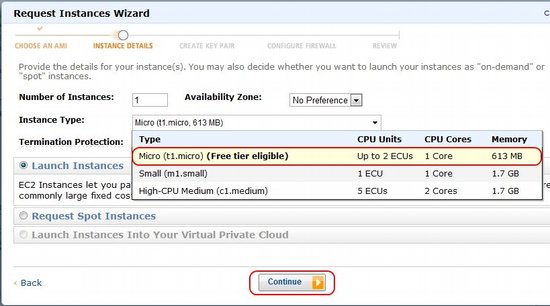
- In the next step, we need to choose the Instance type. This is a very important step, so be careful. In the Instance Type drop-down, select “Micro (t1.micro) (Free Tier Eligible)”. This is the only instance that is free. If you select any other instance, you’ll be charged for that (remember that Amazon already got your credit card information in the first step). Then click on “Continue”.
-
- You can leave next window as it is, and click on “Continue”.
- In the next window you are asked to create tags. I am really not sure what is it required for, but I still went ahead and made a key / value pair, just in case it is required in future.
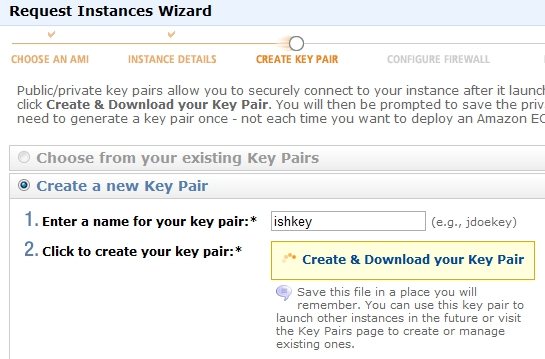
- In the next window, you will be prompted to create a key pair. This is required to get SSH access to your instance. So, provide any name for your key pair, and then download it.
-
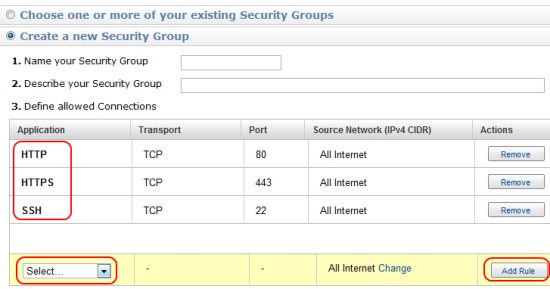
- The next step is Configure Firewall. Do not go with Default configuration. Instead, click on radio button for “Create a New Security Group”. From the drop-down box at bottom, select options of “HTTP”, “HTTPS”, and “SSH”. After selecting every option, click on “Add Rule” button on the Right. This will allow you access to your instance. You will also need to provide a name for your Security Group. You can choose any name. Once you are done with this, click on “Continue”.
-
- Now you come to the last screen of setting up your instance. Just click on “Launch” at bottom of this screen.
- This will take you back to your Amazon EC2 console, and you will see your new server getting started there. It can take a couple of minutes for this new instance to launch.
- Once it has launched (the status column shows “running”), then just click anywhere on the row.
- This will show description of the instance at the bottom. In this scroll down, and you’ll come to a row that has “Public DNS”. On the right side of this, you will see a URL. Just copy this URL, and paste in your browser. Note: It might not work for a few minutes, but it will work after that.
- Now, you will see a Bitnami page. In this page, click on the WordPress link at the top, and you will see your WordPress blog running!
- To login to your WordPress blog, you need to append “/wp-admin” at end of the URL on which you see your Wordpres blog. Default username and password for Bitnami is: user/bitnami
- Now you’ll be in WordPress admin area, and can do anything; like install themes or plugins, and create new posts.
This is your free WordPress blog. You will immediately notice what a great performance you get by using Amazon EC2. It is quite hard to believe that all of it is completely free. Here is the free WordPress blog that I setup using the steps that I mentioned above: http://ec2-50-17-71-122.compute-1.amazonaws.com/wordpress/
Now, it is a good time for me to admit that I am not a Linux expert; so if anything doesn’t goes as per what I have mentioned above, I would most probably not have a clue that what might have gone wrong. However, I did try these steps multiple times, and they always worked. Also, I have not mentioned that how can you change the ugly looking URL to your own domain. I think some sort of CNAME setting would take care of that, but I am feeling too sleepy at this time, to do any further research on that :)
Here are some more resources that you might find useful:
Link 1: A similar guide as above from Bitnami
Link 2: Scroll a bit down in this article to see how to get SSH access to your free WordPress blog.
Link 3: This article explains how to migrate your existing WordPress blog to this Amazon EC2 instance.


