Most of us use more than one E-mail service, or more specifically, more than one E-mail address these days. We may have one E-mail address for work, one for personal communication, and so on. While not entirely cumbersome, sometimes, logging into multiple E-mail services one by one just to check (and respond to) your E-mail can get tedious, especially if you deal with a lot of E-mail communications on a daily basis.
Well, Guess what? There are ways to get around that. In this multi part article series, ILFS will be explaining how to manage your multiple E-mail accounts from the Webmail UI of a single E-mail provider of your choice. And, it’s only fitting to start off with the largest free E-mail service, GMAIL. So without further ado, let’s get to business.
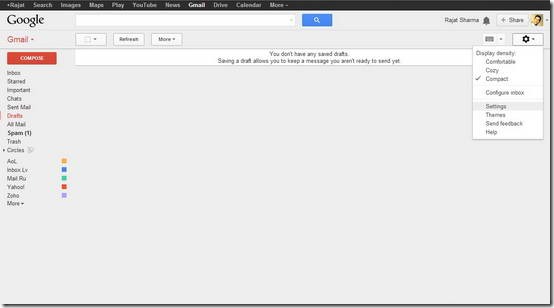
STEP 1: Login to your Gmail account, navigate to the settings icon (gear), and select settings from the drop-down menu.
STEP 2: Once in the settings menu, click the “Accounts” tab. Head over to the section that says “Check Mail from other accounts using POP3”. Click “Add a POP3 Mail Account you Own”.
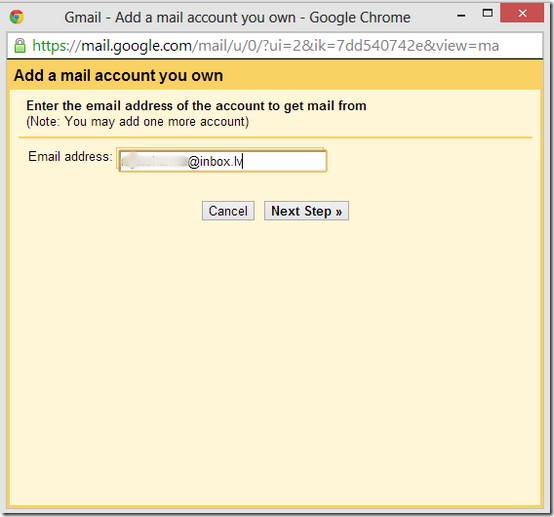
STEP 3: A Small window will pop-up, asking you to enter the e-mail address that you want to be checked using Gmail. Enter the e-mail and hit “Next Step”.
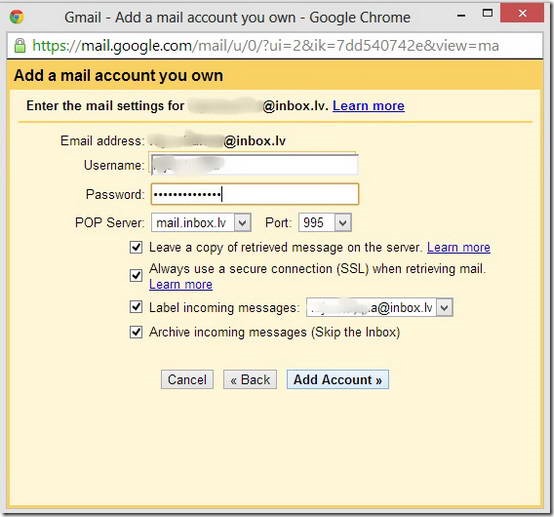
STEP 4: Gmail will autodetect the incoming and outgoing server settings. At this point enter the password for that e-mail account into the password field. For the options that are displayed underneath, check them based on the explanations below. However, I would suggest checking all four of them.
- Leave a copy of retrieved message on the server: CHECK THIS (unchecking this would delete the E-mail from your target E-mail provider’s inbox once they have been pulled into G-mail)
- Always use SSL when retrieving mail: DEFINITELY CHECK THIS, AS THIS ENSURES YOUR E-MAIL IS FETCHED IN A SECURE AND ENCRYPTED FORM FROM THE TARGET E-MAIL PROVIDER’S SERVERS (See also – HTTP vs. HTTPS)
- Label incoming messages: CHECK THIS (G-mail would assign a default label to the pulled E-mail, which is just the name of the target E-mail address, it can be changed later)
- Archive incoming messages: OPTIONAL (Checking this would make sure that the E-mail pulled from the other E-mail provider’s servers doesn’t land in your inbox. Rather it gets archived, and can be accessed via the corresponding label.
STEP 5: In the next step, Gmail will notify you that your e-mail account has been successfully added. Additionally, you will be given an option to send and e-mail from your target e-mail address via Gmail’s web UI. This is a very handy feature, as it completely eliminates the need to check your other e-mail account.
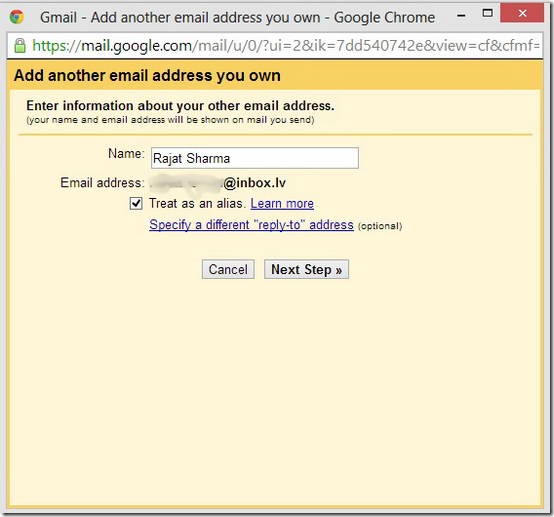
Click the radio button saying, “I Want to be able to send e-mail as [email protected] and Hit “NEXT STEP”. This screen would allow you to change sender name as it would appear to the recipient, and the option to use this e-mail address as an alias for Gmail or not. For all intents and purposes, leave the options as they are, and hit “NEXT STEP”.
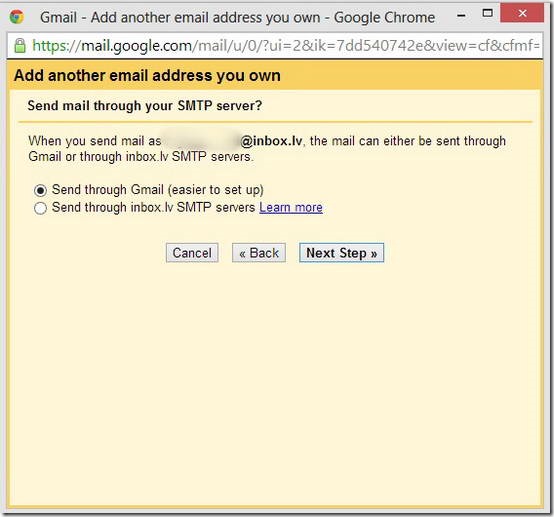
STEP 6: Almost there. The next screen would give you the option to either send the e-mail by routing it through Gmail’s servers or the source e-mail providers servers. Leave it as default, as the other option requires delving into unnecessary settings that don’t matter for casual users.
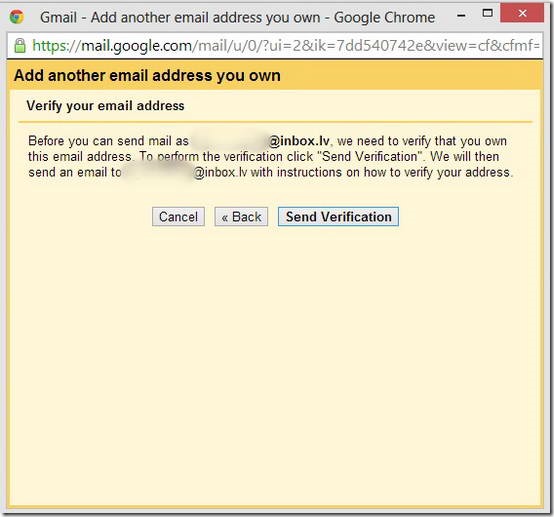
STEP 7: The final screen will explain you that Gmail is now going to send a verification e-mail to your other e-mail address to verify that you “Own” that address. Once you click on “Send Verification”, you need to open up another tab and login to your other e-mail address to check for the verification e-mail from Gmail (it generally arrives almost instantly).
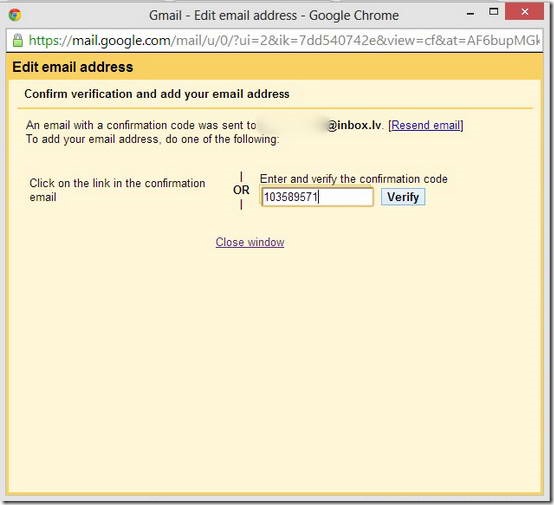
STEP 8: Finally, you’ll have to enter the confirmation code that you’ll receive in the verification e-mail from Gmail. Just copy it into the box and click “VERIFY”. Alternatively, you can also click the link inside the verification e-mail.
STEP 9: You’re all set. From now on, Gmail will periodically check your e-mail address for incoming mail and will deliver it to your inbox or directly archive it under its label.
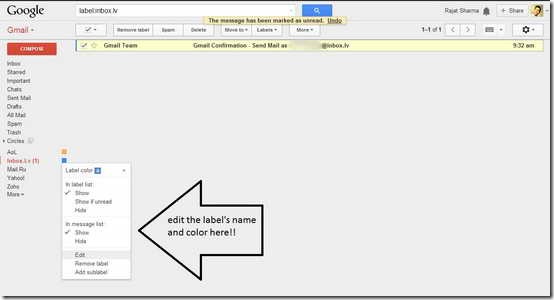
As a final optional step, you can give a specific color to the label and rename it to a shorter name by right clicking the small dropdown box next to it, in the list of labels, in the left pane of the webmail UI.
Congratulations!! You’ve just removed the need to login to another E-mail account of yours altogether, courtesy of this nifty little feature of Gmail, which is known as the “POP Fetcher”
Note: You can add up to 5 distinct E-mail accounts to Gmail so that you can manage a total of 6 E-mail accounts (1 Gmail + 5 Others) from a single Webmail UI. While composing an E-mail, just select the E-mail address that you want to send the E-mail from, using the dropdown arrow in the “FROM” field.
Conclusion
With almost every E-mail user maintaining multiple E-mail accounts for different purposes, it gets cumbersome to login to each and every single one of them to just check and send E-mail. This is where POP fetcher feature of Gmail comes into play, saving you unnecessary logins to multiple webmail portals.
Almost all other major E-mail providers like Outlook, Yahoo! have a similar feature. I’ll be discussing them in the subsequent articles of this series.
Do you guys already use the POP fetcher in G-mail? If yes, how many E-mail accounts do you manage through it? And if no, do you plan on using it now? Do let me know your thoughts in the comments below.
