This tutorial covers how to hide specific pages in Settings app of Windows 10. Settings app contains many important menus (like Display, Windows Updates, Storage, Lock Screen, Themes, etc.) under which a lot of pages are present. These pages help to enable night mode, change screen resolution, set desktop background, manage taskbar settings, enable or disable Game DVR, check updates, and manage other options by accessing those pages. So, if you don’t want someone to change settings adjusted by you, then hiding pages of your choice in Windows 10 Settings app is a good trick.
To hide or remove specific pages in Settings app of Windows 10, you need to use any of the two built-in features of Windows 10: Local Group Policy and Registry. In this tutorial, both of these methods are covered with all steps to help you hide specific pages in Settings app of Windows 10.
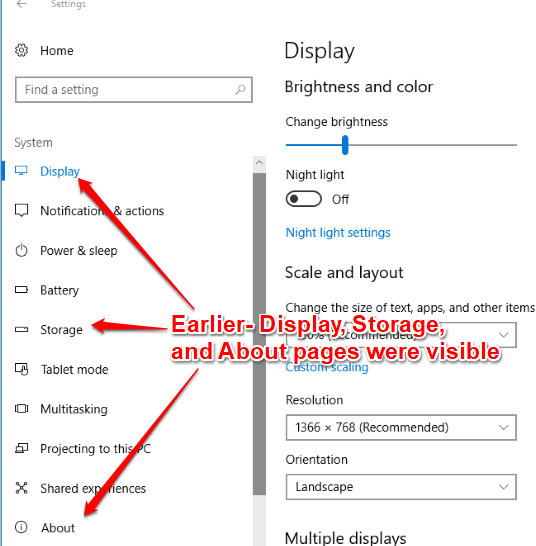
In the screenshot above, you can see that earlier all the pages of ‘System’ category were visible with their options. Now, check the screenshot visible below. You can see that later, I hide Display, Notifications & actions, and Storage pages.
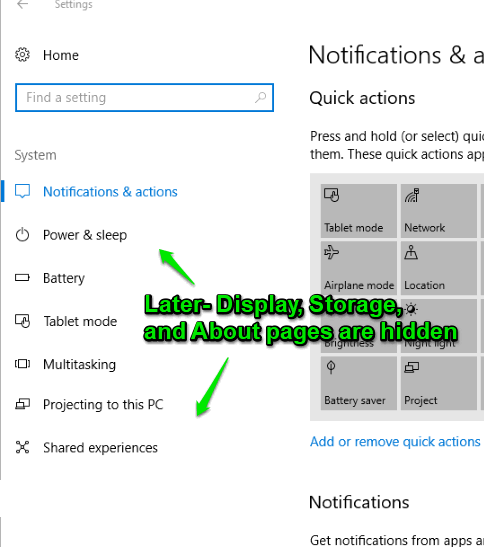
As you hide some pages, all the options of those pages are also hidden automatically.
Method 1: How To Hide Specific Pages In Settings App of Windows 10 Using Local Group Policy
If you are running Windows 10 Home, then Group Policy won’t be there. In that case, you can either use method 2 or simply install Group Policy to try this method.
Step 1: Click in the Search box, write ‘gpedit‘, and then you can open Local Group Policy.

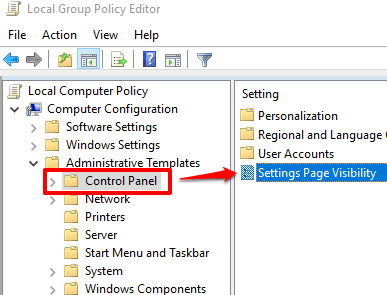
Step 2: Open Computer Configuration menu in Group Policy → explore the Administrative Templates folder → and you will see Control Panel folder. Select it and then a “Settings Page Visibility” option will appear on the right side. Double-click on it.
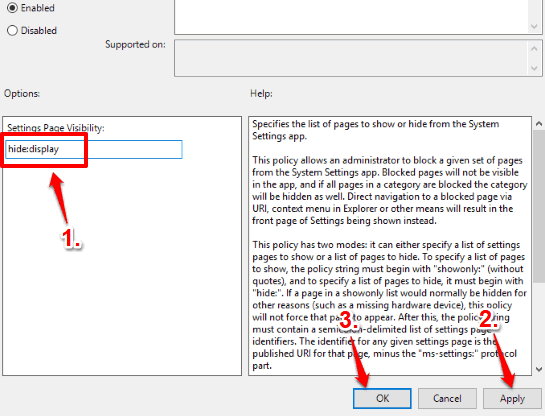
Step 3: When Settings Page Visibility window is opened, "Disabled", "Not Configured", and "Enabled" options will visible. Click Enabled and Settings Page Visibility box will activate.
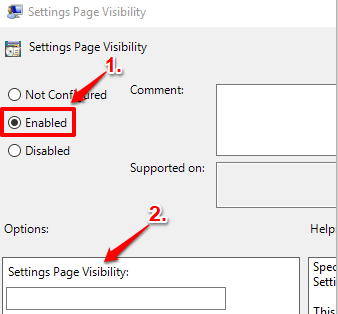
Step 4: In Settings Page Visibility box, you need to add PageURI that you want to hide. For example, if you want to hide “Display” page of System category, then you have to enter “hide:display” in that box. Save your changes and then open Settings app. You will notice that Display page is hidden now.
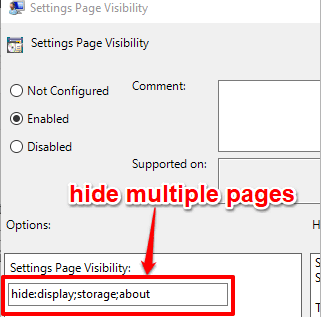
To hide multiple pages of Settings app, you would need to enter “hide:display;storage;about“. Replace “display, storage, and about” with the pages of your choice.
In case you have to hide a lot of pages, then instead of entering hide command, you can add ‘showonly‘ command and enter those pages that you want to show. For example, if you want to show only display page which is present in System category of Settings app, then add “showonly:display” in Settings Page Visibility box.
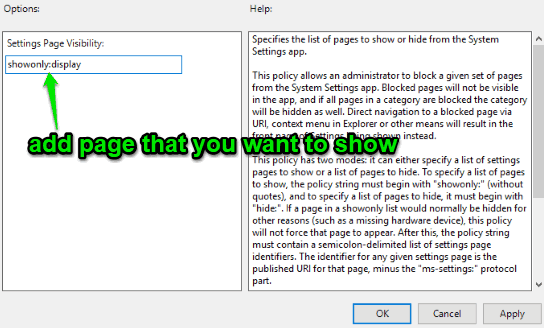
This will hide rest of the pages as well as categories under Settings app. Only the page that you have added will visible in Settings app of Windows 10.
Step 5: To show Settings pages again, you can follow step 1 to step 3. After that, use ‘Not Configured‘ option and save it.
When you will open Settings app and that particular category whose pages were hidden, you will see that all those pages are visible again.
Method 2: How To Hide Specific Pages In Settings App of Windows 10 Using Registry
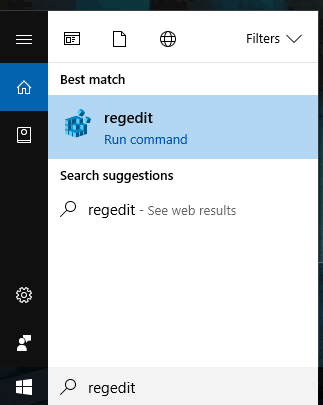
Step 1: Click on Windows 10 Search box, then enter ‘regedit‘ in that box, and start Registry Editor.
Step 2: In Windows 10 Registry, select ‘Explorer‘ key. This key is available under the main HKEY_LOCAL_MACHINE key. You need to use this path to access Explorer key: HKEY_LOCAL_MACHINE →then SOFTWARE →expand Microsoft →then Windows →expand CurrentVersion →then Policies → and then you can select Explorer key.
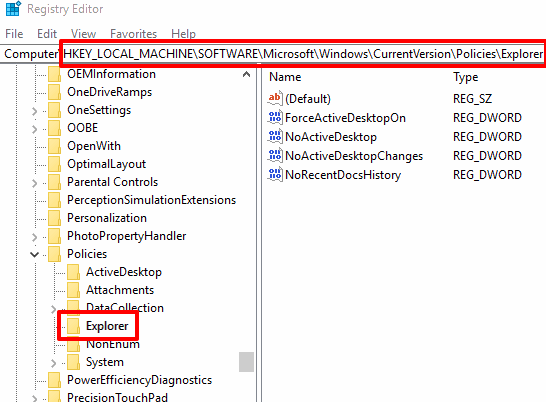
Step 3: Create a String Value (right-click on the side in an empty area → New → String Value). When this value is created, rename it as “SettingsPageVisibility“.
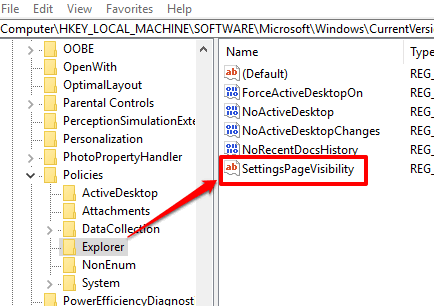
Step 4: Double-click ‘SettingsPageVisibility’ String value and then enter the page name in value data box of this value. So, you need to enter “hide:page name“. For example, if you have to hide Display page, then enter “hide:display”.
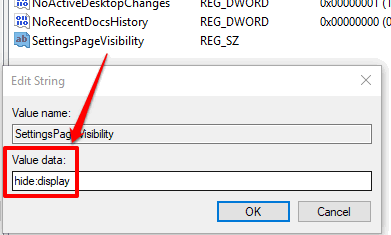
Use OK button and then open Settings app of Windows 10. You will see that particular page is hidden now.
Step 5: To hide multiple pages in Settings app of Windows 10, you have to enter “hide:pagename;pagename;pagename etc.” in value data of SettingsPageVisibility String value. For example, you need to enter “hide:display:storage:about” to hide these three pages.

Use OK and save it. This will hide all those pages in Settings of Windows 10.
To show all pages again, you can simply delete “SettingsPageVisibility” string value.
Here are other useful tutorials for you: How To Delete Previous Version of Windows Using Settings App In Windows 10 and How To Add Settings To Windows 10 Context Menu.
The Conclusion:
If you share your PC with others and want to avoid any changes in the options set by you under pages of Windows 10 Setting, then hiding those pages is useful. For that, these two methods are just awesome. I personally prefer Local Group Policy because it is a bit easier than Registry Editor method. Try these methods yourself and hide specific pages of your choice in Settings app of Windows 10.