Dropify is a social file sharing service, whose free plan allows you to upload and share 3 files up to 50MB in size. This isn’t particularly impressive, but what is impressive is that Dropify allows you to integrate file sharing with social networking, most notably Facebook. By connecting uploaded files with Facebook you get download stats, like stats, viral reach info and much more right from your Dropify dashboard.
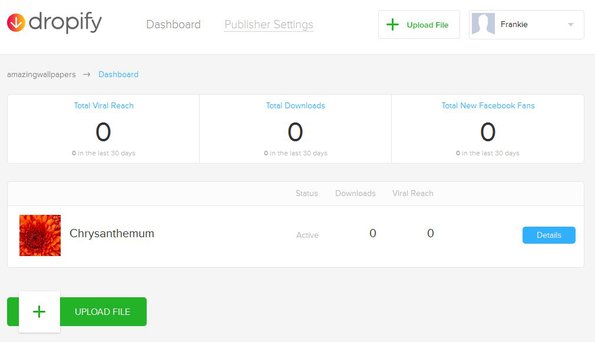
This is how overview over uploaded Dropify files inside the Dashboard looks like. Notice the overall stats which can be seen at the top and the individual file stats available down below. Sharing files requires you to connect your Facebook account, so that uploads can be shared directly to your timeline and also to pages that you’re administrating.
Similar software: Shre.io, SparleShare.
Sharing via other social networks is also possible, via link, just like you do with every other file sharing service.
Example of a Facebook timeline post of an upload that we created with Dropify can be seen on the image above. When people click on the link here, they’re gonna be brought to the download page or “Drop” page of Dropify from where the files can be downloaded.
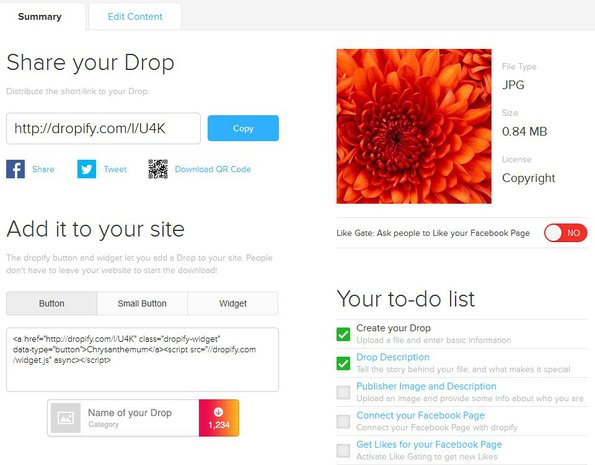
URL address that you see in the URL address field is the Dropfiy ID, which is created during the first file upload and stays the same for every file that you upload, so be mindful when choosing it. This is the download page or a “Drop” page that we mentioned from where your files can be downloaded.
Key features of Dropfiy free social file sharing service are:
- Easy to use – setup everything and share files in just a few steps
- Facebook download popularity stats – downloads, likes, viral reach, etc.
- Allows you to add Twitter follow buttons to your “Drops”
- Share buttons and widgets for your website – via embed code
- Allows you to upload and share images, video, documents, audio
- Free accounts are limited to 3 file uploads with maximum size of 50MB
How to upload and share files with Dropify free social file sharing service
Up until now we covered how everything looks after files are uploaded, but not the actual upload. To upload files, open up the Dropfiy homepage and click on File Upload.
If this is your first file upload, you’ll have to login with your Facebook account and setup the Dropify ID, an address where your “Drops” go. On the image above you can see setup of an uploaded file, which is the last step of the setup. Here you can find the URL address of your “Drop”, embed codes for your site, or share it directly via Facebook and Twitter buttons or the QR codes that you see in the left corner.
Conclusion
Dropify is an interesting blend of file sharing and social networking, which gives you a lot of controls over how your files are being shared via the most popular social network. A lot of other features are available than the ones that we mentioned above, so make sure to give this free social file sharing service a try and see how it goes.


