ScreenConnect is a free web-based remote desktop access and screen capturing software that is a free TeamViewer alternative. It provides a very secure way to access a desktop remotely as it uses 256-bit end-to-end encryption. It also offers many other handy options while controlling a PC remotely like you can annotate on guest/client’s screen, capture a screenshot any time or even record a video of guest’s desktop as AVI file. You can also transfer files to guest’s desktop and send support messages to your client. In short, it is a quite useful remote desktop access software that you can use professionally to offer remote IT support to clients.
Note: ScreenConnect is only free for personal and non-commercial use.

There are plenty of other free TeamViewer alternatives but what separates it from the crowd is that it is highly secure as it uses 256-bit end to end encryption and comes bundled with other handy features that you can use to provide full technical support to your customers, friends, etc.
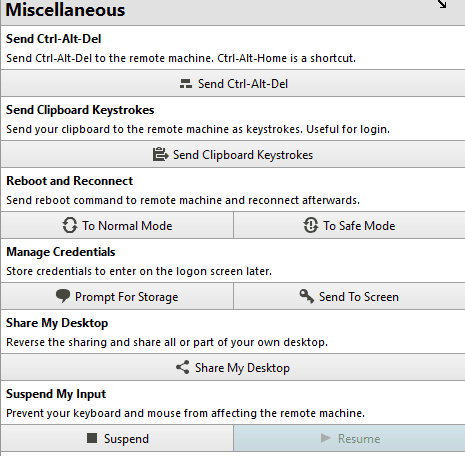
It allows you to capture screenshots, record screen of client’s desktop and even draw on it. Apart from that, you can even block inputs from your client’s desktop and send commands directly to a remote desktop. You can even send a command to reboot a remote PC and reconnect afterward, send clipboard keystrokes, etc.
How to remotely access desktop using this free TeamViewer alternative:
In order to use ScreenConnect to remotely access a desktop, you have to first create a free account on it from here. After that, create a session for your client/friend. After that, simply invite your client to join a session and access his/her desktop remotely. The best part is that it will provide you a custom URL of your profile that your client can access to view your actively created sessions and join them but remember you and your client have to be logged in to ScreenConnect at the same time in order to facilitate a remote support session.
Let’s see the steps in a more detail and see how to remotely access desktop using ScreenConnect:
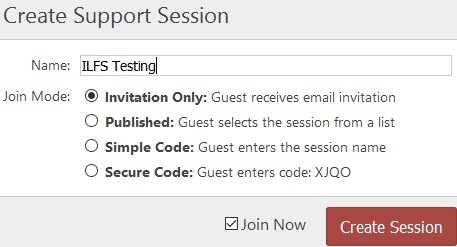
Create a remote support session: After logging into ScreenConnect, you first have to create a remote session and then invite your client to join it. To create a remote support session, click on “Create +” button that appears on its interface and then specify a name and mode of invitation.

As per your support session join mode, your clients can join the created remote support session. An easier way would be to create a Published session and share your profile info with clients. Your client can then simply visit your profile and select the appropriate remote session created for him/her. If you need security then choose the Join mode other than Published.
Well during this process both you will be prompted to download an application file that will be automatically installed on your system. Type of the application file will depend on your OS, in my case, it was an EXE file (Windows). After its application file is installed, it will then automatically open and wait for your guest to join. Your guest will also be prompted to install its application file and when your client will execute this application file then you will automatically see his/her desktop screen in your ScreenConnect application window, as shown in the main screenshot. You can control it just like any other remote desktop access software.
As I have already mentioned about some of the tasks that you can perform additionally while you are controlling a desktop remotely, let’s see all of them:
Send commands to remote desktop:
On its application window, you will see a toolbar from where you can directly perform additional tasks such as sending commands to remote desktop, annotate guest desktop screen, transfer files. You can send remote commands and clipboard keystrokes from its Miscellaneous option. I tested its command to power off a remote desktop and see if it reconnects with ScreeConnect or not. For me, it worked quite fine but there were some lags which are quite obvious. There are many options that you can check out and perform on a remotely accessed desktop. For example, you can send Ctrl-Alt-Del, send clipboard as keystrokes, etc. to remote desktop.

Annotate on guest desktop:
To annotate guest’s desktop screen, select annotation tool and thickness from its Annotation menu. You can select an annotation mode as per your requirement like Invisible, View only, etc. In its invisible mode, all annotation will disappear from guest’s desktop.

Transfer files to remote desktop:
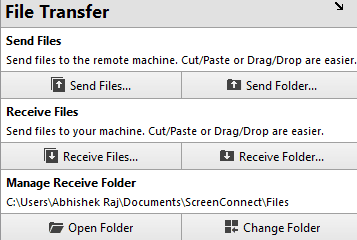
You can simply transfer files to remote desktop by dragging and dropping them into guest’s desktop on ScreenConnect application window. Alternatively, you can also select to send or receive files from a remote desktop from its File Transfer menu option, as shown in the screenshot below.
 Verdict:
ScreenConnect is a free TeamViewer alternative to remotely access a desktop. I will definitely recommend it as it offers a very secure way to remotely access a PC and other handy features such as screen annotation, capturing, file transfer, etc.
Start using ScreenConnect from here.