In this blog post, you will read about how to remove white, black, transparent spaces from images online. To do so, you can use an online tool called Trimmy. It is quite simple and easy to use. All you need to upload images that have white, black or transparent backgrounds. You can specify the color of the image which you want to remove. For example, if you have an image with extra black space. Then, after uploading that image, you can choose the black color to remove. Thereafter, this tool trims that extra part and provide you an image with no extra space.
It is pretty simple to do as you don’t need to select a specific area to crop. The tool does it all for you. Furthermore, the tool supports input file with JPEG, GIF, PNG, JPG, file types. It also lets you select the output file type. You can choose a JPG or PNG file format before downloading the image file. The output image does not spoil the quality of an original image.
As shown in the image below, the left image has extra black space and after using the tool it trims that black space and provides you the main object visible in the image. I have also covered an article where you can redact images in just one click.

Remove White, Black, Transparent Spaces From Images Online
To make your task easy, you can use the online tool named Trimmy. As the tool name suggests, it trims the image that has an extra background. The background can be considered as extra space. It can be the white, black, and transparent space.
When you open the link, you will see the option titled Get Started. You can click that to view the interface. Then, in just a few simple steps, you can trim the images. The steps are as follow:
Step 1: Firstly, you have to upload the image from your computer. You can add 10 image files maximum. The supported image formats are JPEG, GIF, JPG, and PNG. Then, press Continue.

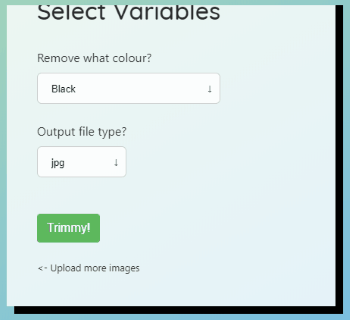
Step 2: In this second step, you have to mention what color you want to remove from the image. You can trim the white, black, and the transparent space around the image.
If you upload the image with white space and selecting a black color to remove, then the tool will not provide you output. Because the image won’t be having black space. So, make sure that you are choosing the right color that your image has.
Step 3: Thirdly, you can decide that in what format you want to save the image. The tool lets you select JPG or PNG as your output image file. Then, whatever the format you choose, the image gets saved in that specific file format. Then, go click on Trimmy.

After following these steps, you will see the Download button which you can click. However, you cannot see the output in the preview mode. But after downloading the image you will be liking the result. The tool trims the white or extra space so perfectly.
In brief
Trimmy is a great tool to quickly trim the image. You don’t need to crop or select the area from the image to cut it out. All you need to upload image, select color, output file type and download the image. It shows the output of the trimmed image after saving the image file. Also, you can trim 10 images together and save images in a zip file with good output.