Storj is a decentralized, distributed and end to end encrypted cloud storage for those who are concerned about their privacy. This cloud storage is very different from the traditional ones. The decentralization part of this cloud storage makes it unable to raid, shut down, and monitor. Your files will remain safe with it and only you will have the access to them. Not only is this, but the data keeping feature of this cloud storage is very different. It first encrypts your files and then splits them in number of chunks. Later on, it stores those chunks in the computers of Storj network. However, I would like to clarify here that Storj is not completely free. It gives you 12 months to use it for free by allotting 25GB bandwidth per month. For further using it, you will have to spend some money and it actually works like currency exchange manner that I will explain later.
Understanding Storj before actually using it will be wise enough. Storj is basically a protocol, crypto currency, and more importantly a group of decentralized applications. Apart from cloud storage, it also serves a purpose of end to end currency system like Bitcoin. You can rent your hard disk to other user and charge him accordingly. This is the key idea of file storage on Storj. Each of your file is present on the hard drive of other user in encrypted form. Also, in addition to the encryption, it also shreds your file. And those shredded parts can be requested by you and you will be charged for it. But, in case the user having your files is offline, then there will be no charge. And if you are offline and the other user has your files, then he has right to drop them.

How to use Storj as a Cloud Storage?
The main purpose of Storj is the secure cloud storage. But, the process of using Storj to save your files is very different from what you see in other cloud services. It has a web interface but it can only be used to create buckets and track your balance. To use Storj for downloading and uploading files, you will have to use desktop clients. And you will be surprised to know that now, FileZilla provides Storj as a protocol, in its software. You can connect to your Storj bucket with the help of FileZilla to upload and download files. And not only this, there is another GUI based desktop client available for it that you can use. In the following sections, I will explain about both.
How to Upload, Download Files from Storj using FileZilla?
You may have heard about FileZilla before. FileZilla is one of the best FTP software for Windows that you can use. It supports various protocols like FTP, SFTP, etc. And now it supports Storj protocol natively. You use it to transfer files to and from your Storj bucket very easily. If you have used this software for FTP, then in the same way you can use it for Storj.
Here are a few steps which will help you upload, download files from Storj.
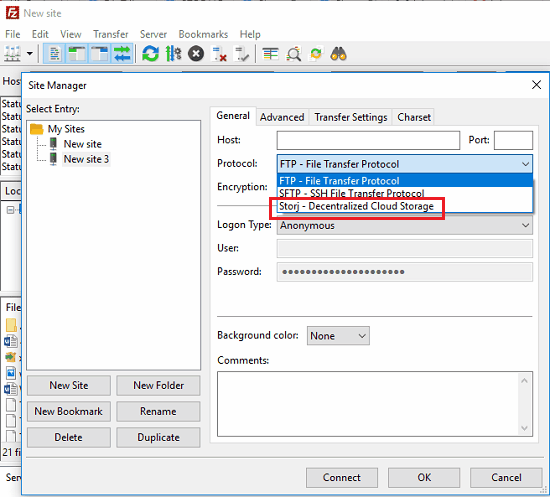
Step 1: Open FileZilla and then add your Storj bucket in it. To do this, add a new site from File > Site Manager. After that click on New Site button and fill out various details.
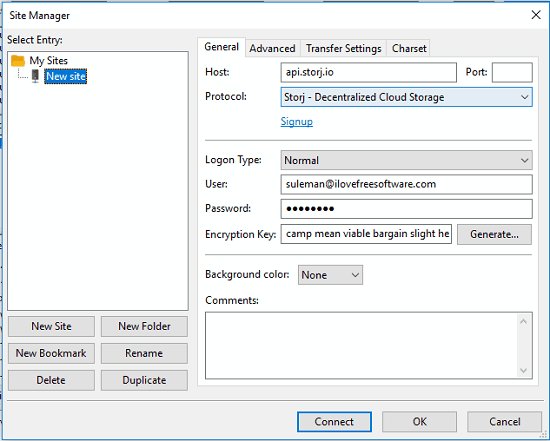
Step 2: In the Host field, enter the host URL of Storj that is “api.storj.io”. Next, in the User field, specify the email address that you used to sign up on Storj. And in the password field, specify the Storj’s account password.
Step 3: After you have connected to your bucket, you can upload and download files.
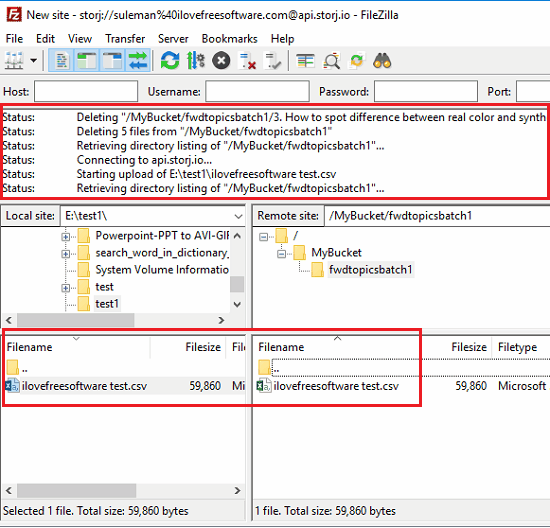
With the help of these steps you will be able to download and upload files to Storj using FileZilla. And you will find it very easy to do that.
How to Upload, Download Files from Storj using Storj’s Client?
There is an open source Storj’s client available that you can use to transfer files to and from Storj’s bucket. The client is a cross-platform software and you can use it to see your account details, your files, and track your bandwidth usage and balance.
The Storj’s client is a portable software that you can run from a USB flash drive. There is nothing you have to configure at your end to make it work. Just after downloading its package, unpack all files and execute the executable file. The interface of the software will show up.
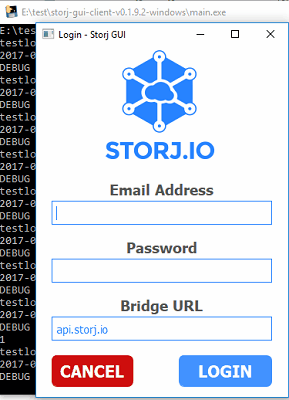
On the interface of the software, fill out your login credentials and sign in. After successful sign up it will show you your files. In the bucket you can see your files and you can download them or upload new ones here. With the help of the software, you can easily upload and download files to your PC. Also, you can keep track of your account information such as bandwidth usage which is quite important in case of Storj.
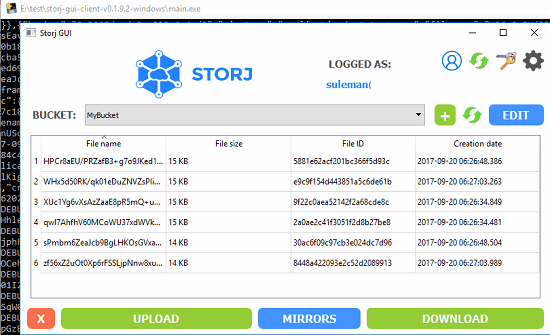
This official client of Storj is not very intuitive, but does its job as promised. If you like to use this, then you can download this for free otherwise you can stick to FileZilla.
Final Thoughts:
There are a lot of popular cloud storage services but they don’t offer the level of security as Storj does. At first, I thought, that Storj is like any other cloud service but then found it’s not and it is probably the best cloud storage for people who want to keep sensitive information remotely accessible to them. All the feature and other highlights I have discussed above. Also, usage guide that I have given above will help you getting started with it quickly.