This tutorial explains how to disable Start menu settings in Windows 10. For doing this, you can use two native features of Windows 10. These are: Local Group Policy and Registry Editor window. When Start menu settings are disabled, you won’t be able to use Start menu options available under Settings app of Windows 10. It includes options to show/hide recently added apps, most used apps, use Start menu in full screen, add documents, music, network folder in Start menu, etc. All these options are disabled after doing these changes, but you can enable them back whenever you want.
In the screenshot below, the difference is visible quite clearly. Earlier, Start menu options were visible and could be turned on/off easily, but after using these two native features, Start menu options present under Settings app are disabled.
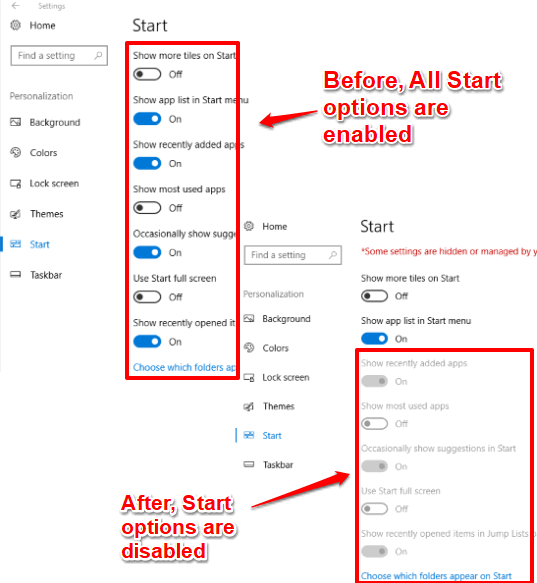
Note: Disabling Start menu settings in Windows 10 won’t disable hide or show more tiles on Start and show or hide apps list options for Start menu. The rest of the options are disabled.
Method 1: How To Disable Start menu Settings In Windows 10 Using The Group Policy Editor Window
Step 1: Click on Search box and write gpedit.msc. By doing this, you can open Group Policy Editor.
Step 2: When Group Policy is started:
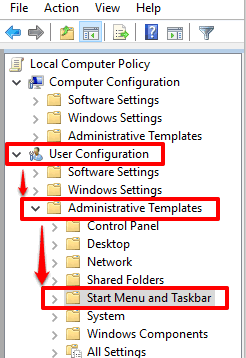
- Double-click the ‘User Configuration‘ menu. This will help you access “Administrative Templates“.
- Now this time, double-click Administrative Templates folder. When you have done this, you will see “Start Menu and Taskbar” folder. Click on that folder.
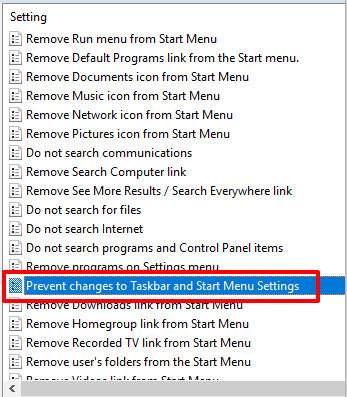
Step 3: At the right pane, you will see some options. Carefully scroll the list of options, find “Prevent changes to Taskbar and Start Menu Settings” option, and double-click on it.
Step 4: A new window will open. In that window, the top left side has 3 options: Not Configured, Enabled, and Disabled. By default, ‘Not Configured’ option is selected, which means Start menu options in Settings app can be accessed. You have to select Disabled option and save changes to disable Start menu settings.
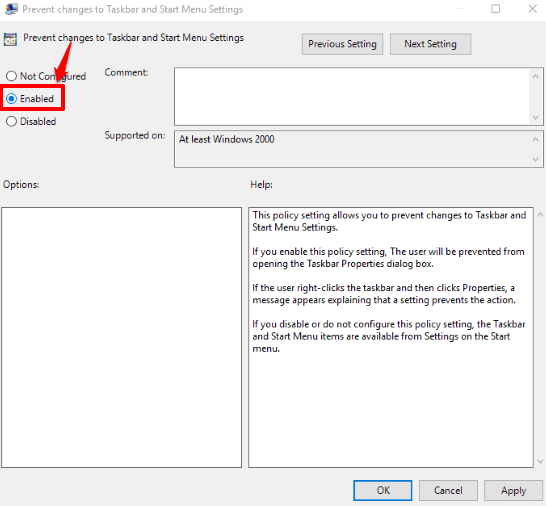
Now access Start options in Settings app and you will see that all options are disabled.
You can enable all options again by selecting Not Configured option in that big window (mentioned in step 4) and saving the settings.
Method 2: How To Disable Start menu Settings In Windows 10 Using Registry Editor Window
Step 1: Start with opening the Registry Editor. Type ‘regedit‘ in Search or Run Command and use Enter key to open Registry Editor window.
Step 2: Now you have to expand some keys so that you can access Explorer key. Here is what you have to do: HEKY_CURRENT_USER → Software → Microsoft → Windows → CurrentVersion → Policies → Explorer.
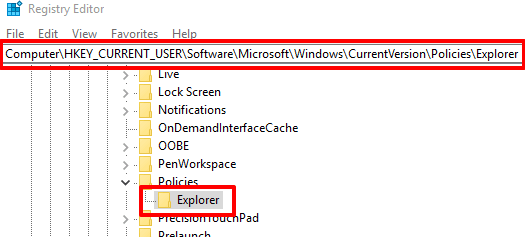
Step 3: At the right pane of Explorer key, create a DWORD value and its name must be “NoSetTaskbar“. When this value is generated, double-click it, and then put ‘1’ in Value data box. Press OK to save it.
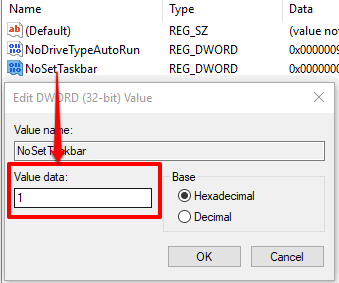
After this, PC or File Explorer restart is required. When it is done, you will see that all Start menu settings are disabled.
To gain access to all Start menu settings in Settings app of Windows 10, you can add ‘0’ in the Value data box of NoSetTaskbar DWORD value.
The Verdict:
When you have set Start menu options and don’t want anyone else to change it, then disabling Start menu settings in Windows 10 would be helpful. And for doing that, these two methods will come in handy. I like Group Policy method because it is straightforward. Registry Editor method is also simple but needs some extra care while following the steps.