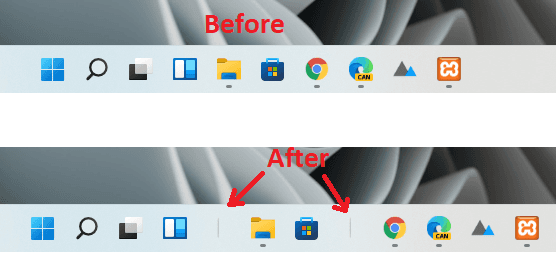
This tutorial explains how to add a separator between Taskbar items in Windows 11. To do this, there is a third-party app called “Separator” you can use to do it with ease. With the help of this tiny application, you can add a divider between taskbar items in a few clicks. By adding a divider in Taskbar, you will be able to categorize similar application icons in Taskbar.
In the Windows 11 Taskbar, all the icons of applications and utilities are closely placed. But if you want to categorize them, then one of the best options is to add a separator or a divider between them. Since, Windows 11 doesn’t offer this functionality natively, you can take help of an external tool. And in this post, I have mentioned a step-by-guide to do it.

How to Add Separator Between Taskbar Items in Windows 11?
- Download Separator.exe file from here and it comes inside a .7z archive. You will need 7-Zip to extract it to some location on your PC.
- Now, you just right-click on the EXE file and slide it slightly to have a short context menu appear. Select “Create shortcuts here” option.
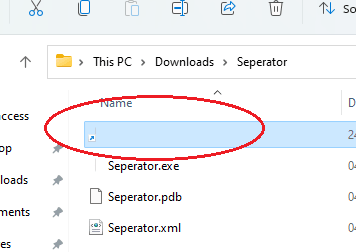
- Rename the generated shortcut file. Select the shortcut icon and press F2. Type a new name as “0160” while holding down the Alt key. This will help you give it a blank as filename.

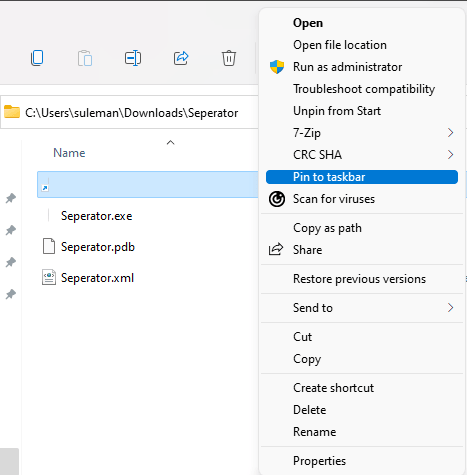
- Pin it to the Taskbar by selecting “Pin to taskbar” option from the right-click menu.

- You can now drag it and place it anywhere on the Taskbar. You can place it in between icons to separate them. To add one more divider or separator, just again right-click on the shortcut file and pin it to Taskbar again.

Here’s the complete video tutorial for the same.
This way, you can add as many dividers as possible on Taskbar in Windows 11.
Closing thoughts:
If you are a desktop customization enthusiast, then you will like the simple tool I have mentioned here. Just create a shortcut file and pin it to taskbar to have a divider for separating Taskbar icons. This is a simple and effective way to categorize similar pinned programs in Windows 11 Taskbar, and we have covered a similar topic for Windows 10 as well.