This tutorial explains how to add an image watermark on desktop screen that remains always on top. There are multiple benefits of it. For example, it can be handy when you are recording desktop screen and want to display the logo of your own company or product in the recording. Or, you are doing some screen broadcasting and want to have your watermark placed on desktop. I have covered two different software using which you can show an image watermark on the desktop screen that will remain always on top of other windows. The best part is that you will be able to set the watermark opacity as per your wish. So, your image watermark will look more realistic.
See the screenshot visible below. You can see an image watermark visible on top other windows on my desktop screen. You can also do this.

Let’s start with the first method.
Method 1: Show an Image Watermark on Desktop Screen that Remains Always On Top Using A Free Frameless Image Viewer
This is actually a command line frameless image viewer that helps to show images without borders on the desktop screen. However, it can be used to show an image watermark on the desktop screen. You can keep that watermark always on top as well as set the image watermark opacity. Its full review is here. To learn how to use this command line tool to show the image watermark on the desktop screen, follow these steps:
Step 1: Grab the zip file of this software and extract it. You will find a Frameless named application file in the extracted folder.
Step 2: Open Command Prompt and drop that Frameless application.

Step 3: Now to add an image watermark with adjusted opacity on desktop screen and with always on top parameter, you need to provide the source path of the image with transparency value and always on the top parameter. So, your command would be: Frameless.exe “source path of image along with image extension (like PNG, JPG, etc.)” trans=0-255 aot=yes.
Here, trans=0-255 indicates transparency value (set any value between 0 to 255) and ‘aot=yes’ indicates that you want to put the image watermark always on top of other windows.

Execute the command and see the magic.
You will see image watermark with the opacity level set by you on the desktop screen. Here, the good thing is that you can also move that image watermark on any part of your desktop screen.
When you want to remove image watermark, right-click on it and select Exit option.
Method 2: Add An Image Watermark on Desktop Screen That Will Remain Always on Top Using A Free Overlap Wallpaper Software
Overlap Wallpaper software is another interesting method to add an image watermark on desktop screen with always on top feature. it is mainly developed to show a wallpaper on top of other windows on the desktop screen (full review can be found here), but I find it useful to put an image as watermark on the desktop screen. You can add a JPG, PNG, GIF, or BMP image, set position and opacity level, and enable the option to remain always on top. After that, the image watermark will visible on your desktop screen based on the set options. The best part of this software is that you will be able to preview the output before applying the changes. However, when the image watermark is set on the desktop screen, you won’t be able to move it. You have to access Settings again to change its position.
Step 1: Download and launch its portable application. After that, it will start running in the system tray.
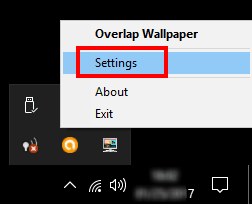
Step 2: Right-click its tray icon and click on Settings.

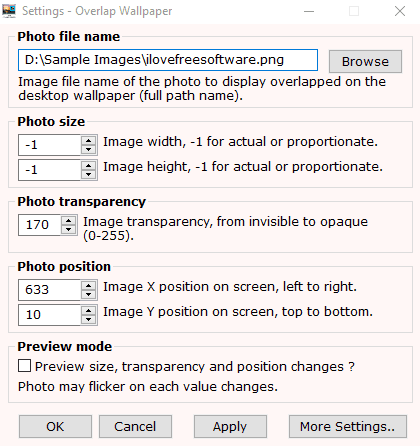
Step 3: The Settings window has self-explanatory options. You first need to add an image. After that, adjust photo size, transparency level, and position to display on the desktop screen.

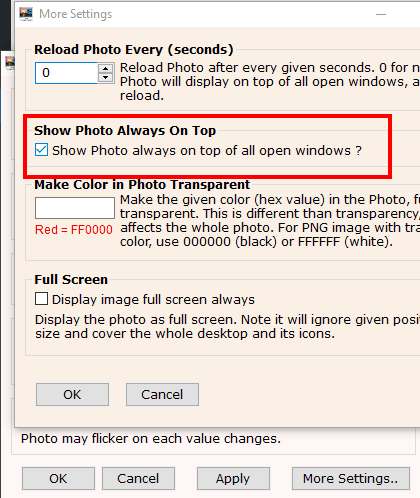
Step 4: You can enable preview option to see how the output looks. However, the work is not completed yet. You have to set image watermark position always on top. For this, click More Settings.. button. Another window will open in which you will see “Show Photo always on top of all open windows?” option. Enable that option and press OK to come back to the main Settings window.

Now press Apply and OK buttons to see the image watermark on the desktop screen.
The software is minimized back to the system tray. Now you can enjoy viewing the image watermark on the desktop screen which will remain always on top of other windows unless you close the software.
The Verdict:
Among these two methods, I prefer method 1. Even though it is a command line tool, using it is very simple. Also, the feature to move the image watermark on any part of the desktop screen makes it more useful. The 2nd method is also quite useful, but when image watermark position is fixed, you can’t move it around. Therefore, I find method 1 better than method 2.