This tutorial explains how to disable Game Bar in Windows 10. You can do this with three different options. You can use Settings app of Windows 10, Registry Editor, and Xbox app to disable Game Bar. Once the Game Bar is disabled, you won’t be able to record desktop and games and capture screenshots (though Windows 10 provides another built-in option to capture screenshots). You can also turn on Game Bar feature anytime you want.
The three methods that I covered here are very simple. To make it simpler, I have added every step for each of these methods using which you can disable Game Bar in Windows 10.

Let’s start with the first and my favorite method.
Method 1: How To Disable Game Bar In Windows 10 Using Modern Settings?
This is an easy method to disable Game Bar in Windows 10. We have to use Gaming menu available in Settings app or modern Settings of Windows 10. However, do note that this menu is introduced in Creators Update of Windows 10. If you don’t have this update yet, you won’t see this option. If you are using preview build of Windows 10 Creators Update, then this method can be used.
Step 1: This is a very simple step. Open modern Settings of Windows 10 using Search box or Start menu.
Step 2: Settings App will have a Gaming menu. Click on that menu.

Step 3: Now you will come under Game bar menu where you will see some options related to Game bar. You will also see “Record game clips, screenshots, and broadcast using Game bar” option which is already turned on. Just turn off that button.
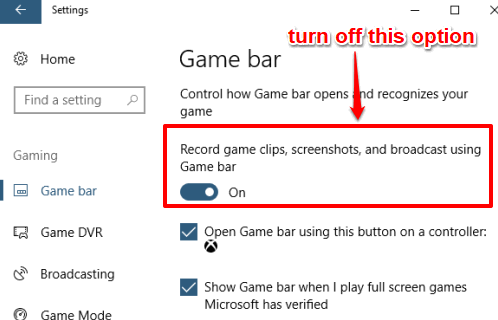
This will disable Game bar immediately.
You can turn on that option again to activate Game bar.
Method 2: How To Disable Game Bar In Windows 10 Using Xbox App?
This method does the same thing but using Xbox app.
Step 1: Type xbox in Search box and press Enter. It will open Xbox app. After that, you have to login to your Xbox account.
Step 2: Xbox app contains a left sidebar that remains in collapsed mode by default. You can expand that sidebar using the hamburger icon if you need. Now click on the Settings option available in that sidebar.
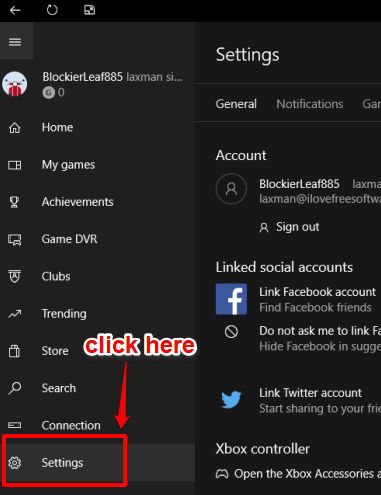
Step 3: Settings option has some menu tabs among which you need to access Game DVR tab. After accessing this tab, you will see that all the options that you find in Game bar menu in Settings app are also available in Game DVR tab. Among those options, you will see “Take screenshots using Game DVR” option. Turn off this option.
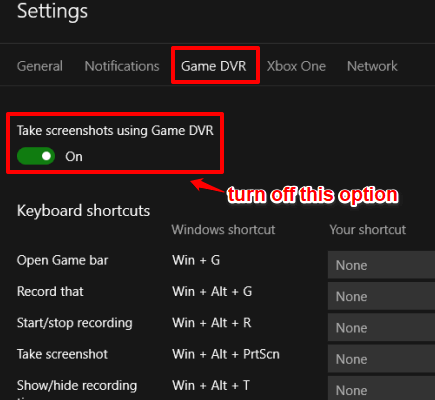
Now Game bar is disabled. You can try using Win+G hotkey, but you will notice that Game bar is not opening.
If you want to access Game bar again, you can turn on Take screenshots using Game DVR option.
Method 3: How To Disable Game Bar In Windows 10 Using Registry?
This method indirectly turns on/off options that we disable in method 1 and 2. We are going to use Registry Editor.
Step 1: You can write regedit in Search box to open Registry Editor.
Step 2:Explore Registry and find GameDVR key. You can do this by expanding HKEY_CURRENT_USER, then Software key, Microsoft key, Windows key, and then expanding CurrentVersion key. Under that CurrentVersion key, you will see GameDVR key.
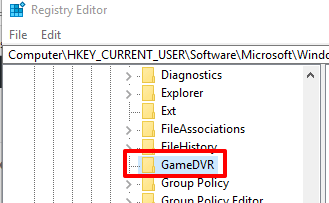
Step 3: GameDVR key contains many DWORD values. Here you will see “AppCaptureEnabled” DWORD value. Double-click that DWORD value to change its Value data. Here, you will see ‘1’ in Value data. Change ‘1’ with ‘0’ and press OK to save it.
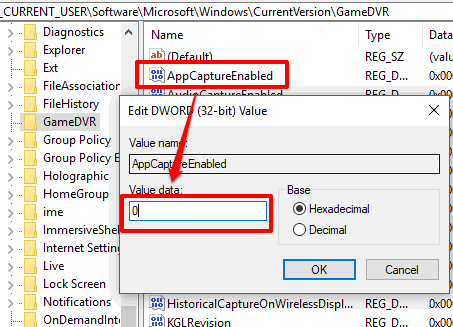
By doing this, you have disabled Game bar in Windows 10.
To turn on Game bar again, you can change the value data of AppCaptureEnabled by adding ‘1’ in value data.
The Verdict:
Game bar is obviously a good feature in Windows 10 that is really helpful to capture screenshots and record games. However, if you never or rarely use this feature and want to disable Game bar in Windows 10, then all the above methods will be helpful. I personally like Settings app option because it is so easy to use. However, if you don’t want to update your Windows 10 PC for the time being, then method 2 and 3 will be useful.