This tutorial explains how to disable Windows 10 Action Center. You can temporarily or permanently disable Action Center in Windows 10 using two built-in options. You can disable it either using Group Policy Editor window or the Registry Editor window. Both methods are very simple and steps covered in this tutorial make them simpler.
When Action Center is disabled, its icon won’t be visible on taskbar. You also won’t be able to launch Action Center with Win+A hotkey or some other way, until you enable Action Center again. I have also added steps to enable Action Center again. So you won’t face any problem.
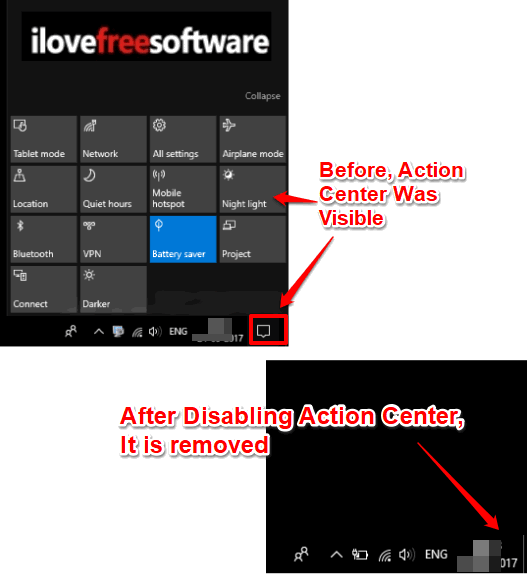
The screenshot above shows earlier Action Center icon, as well as Action Center, was visible, but after disabling it, Action Center is removed completely.
Earlier, in Windows 10 Anniversary Update, there was an option in Settings app to show or hide Action Center. But, in Creators Update, this option is removed. Therefore, if you are looking for some way to disable Action Center, then these are two methods you should try.
Method 1: How To Disable Windows 10 Action Center Using Group Policy Editor
Step 1: This basic step is used to start the GPO (Group Policy Editor) window. To open it, either write gpedit.msc or local group in the Search box, and use the Enter key.
Step 2: Now you have to do two things.
- Explore Group Policy window to access “Start Menu and Taskbar” folder. You can do this very easily using this path:
User Configuration → Administrative Templates → and then Start Menu and Taskbar. - When this folder is accessed, carefully look for “Remove Notifications and Action Center” option, and double-click that option.
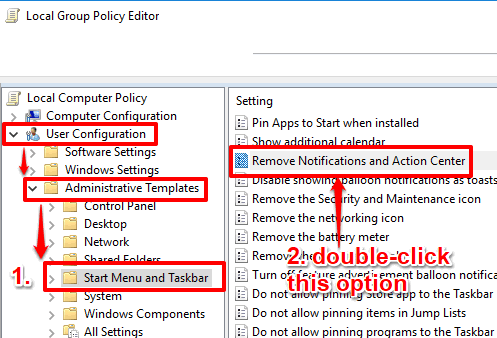
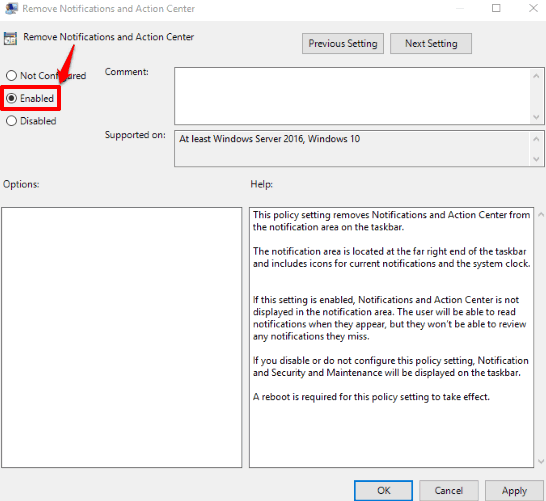
Step 3: A separate and big window will open now. In that window, three options are present on the top left side: Disabled, Not Configured, and Enabled. For disabling Windows 10 Action Center, you need to click the radio button of Enabled option and apply your new setting.
Step 4: This is the final step. Here you have to restart your PC or File Explorer.
That’s it! Action Center is now disabled. You will notice that it is removed from taskbar.
To bring back Action Center, use the same big window (as mentioned in step 3) and select ‘Not Configured’ option. Apply new setting and restart File Explorer.
Method 2: How To Disable Windows 10 Action Center Using Registry
Step 1: In this first step, you have to start the Registry. For this, you can open Run Command (Win+R) or Search box and write ‘regedit‘. This way you can open Registry.
Step 2: Explorer Windows 10 Registry to find ‘Explorer‘ key. You can access it very easily by following this path: HKEY_CURRENT_USER → then Software → Policies key → Microsoft → then Windows key → and finally you can access "Explorer" key.
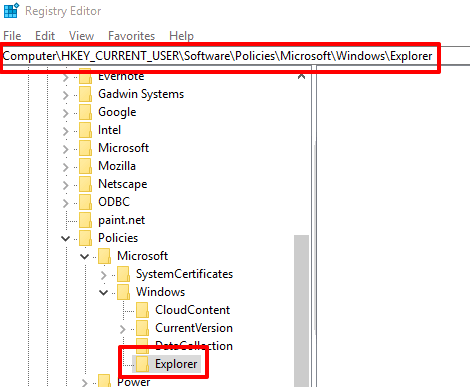
Step 3: At the right pane, right-click on the empty area, select ‘New’, and click DWORD (32-bit) Value. This will help you create new DWORD value. When it is created, you must rename it with ‘DisableNotificationCenter‘. After that, double-tap this value and fill ‘1’ in Value data area.
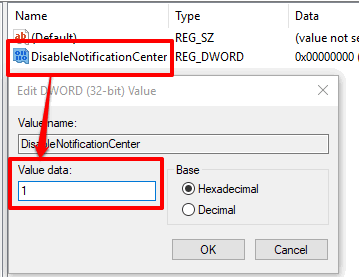
Press OK and then either restart PC or only File Explorer. This will apply the changes, and Action Center will disable.
To enable Windows 10 Action Center again, set ‘0’ as Value data for DisableNotificationCenter value.
You should also check How To Keep Action Center Always Open In Windows 10 and How To Disable Notifications from Showing In Windows 10 Action Center.
The Verdict:
Windows 10 Action Center is actually a very useful feature. It helps to quickly enable/disable location, airplane mode, Bluetooth, show notifications of apps, etc. Still, those who rarely use this feature, then disabling Action Center in Windows 10 is good. I hope these two methods will help you in that. You should start with method 1 as it is easier.