This tutorial explains how to auto enable or disable Chrome extensions for specific websites. By using the method explained in this tutorial, you can automatically enable or disable Chrome extensions when you visit a specific website. Let’s say you have some extensions that you only want to use on a specific website or disable some Chrome extensions when you go to a specific website, then this tutorial will help you to achieve this. You can simply create multiple rules to auto enable or disable Chrome extensions for specific websites. For this, I am going to use a free Chrome extension manager called NooBoss. This Chrome extension manager comes with an auto state feature by which it automatically maintains Chrome extension states (enable or disable) between different websites. In simpler words, it automatically enables or disables a Chrome extension for specified websites.
It can also notify you when the state of a Chrome extension changes from Enabled to Disabled, or vice versa. In addition to this useful feature, it also lets you enable or disable all Chrome extensions at once. You can also remove Chrome extensions one by one from its interface and quickly move to the options page of any installed Chrome extension.

There are many Chrome extension managers but none of them can automatically enable or disable Chrome extensions based on your presets. With this auto state Chrome extension manager, all you have to do is specify rules as per which it automatically enables or disables Chrome extensions.
If you have installed some Chrome themes then you can check out any of these Chrome theme management extensions.
How to auto enable/disable Chrome extensions for specific websites:
As I mentioned, I will use NooBoss to auto enable or disable Chrome extensions for specific websites. The method to auto enable Chrome extensions is quite simple and straightforward. You just have to download this Chrome extension manager and specify rules to auto enable/disable Chrome extensions for different websites.
Let’s see the steps to use this Chrome extension manager to auto enable/disable Chrome extensions:
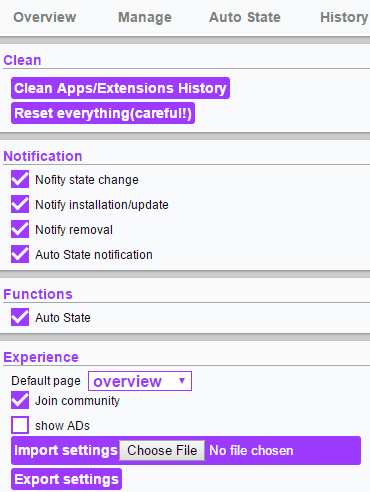
Step 1: Download NooBoss from the link provided at the end of this tutorial. Once it is installed, click on its Chrome extension icon and from the Options tab enable the “Auto State” option.

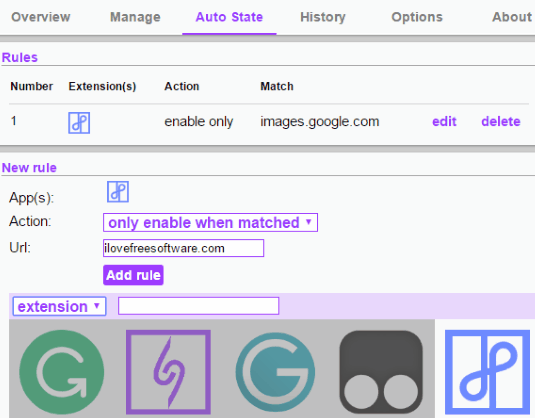
Step 2: In this step, you have to specify rules to auto enable or disable Chrome extensions. For this, simply click on its Chrome extension icon and switch to the Auto State tab. From there, select a Chrome extension and an action to be performed when you visit a specific website, as shown in the main screenshot of this review. To automatically enable a Chrome extension when you visit a specific website, you have to select the “only enable when matched” option and specify the name of the website in the URL field. If you want to disable a Chrome extension when you visit a specific website then select “disable when matched” option. You can add any number of rules and select multiple Chrome extensions to enable or disable for a specific website.
That’s it, from now on this Chrome extension manager will automatically enable or disable Chrome extensions when you visit a specific website.
Verdict:
In this tutorial, I explained how to auto enable or disable Chrome extensions for specific websites. You will just have to define the rules to auto enable Chrome extensions once and after that, the Chrome extension manager mentioned in this tutorial will automatically manage the states of the Chrome extension as per your rules. This tutorial will certainly be useful for users who are looking for a way to enable or disable Chrome extension for specific or all websites.