This article covers how to use Mac mouse cursor on Windows 10. Like Windows 10, there are default mouse cursors or pointers for Mac OS which are beautiful. From normal select (that beautiful black cursor) to busy, working in the background to precision select, text select to unavailable, link select to location select, diagonal size to move, and more, different Mac mouse cursors are available. If you want to use such cursors on Windows 10, then this article is helpful.
You just need to install a cursor scheme called “Capitaine cursors” on your Windows 10 PC. After that, the mouse properties window will have Mac cursors which you can apply and use.
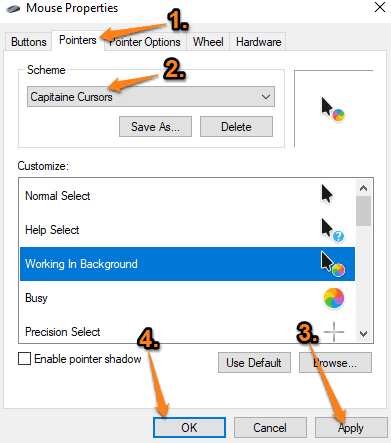
You can see the same in the screenshot added below that Mac mouse cursors are visible under scheme section of Mouse Properties.

Let’s check how you can do it.
How to Use Mac Mouse Cursor on Windows 10?
Step 1: You can use the download link available at the end of this review to get the zip file of this Mac cursor theme.
Step 2: Extract that file in a folder that you downloaded.
Step 3: Open the extracted folder. Access the “.windows” folder available under it. There you will see “install.inf” file. Right-click on that file and use Install option. This will install the cursor scheme immediately.

Step 4: Now open Control Panel using the Search box.
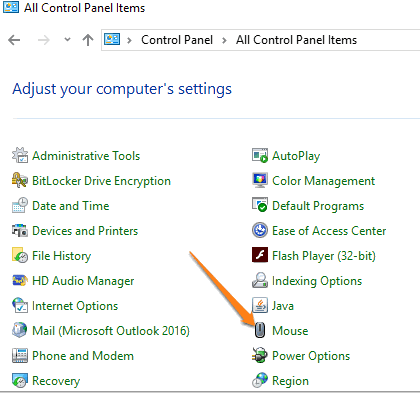
Step 5: In Control Panel, click on Mouse option. This will launch the Mouse Properties window.

Step 6: Jump to Pointers tab and use the drop-down menu available for Scheme. There, you will see the Capitaine Cursors theme. Select it. Now you will see all the available Mac cursors under that theme.

Just Apply and then save the applied change.
That’s it! This way you can use Mac mouse cursor on Windows 10.
The Conclusion:
If you are bored with the default or some other cursor schemes, then trying Mac mouse cursors on Windows 10 will be an interesting change. All the cursors for different actions look beautiful. Just install this cursor scheme and enjoy the benefits.