This tutorial is about how to rename photos using EXIF metadata such as the camera name, date of capture, time of capture, resolution, exposure, GPS data, etc.
In this tutorial, I am going to use 5 different free software to bulk rename photos based on their EXIF data. All of these tools supports renaming photos with EXIF data like date and time. But, some of them, like “BatchRename”, also allow you to rename photos with other entities like GPS data, exposure, aperture, resolution, frame delay, and more.
There are dozens of file renamer software available, but I have used some of the best, simple, and intuitive software in this tutorial.
BatchRename:
BatchRename is probably one of the best tools to rename photos using EXIF data. It supports renaming photos with almost all the EXIF properties like the camera name, exposure, GPS data, date & time of capture, shutter & ISO speed, aperture of the lens, frame delay, colormap, resolution, tile length, gamma, and so on.
Now, let me explain the steps to batch rename photos using EXIF data.
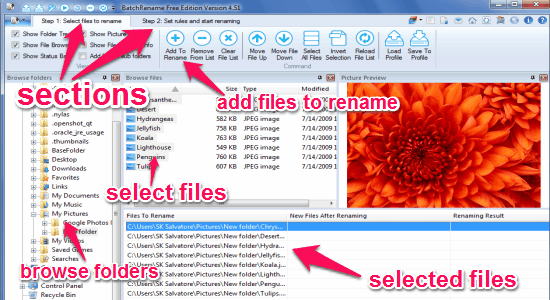
Step 1: When you open BatchRename, you will see two different sections at the top named as “Step 1” and “Step 2”. In the first section, you can browse folders and add photos which you want to rename, as shown below.
Step 2: As soon as you’re done with selecting photos, simply click the other section to create a rule for renaming photos using EXIF data. On the left, there will be a “Renaming Rule Builder” section where you can create the rule.
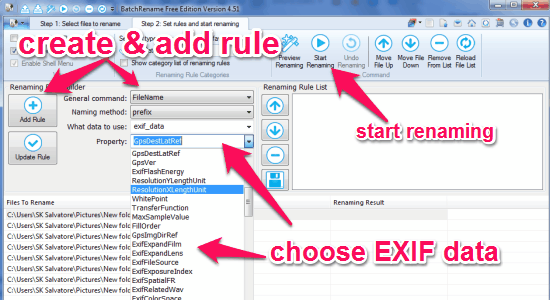
Step 3: At first, click the drop-down menu of “General Command” and select “FileName” from the list. Then a new menu will appear with naming methods like suffix, prefix, replace, remove, uppercase, lowercase, and insert. The EXIF data can only be used with methods like prefix, suffix, and insert.
Step 4: Select the method either as the suffix, prefix, or insert to proceed. Now, in the menu “What Data To Use”, simply select exif_data. After that, you will be able to see almost all the EXIF properties listed in the drop-down menu of “Properties”, as shown in the above screenshot.
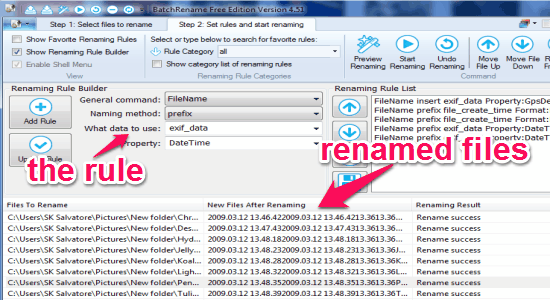
Step 5: Select any of the EXIF property using which you want to rename the photos, and then hit the “Add Rule” button on the left. The rule will be added instantly and you can click the “Start Remaining” button at the top to execute the rule and rename photos.
Namexif:
Namexif is another free tool to rename photos with EXIF data. It only supports EXIF properties like date of capture and the time of capture. That means if you want to rename all your photos with the date & time of when they were captured, then you can use this simple tool to do so. It only renames the filenames and doesn’t manipulate with other embedded data of your photos.
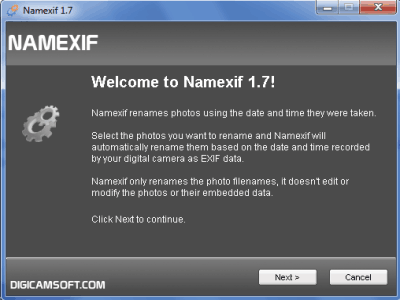
Step 1: Simply open the tool after installation, and you will see few instructions about the tool along with a “Next” button on the main window.
Step 2: Click the “Next” button to proceed and add files. There will be two different options to add photos for renaming. One to add photos from different directories and another to directly add a directory to import all the photos located in it.
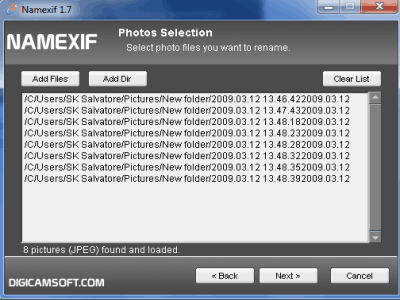
Step 3: When you’re done with adding photos, click the “Next” button at the bottom. After that, it will ask you to select a preferred format for renaming your photos. Initially, you will see a default format, but do not worry as it also has the option to create a custom format with the date and time. In addition to that, you can shift the time of capture as required (optional) before renaming photos.
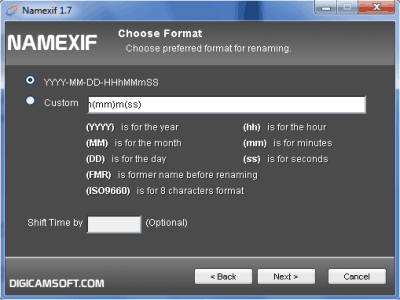
Step 4: When you’re done with choosing a format, hit the “Next” button and it will automatically process your photos and rename them in the original directories.
Exif ReName:
ExifReName also allows you to rename photos based on the date & time in their EXIF data. But, it comes with some unique features like you can make a copy of renamed files without replacing the original, keep original file names while adding EXIF data, and also insert a new file name.
Step 1: After opening this tool, click the “Open” button at the top to add photos. All the added photos will be visible on the right.
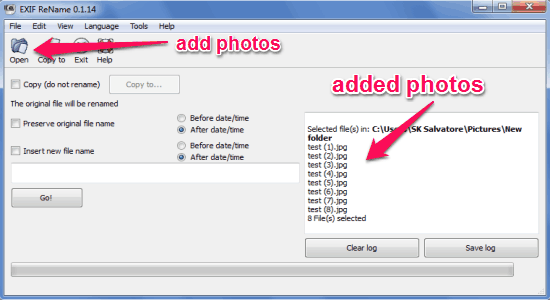
Step 2: On the left of the window, you will see 3 different options as Copy, Preserve Original File Name, and Insert New File Name along with a “GO” button. Now, let me explain all these options separately.
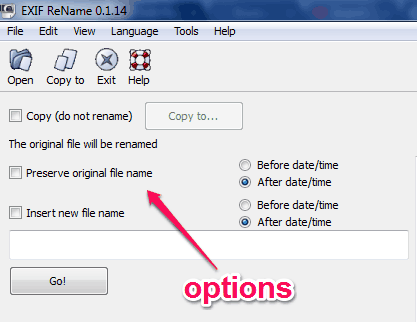
Step 3: The “Copy” option allows you to rename photos and save them as copies instead of replacing the original file names. Simply enable the option, and choose the destination folder where you want to save the copies of renamed photos.
Step 4: You can also rename photos with EXIF data while keeping the original file names as they were. That means you can add the EXIF properties like date and time before or after the original file names. Enable the option “Preserve Original File Name” and choose between prefix or suffix of the files where you want to add the EXIF data (date & time).
Step 5: Apart from renaming photos using date and time, it also has the option to insert a new file name before or after the data and time. All you need to do is enable “Insert New File Name”, choose between before or after, and type the new file name in the field.
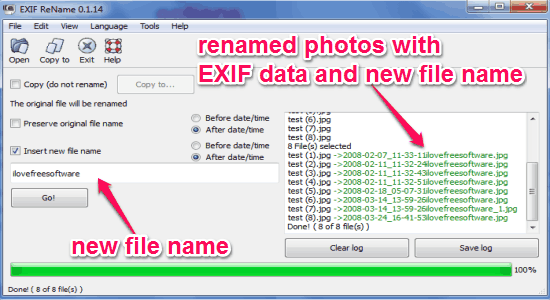
Step 6: When you’re done with enabling your desired options, simply click the “GO” button to rename photos. It will also show the preview of the renamed photos on the right.
Advanced Renamer:
Advanced Renamer is another useful tool that lets you rename all your photos using various EXIF metadata like GPS location, date & time, image width & height, camera name & model, aperture, brightness, focal length, exposure, and many other embedded data. For this, all you need to do is add photos you want to rename, add a method with EXIF properties, and start renaming.
Let me explain how you can use Advanced Renamer for renaming photos.
Step 1: After opening this tool, the first thing you need to do is add photos which you want to rename. Select the tab “Rename Files” and click the “Add” button to import photos as shown below.

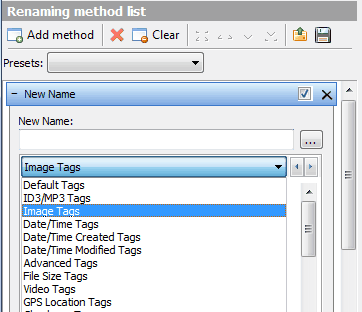
Step 2: When you’ve added the photos, click the “Add Method” button on the left and select “New Name” to create a custom renaming method. After that, click the drop-down menu and select your desired EXIF data tags such as Image tags, GPS location tags, Date/Time created tags, and more.
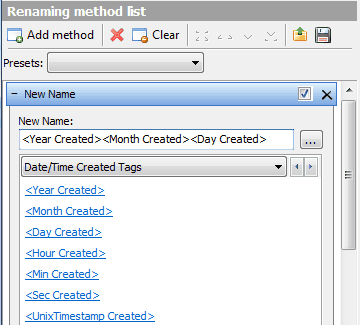
Step 3: Each tag includes various EXIF properties. For example, when you select “Date/Time Created Tags”, you will see different EXIF properties like created year, month, day, hour, minute, and so on as shown below. Whatever property you want to add for renaming photos, simply click on them and they will be added automatically.
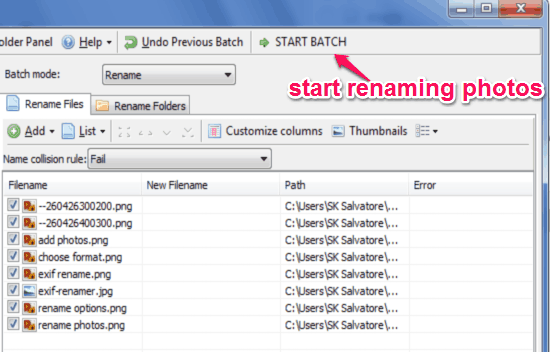
Step 4: Once you’re done with adding photos and assigning EXIF properties in a method, click the “Start Batch” button at the top to rename photos. The photos will be renamed in the source folders with all the properties you have added in the method.
Amok EXIF Sorter:
The last but not least is the Amok EXIF Sorter which assists you in renaming photos using EXIF data. It supports various EXIF properties such as aperture, artist, caption, category, date created, time created, day, contrast, brightness, exposure, focal length, ISO speed, and much more. You can use this tool to rename photos in no time. Renaming bulk photos using EXIF data has never been easier.
Step 1: Open the tool and add as many photos as you want to start renaming. After that, click the “Rename” option in the Sort Method section as shown below.
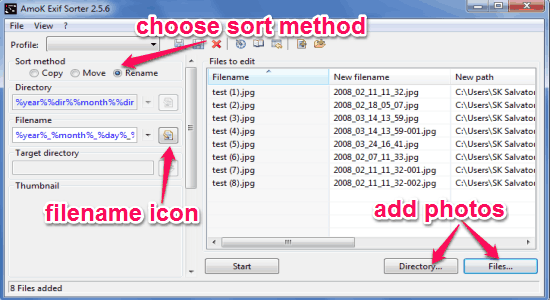
Step 2: To assign EXIF data for renaming, click the icon adjacent to the “Filename” option. A popup will appear using which you can assign the EXIF data which you want to use for renaming photos. Double-click on any property to add it for renaming and then click the “OK” button.

Step 3: Once you’ve assigned the EXIF properties, simply click the “Start” button at the bottom of the window to rename files. All the imported photos will be renamed instantly in their source folders.
My Final Verdict:
If you’re looking for ways to rename all your photos using EXIF metadata, then this tutorial is definitely going to help you do that. I have used some of the simplest tools which let you rename photos in a few simple steps. Personally, I like BatchRename as it allows you to rename photos using almost every EXIF properties such as GPS data, date & time created, exposure, focal length, image width & length, brightness, and much more.
I hope you like this tutorial.