This tutorial will help you pin a USB drive to taskbar in Windows 10. While normally you can’t pin a USB drive from File Explorer to taskbar, the same task can be done very easily with just a few tweaks. After that, whenever you will plug in the same USB drive and click USB icon added to taskbar, it will open that particular USB drive. Do note that this trick works until you haven’t changed the drive letter of that particular Flash drive. So, for example, if you connected a USB drive with letter ‘L’ and pinned icon is also associated with drive letter ‘L’, then it will launch the same connected USB drive. If you changed the drive letter and clicked the pinned icon, then it will show you an error. On the other hand, if you plugged in some other drive whose letter is ‘L’, then the taskbar icon will open that particular USB drive.
To pin a USB drive to taskbar in Windows 10, you need to create a simple EXE file, pin it to taskbar, set its target location and Start in location and then you can use that pinned icon to execute the USB drive plugged in to your Windows 10 PC.

How To Pin A USB Drive To Taskbar In Windows 10?
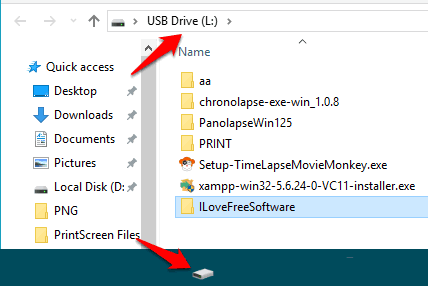
Step 1: First of all, plug in the USB drive that you want to pin to taskbar. Also, note its Drive Letter, say ‘L’.
Step 2: Press ‘Windows Logo Key + E‘ to open File Explorer. After that, click the View tab in Ribbon menu, and then select “File name extensions” option.

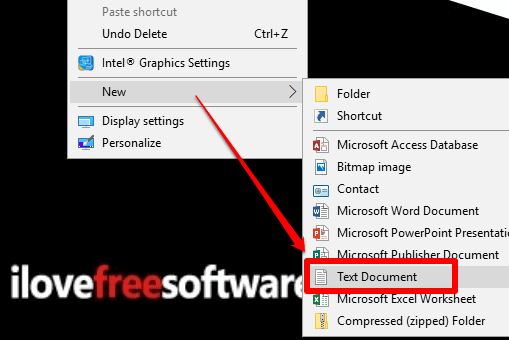
Step 2: Go to desktop, right-click to access context menu, click on New, and then select “Text Document” option.

Step 3: A new text document will be visible on desktop. Rename it and give it any name you want. Also, change its “txt” extension to “exe“. So its name will look like “Drive L.exe“. This is just an example, you can add any name you want, but the extension must be “exe”. File extension wouldn’t visible if you haven’t enabled it in step 1. That’s why we first enabled File name extensions option in step 1.

Step 4: Drag n drop that Drive L.exe to taskbar. Or else, you can right-click on it and then select Pin to taskbar option.

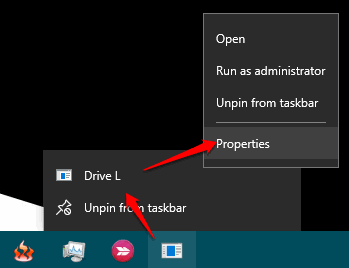
Step 5: Right-click on the pinned icon and you will see the name of the exe file. Again, right-click on that name, and click Properties.

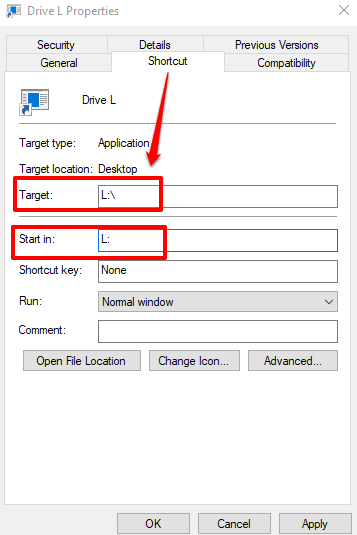
Step 6: Properties window opens with Shortcut tab. In that tab, you will see “Target” and “Start in” options. Here, you need to enter USB drive letter. In Target, enter “L:\” and in Start in you need to enter “L:“. You must replace ‘L’ with the actual drive letter of your USB drive.

Step 7: This step is optional but useful when you want to change the icon of pinned exe file. You can add a hard drive icon that looks nice on taskbar. For this, click on Change Icon.. button visible in Properties window (see screenshot above). A new Change Icon window will be visible. You can select hard drive icon from the list and save it.
![]()
Press Apply and OK button to close the Properties window.
That’s it! Now you will see that EXE file that is pinned to taskbar is showing the hard drive icon. Clicking that icon will open your USB drive.
When you will eject and plug in the same USB drive and click the taskbar icon, it will open the USB drive.
You may also check How To Pin A Website To Taskbar Using Microsoft Edge In Windows 10 and How To Separate Pinned, Unpinned Programs in Windows 10 Taskbar.
The Conclusion:
Pinning a USB drive to taskbar in Windows 10 is handy for all those who regularly use their USB flash drives. Instead of opening File Explorer again and again to access your USB drive, you can pin it to taskbar and then launch it in just a single click.