Let me introduce you to this Camera Photo Manager software for Windows, PhotoHandler. It is completely free to use for commercial and non-commercial purposes. It is capable to import camera photos to computer directly and even detects photos on your PC. To import photos, you just need to connect your camera or camera SD card to PC. It supports a wide range of image formats, including camera RAW formats. After importing images, you can batch edit photos and even batch watermark photos. There’s a lot more than you can do with this free photo manager software. And all of this comes in a future ready sleek interface.
If you want an online alternative to edit camera photos online, here’s an Online RAW Image Editor.

How To Import Camera Photos To PC Using This Photo Manager Software
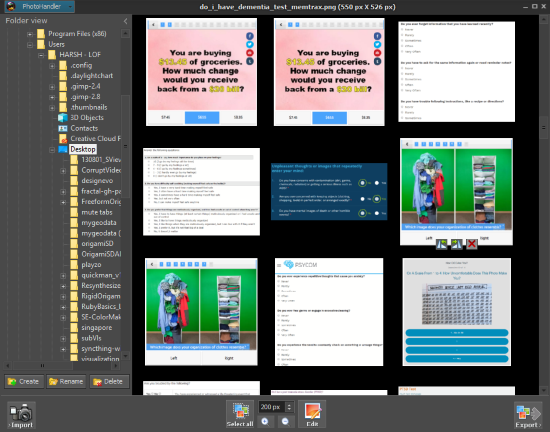
As you install and run this software for the first time, it automatically detects all the photos on your PC. You can explore those photos right away if you want. Simply select a folder from the explorer available at the left side of the interface. The images will appear on the right side of the interface as shown in the above screenshot.
Now, let us see how to import camera photos using PhotoHandler.

See the import button on the bottom left corner of the interface? That’s where you have to click to import photos. To import photos, you can connect your camera to PC. If you do not have a cable that connects the camera to PC, you can use connect the SD card of camera to PC. Most laptops come with built-in SD Card slots.
As soon as you click the button, a pop up will appear. It detects your camera or SD card when connected. You can select a folder on your PC to import photos, or even create a new folder if you want. There is an Automate option which imports photos automatically when Camera or SD Card are connected to PC. Another option, if selected lets you delete photos from camera or SD card automatically after import.
After importing photos, you can either watermark photos, edit photos, or both.
How To Batch Watermark Photos Using PhotoHandler

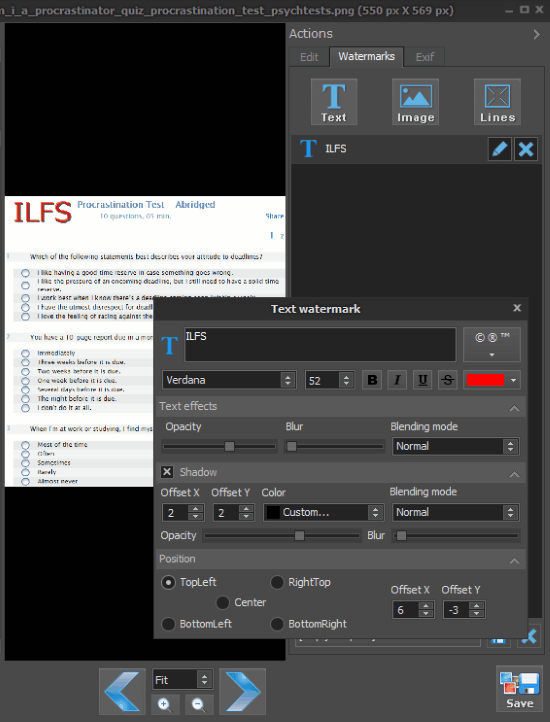
You can add watermark to a single image, multiple images, or all images in a folder. After making the selection, hit the Edit button at the bottom panel of the interface. A new interface will open. Here, you get 3 actions to perform, Edit, Watermark, and Exif, all available at the right panel of interface. Select the Watermark option. This will open a box as displayed in the above screenshot.
Here, you get the option to add text watermark, image watermark, and cross lines watermark. For text and image watermark, you can set the watermark size, position, opacity, shadow, blending, etc. You can change text font if you want. For Cross watermark, you can set color of cross, opacity, thickness of lines, and blending mode.
When satisfied, click the Save button at the button.
How To Batch Edit Photos With PhotoHandler

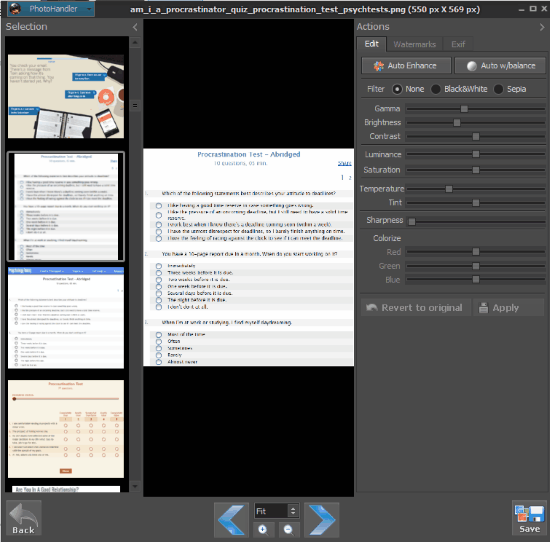
To batch edit photo, you just have to select all photos, as described in the watermark section, and click on Edit option at bottom. Next, from the right panel, select the Edit option. This will open up the editing menu. Here, you get to auto-enhance photos or manually apply editing. You can also apply Black & white and Sepia filters to photos.
How To Export Photos After Editing

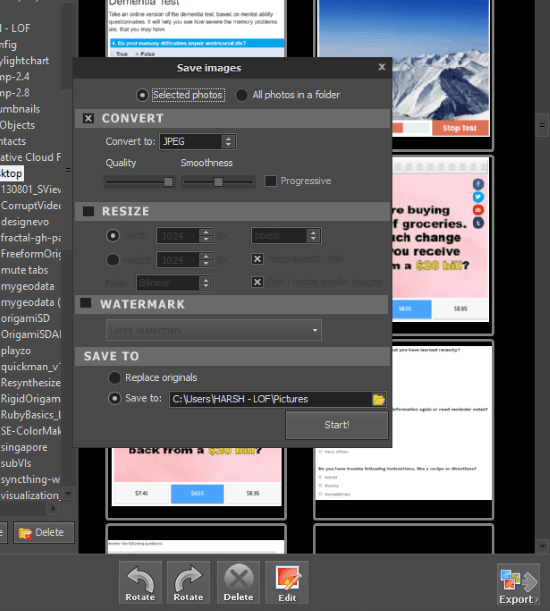
There’s an Export button at the bottom-right side of the interface. After you have edited or watermarked images, you can go about exporting images. In the export box that opens up, you get to set output image format, quality, resizing options, and the output folder.
Closing Words
There’s much more in this camera photo manager that you can do. In my opinion, it is a pretty neat photo manager with decent photo editing capabilities, and is pretty fast as well.