This tutorial talks about how to fill blank cells in Excel. To do this I have mentioned various methods in the following tutorial that will guide you to fill blank cells in your Excel sheet. Some of these methods use built in Excel features while one of these rely on external VBA macro. I have also added a software package that acts as a plugin to Excel and does the same as other methods do. So depending on your needs, you can try any of the methods that you like.
Sometimes you might have a table in Excel in which there might be some blank cells. Filling such cells manually would be pretty time consuming. In such cases, you can use these methods to fill empty cells. I will talk about different methods here to fill cells with different types of values. In one case, you can put same value in each cell. In another case, you can add same value to the cell as the one above it.
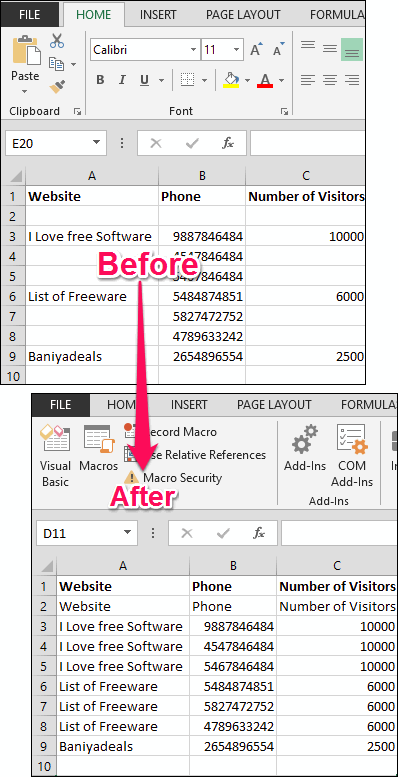
How to Fill Blank Cells in Excel?
Let’s have a look at each method one by one.
Method 1: Fill Blank Cells of a Column in Excel by a Specified Value.
You can fill blank cells of a column in an Excel sheet by a specified value. For doing so, I will make use of the built in capabilities of Excel which are very easy to perform. In this section I will talk about two methods to do that. The first function will use Go To Special feature of Excel and then fill out all the empty cells with the specified value. And this method is so easy that you can use without having any special knowledge.
The following steps will show how to fill blank cells of a column in Excel by a specified value.
Step 1: Open a desired Excel sheet in which you want to fill blank cells.
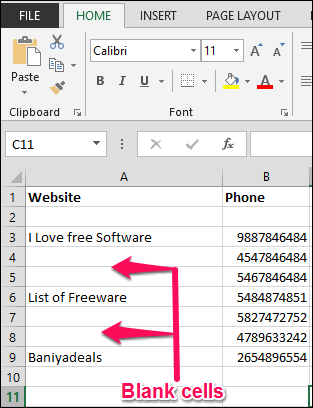
Step 2: Select a particular column that contains some blank cells.
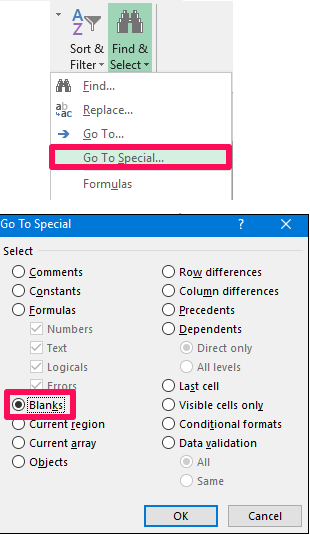
Step 3: Now, navigate to Find & Select tool and choose Go to Special from it. After that, a window will pop up, showing various options. Choose Blank option from it.
Step 4: After you have selected Blank option from the Window, you will notice that all the blank cells will get selected. Now, without pressing or clicking on anything, type the value that you want to put in all blank cells followed by Ctrl+Enter key. And when you do so, you will see that all the blank cells are filled with the value you have just typed. See the below screenshot.
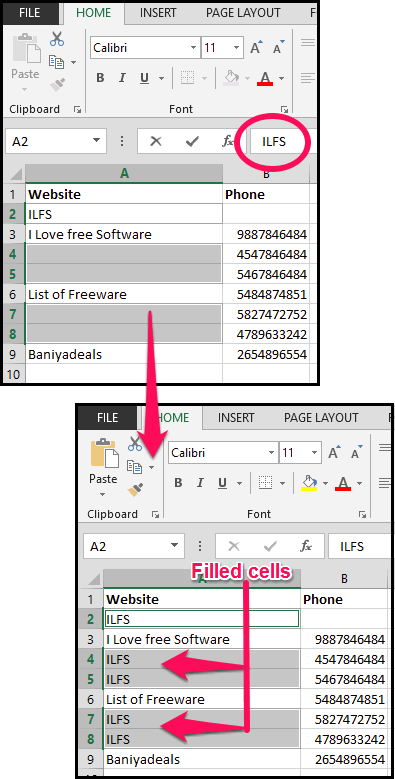
So, in this way, you can easily fill blank cells of a particular column with a specified value. And it was pretty easy to do that as it does not require any other application or software.
Method 2: Fill Blank Cells in Excel with the Value Above Using Excel Functions.
In the above method I have shown you how to fill empty cells fill with a specified value. Now, in this method I will talk about how to fill empty cells with the value of the cell before that. To fill the empty cells with the value of the previous cell, I will use built in function of Excel which is pretty easy to use and similar to the above method. Also, you can use this method in an entire range of cells or you can use it in a particular column of your Workbook.
To begin with this method, follow these simple steps.
Step 1: Open any desired Excel sheet which contains some blank cells.
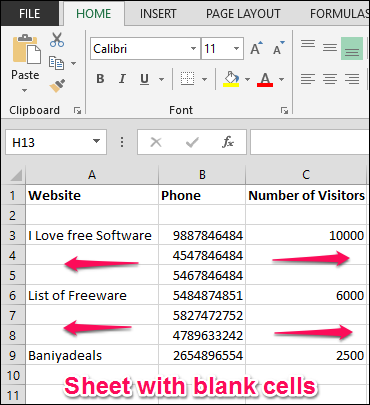
Step 2: Select that range of cells from your sheet to cover all the blank cells.
Step 3: Now, navigate to Find & Select tool and from the drop down select Go To Special option. After that a window will pop up, select the Blank option from it and you will see that all the blank cells will get selected.

Step 4: Now, without disturbing the selected cells, see which blank cell is currently focused. Notice the value above it and type it in the formula bar with the ‘= ‘sign. And after that hit Ctrl+Enter key. You will see that the formula will be carried forward in all other blank cells and they will get filled with the value above them. See the below screenshot.
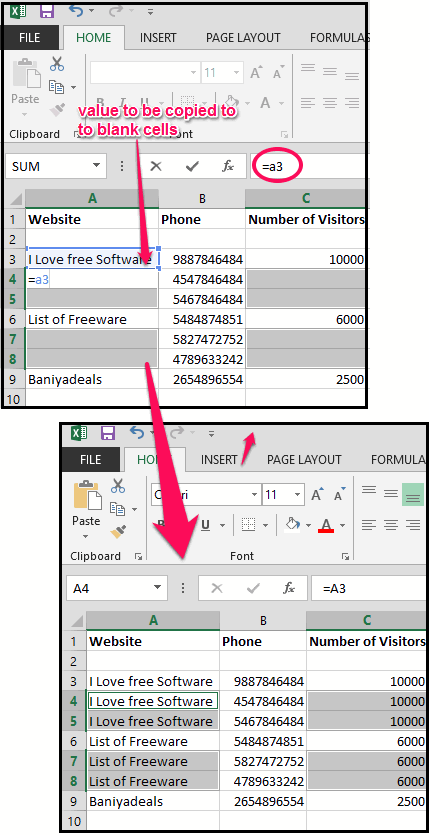
So, in this way you can easily fill all the blank cells in Excel worksheet with the value above them. In the above steps I have used this method in a whole sheet. But, if you want to use it for a specific column, then you can easily do that. Just select the specific column from your sheet and rest of the process is same.
In fact, you can use the same process above to fill the values from below, left, or right of the empty cell. Just put the formula accordingly, and the empty cells will be filled accordingly.
Method 3: Fill all Blank Cells in Excel sheet With the Value Above Using VBA Macro.
In the previous method I have explained how to fill blank cells in Excel with the value above them using built in Excel capabilities. In this method I will show you how to do it by using a simple macro and by just pressing a shortcut key. Here I have written a VBA macro that will fill all the blank cells in Excel with the value above. Also, this VBA macro automatically detects the used range in your Sheet, and then it fills all the blank cells with the value above them, when you invoke it using a hot key set by you.
The following steps will guide you how to do it:
Step 1: Open your worksheet in which you want to fill all the blank cells with the value above them.

Step 2: Now open VBA editor via Alt+F11 key.
Step 3: Right click on any project and go to Insert >Module. After that paste the following VBA code in it.
Sub FillBlankCells()

Static rngUR As Range: Set rngUR = ActiveWorkbook.ActiveSheet.UsedRange
Dim rngBlank As Range: Set rngBlank = rngUR.Find("")

While Not rngBlank Is Nothing
rngBlank.Value = rngBlank.Offset(-1, 0).Value
Set rngBlank = rngUR.Find("", rngBlank)
Wend

End Sub
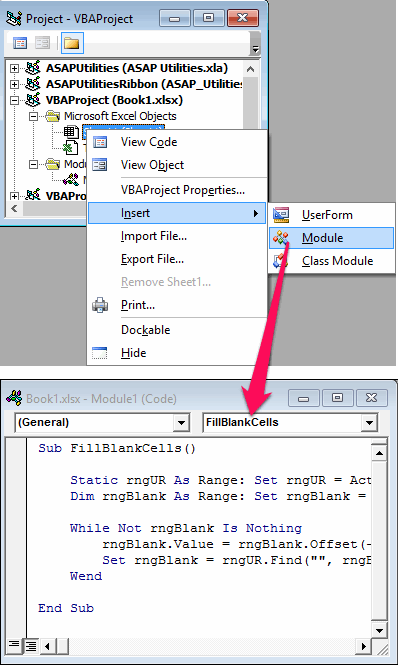
Step 4: Now save the module using Ctrl+S key and a dialog will appear giving you some warning. Just ignore it by clicking on No button. Now, the macro is all set up and all you have to do is to provide it a shortcut key. If you don’t know how to set a shortcut key to a module, then you can see it here.
Step 5: At this point, the macro is ready to use. To use it, simply hit the shortcut key that you assigned to it and you will see the result in a blink of eye.

So, in this way, you can easily fill blank cells in Excel using this VBA macro. However, there is a disadvantage of using macros is that the changes made by VBA code are not reversible. It means once the changes are made to your sheet, they cannot be undone using the Undo option.
Bonus: Fill all Blank Cells in Excel sheet With the Value Above Using an Add-in
Apart from using VBA or built-in capabilities of Excel, you can also achieve the same using Asap Utilities pack. Though it’s a paid software, but it is free for home and educational use. Asap Utilities comes with lots of features and functions and one of them is filling out blank cells. Using Asap Utilities, you can achieve that goal that is filling out the empty cells with the value above.
To fill blank cells in Excel using Asap Utilities, follow these simple steps.
Step 1: Download and install Asap Utilities from here. After that it will create a separate tab in MS Excel.
Step 2: Run Excel and load any desired worksheet in it which has some blank cells and you want to fill them out. After that select the range in your sheet converting all empty cells that you want to fill.

Step 3: Navigate to Asap Utilities tab, and choose Copy cells to empty cells below option. You can also apply this option to an individual column also by selecting it entirely. See the below screenshot.
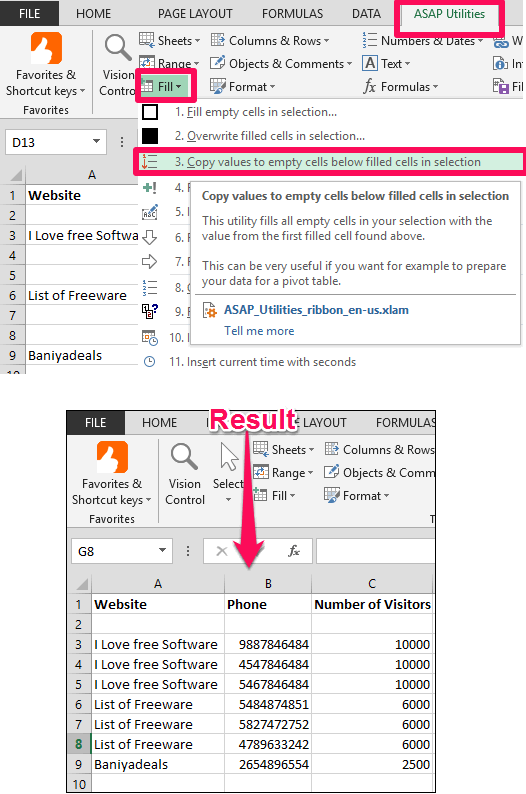
So, in this way you can easily fill out all the blank cells in a selection with the value above them. And the best part about using this is that you can always undo the operation performed by Asap Utilities in your sheet. If you want a much faster way than any other methods mentioned in the above tutorial, you can give a try to Asap Utilities. It is fully compatible with all versions of MS Office.
Also see:
My Final Verdict
These were some pretty easy and useful methods to fill blank cells in Excel. Some of the methods here use external VBA macros to do the same while some of them make use of built in Excel capabilities. All the methods give same result, but the methods that use VBA macros have their own disadvantages. Use VBA macros only if you are pretty sure that you won’t need to Undo your changes. If you are looking for ways to fill blank cells in Excel, then you have come to the right place. Use any of the mentioned methods in your Excel sheet, and share your experience in the comments down below.