This is a short tutorial that explains how to add Recycle Bin to Taskbar in Windows 8. We all know, the quickest way to access any file, application, folder, etc is Taskbar. As Taskbar is visible on almost every page and window by default (and we can even add Taskbar to Start Screen), we can easily access any added application/file from the Taskbar, in double tap.
Some people, like me, frequently use Recycle bin. But to empty it, or to restore any deleted file, you need to access the Recycle Bin from the Desktop. It is a time taking process. If you remember, I have already written an article which lets you add Recycle Bin to the right click in Windows 8. But, adding Recycle Bin will not let you access Recycle Bin from every window, or page.
Hence, adding Recycle Bin to the Taskbar in your Windows 8 PC will definitely make access of Recycle Bin easier. There are different ways in which you can do this.
Method 1: Add Recycle Bin To Taskbar Using Quick Launch
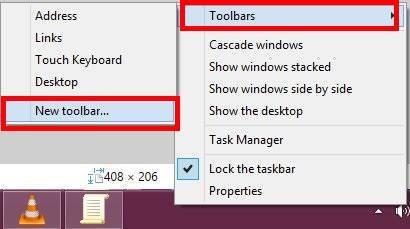
Step 1: Go to the Desktop, and right click on the Taskbar. From the popped option, navigate to Toolbars, and then click on “New Toolbar”.
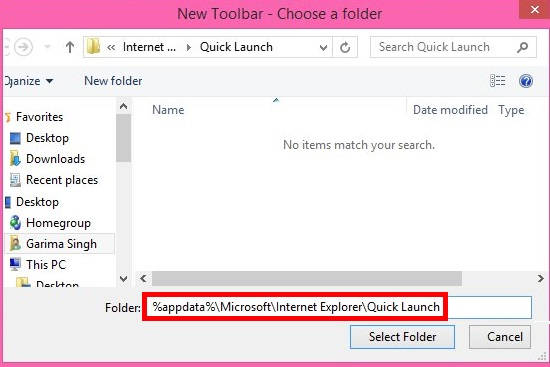
Step 2: In the New Toolbar window, it will ask you to to select folder. Use the below code in the Folder box:
%appdata%\Microsoft\Internet Explorer\Quick Launch
Then click on Select Folder button.
Actually it is a path of the Quick Launch folder, that is by default available in your C drive.
Step 3: You will find that Quick Launch has been added to the Taskbar. Now, open Run, and use the above mentioned code in the Run box.
It will open Quick Launch folder.
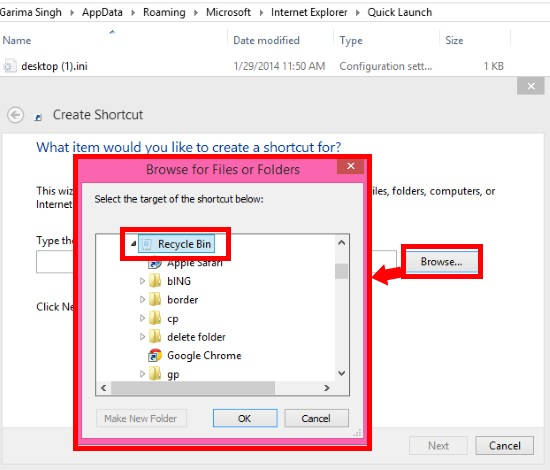
Step 4: Now, right click anywhere, and select New, and then shortcut. In the next window, click on Browse button. Navigate to the Recycle Bin by using following path:
This PC > C: > $Recycle.Bin > Recycle Bin
It will create a shortcut of the Recycle Bin in the Quick Launch.
Step 5: Again, right click on the Taskbar, and then click on “Lock the Taskbar” to unlock it. You will find a dotted horizontal line appears on the Taskbar. Drag the dotted line to the left.
Step 6: Now, right click on the Quick Launch. From the popped list, click on “Show Text” and “Show Title”. It will remove Quick Launch text from the Taskbar, but the Recycle Bin will still appear.
In the same list, click on “View”, and then on Large Icons. It will enlarge the Recycle Bin Icon.
Right click on the Taskbar, and then click on “Lock the Taskbar”. You will see the dotted line disappears.
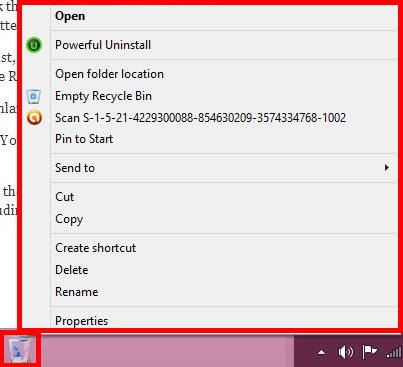
The Fully Functional Recycle Bin has been successfully added to the Taskbar. Right clicking on it will give you all the options (and few additional options as well), including “Empty Recycle Bin”.
Clicking on the icon will open Recycle Bin.
Method 2: Add Recycle Bin To Taskbar Using Desktop Shortcut
This is easier method than above. But it doesn’t let you pin fully functional Recycle Bin to the Taskbar. That means, right clicking on the icon will not give you any option, like “Empty Recycle Bin”. But clicking on the icon will redirect you to the Recycle Bin.
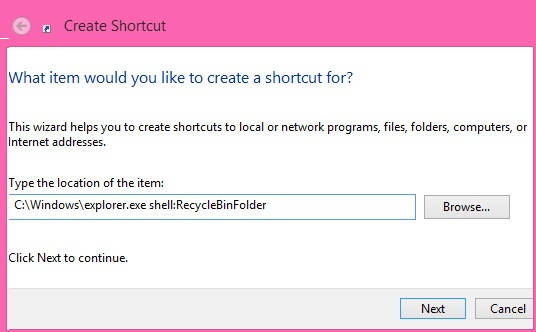
Step 1: Go to Desktop. Right click on an empty space. Navigate to New, and then click on Shortcut.
Step 2: In the Browse box, use the following code:
C:\Windows\explorer.exe shell:RecycleBinFolder
Click on Next.
In the next window, name the shortcut as Recycle Bin. By default, the icon of the shortcut is explorer.
Step 3: Now, lets change the icon of the shortcut first. Right click on the created shortcut, and then click on properties. In Properties, click on the button that says “Change Icon”. From the option, select Recycle Bin Icon, and click on OK.
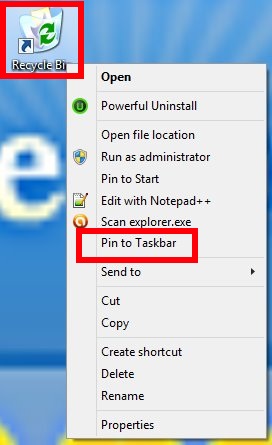
Step 4: Right Click on the Recycle Bin shortcut that you have created. Then, click on “Pin to Taskbar” option.
You will find that the Recycle Bin has been successfully added. Clicking on it will open Recycle Bin.
That’s it.
You can now access Recycle Bin easily from the Taskbar in Windows 8.
