This is a detailed guide on how to use Microsoft Kaizala on Android. Microsoft Kaizala is a free communication app by Microsoft Garage to help organizations and businesses simplify their work via team chat. You can chat with individual contacts or create a group to communicate with your entire team. Apart from sending text messages, you can also send photos, videos, contacts, audio, and documents securely. Unlike other secure messengers for Android, it lets you send various collaborative actions like Survey, Quick Poll, Checklist, Job, Meeting, and more to achieve tasks more easily.
When you send these actions, the team members will be able to like, comment, and submit responses to the actions. One of the unique features of Microsoft Kaizala is that apart from adding individual team members, you can also add groups to a new group. This can come in handy if you want to send a message, action, or make an announcement to multiple groups at the same time.
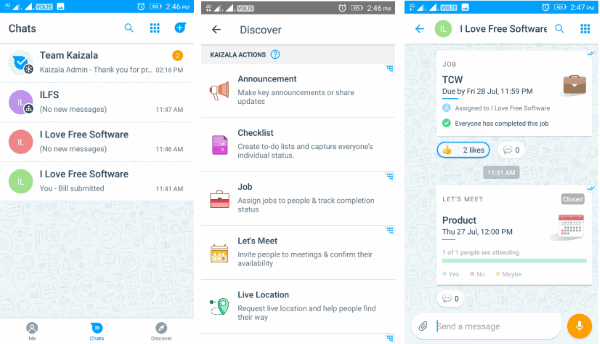
Note: Microsoft Kaizala is not yet available for PC, and can only be used on Android and iPhone. In this post, I will explain in detail about the Android version only.
How to Use Microsoft Kaizala on Android:
To get started, simply install Microsoft Kaizala on your Android phone. After that, it will ask you to verify your phone number. Then it will open up the “Chat” tab where you can start chatting with others. For starting a chat, simply tap on the “+” button at the top of the “Chat” tab. After that, you can choose whether you want to start a private chat with anyone or create a group.
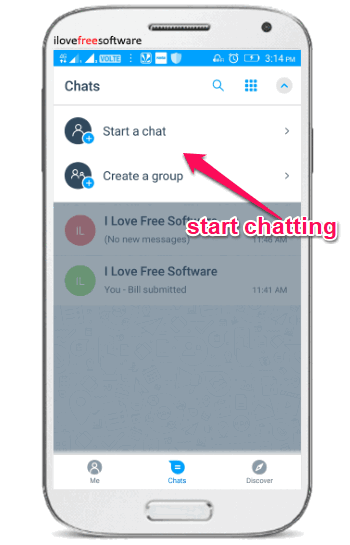
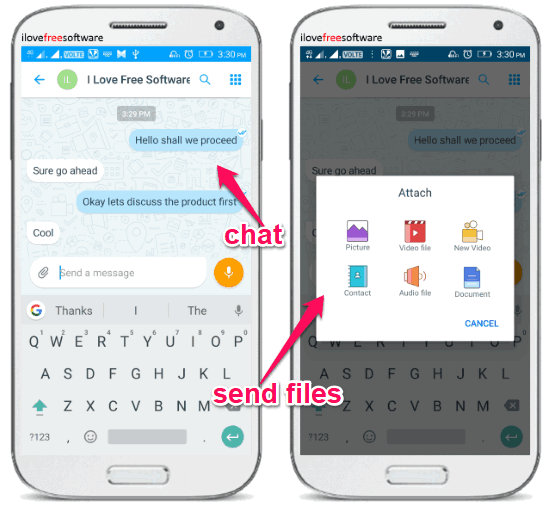
Suppose, you have selected the “Start a Chat” option, then you would need to select the user with whom you want to chat. The user must be a Microsoft Kaizala user or else the name will not appear in the contact list. As soon as you select a user, the chat screen will appear where you can start sending text messages. You can either type messages or record voice messages using the “Record” button at the bottom. Apart from that, you will also see an “Attachment” icon which can be used to send photos, videos, documents, contacts, and audio.
If you’ve selected the “Create a Group” option, then the first thing you would need to do add group members. After you’re done adding group members, you can simply choose a profile photo and then give a name to the group. Once done, you can open the group and start chatting with the members.
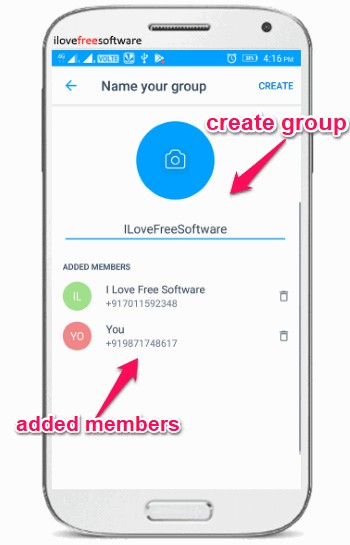
Unlike any other messenger apps, there is no virtual limit on the number of members and you can add millions of users to a single group. This can actually be achieved with a unique feature of Microsoft Kaizala where you can add groups to a group. Yes, apart from adding individual members to a group, you can also add entire groups to a group.
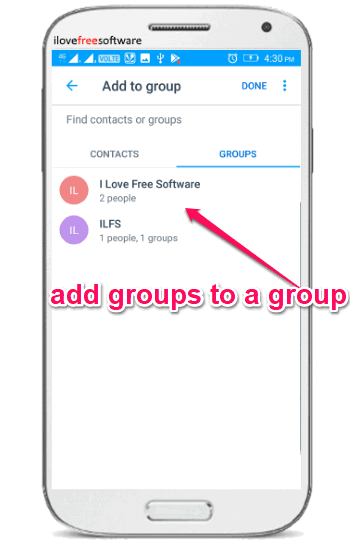
This will allow you to bring together tons of users to a single group without manually adding them and also send a message to multiple groups at once. To add existing groups to a new group, all you gotta do is select the “Group” tab while adding members to a group and then choose the groups which you want to add.
Now, let us talk about the unique features of Microsoft Kaizala. Sending text messages and files is possible on any messenger for Android, but what makes this app unique is the option to send actions as cards to individual users or groups. It offers 11 different actions named, Announcements, Job, Let’s Meet, Quick Poll, Photo with Location, Survey, Checklist, Live Location, Request Location, Share Location, and Submit Bill.
Let me explain how to send these actions to users or groups.
How to Make an Announcement in Microsoft Kaizala:
For announcing anything, simply tap on the “Grid” icon at the top of the chat screen in private or group chat. After that, a popup dialog will appear where you will see an option named, “Announcement”. Simply, select this option and then you will be able to enter the title and description of the announcement. Apart from that, you will also be able to add photos, documents, and audio to the announcement.
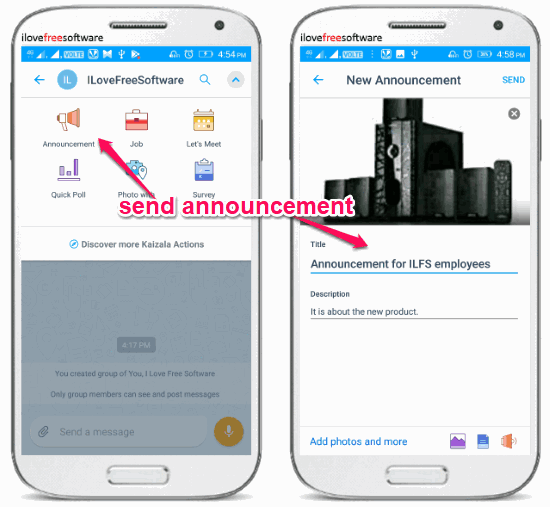
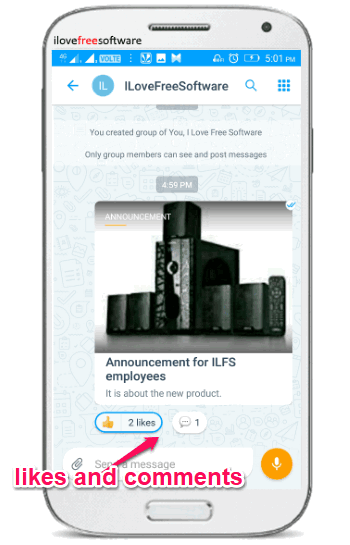
Apart from that, you will also be able to add photos, documents, and audio to the announcement. When you’re all set with the details and attaching files, simply hit the send button to send the announcement to a group or user. Suppose you have sent it to a group, then all the members of that group will be able to like, comment, and download the attachments.
How to Assign Jobs to Users on Microsoft Kaizala:
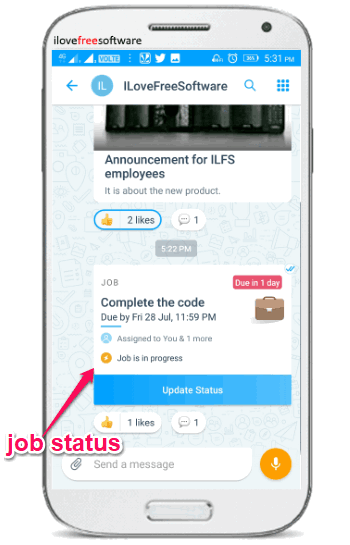
The “Job” action lets you assign tasks to your contacts or group members and track their status of completion. To assign a job, simply tap on the “Grid” icon on the chat screen and then select the “Job” option. After that, you will be able to add a description for the job, set a due date, and assign users to the job. There you will also see an option to make the job responses visible only to you.
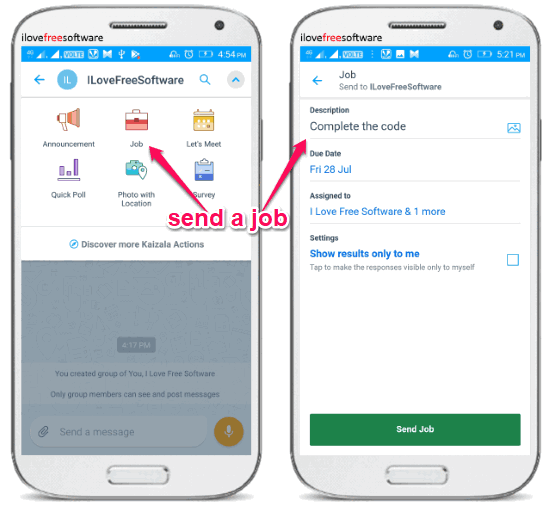
When you’re done with the details of the job, simply press the “Send Job” button and then the job will be posted on the conversation. The assigned users will be able to like, comment, add notes to the job, and update the status of the job. They can either change the status to In-Progress or Complete. All the responses will be reflected on the job card on the chat screen, as shown below. You can also open a job card to see the responses and send a reminder to users to respond.
How to Create Meetings on Microsoft Kaizala:
The “Let’s Meet” action will allow you to create meetings, invite users to the meetings, and also confirm the status of their availability. To schedule a meeting, select the “Let’s Meet” option on the chat screen. After that, enter the title of the meeting, set date & time, duration, place, agenda, and response visibility setting.
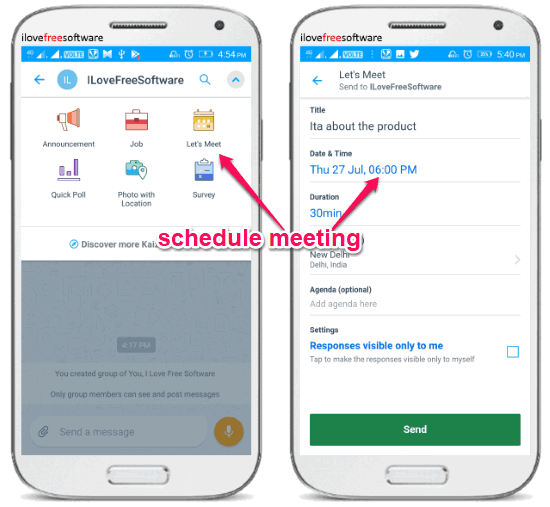
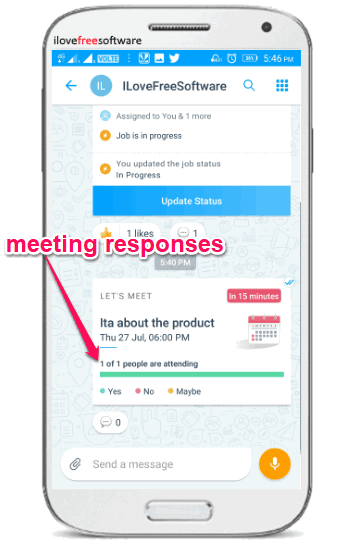
After creating a meeting, simply hit the “Send” button to post it to the conversations. Now, the users will be able to see the meeting card along with 3 options named, Yes, No, and Maybe. The users can select any option they want and you will be able to track their responses on your phone. The users can also comment whatever they want on the meeting card.
How to Create and Send Poll to Users on Microsoft Kaizala:
The “Quick Poll” action can be used to create and send polls to users. You can use it to ask questions and get an opinion from the users regarding the questions. To create a poll, you need to select the “Quick Poll” option on the chat screen. After that, you can enter the question for the poll, add choices (text or images), set poll expiry time, and response visibility setting.
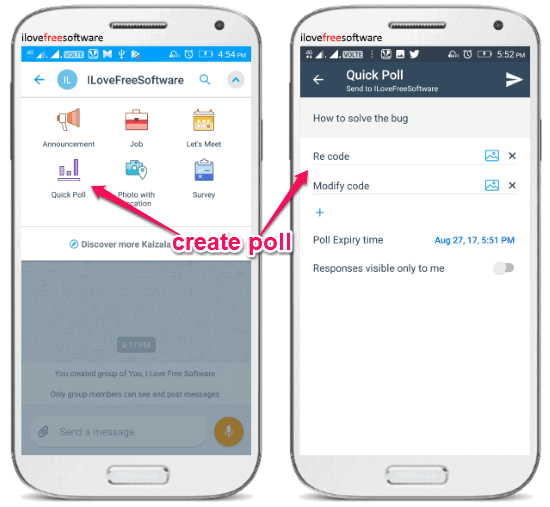
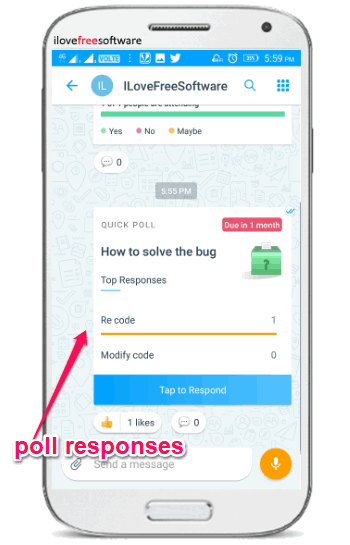
After that, you can send the poll to any user or group. The users will be able to give their opinion by selecting any of the choices added by you on the poll card. They can also like and comment on the card. You can open the poll card to track the responses, close poll, share poll results, and remind users to respond.
How to Share your Current Location with a Photo on Microsoft Kaizala:
The “Photo with Location” action is another important aspect of chatting as you can use it to send your current location to any user or group with a photo. To do that, simply select the “Photo with Location” option on the chat screen and then it will open up the camera for you to take a photo. After you do that, it will allow you to search and select your current location.
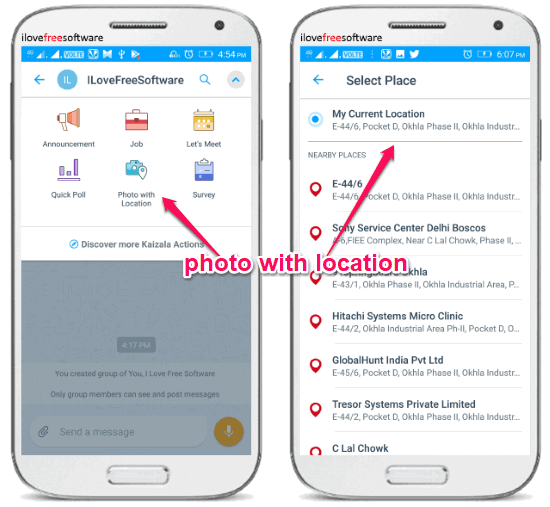
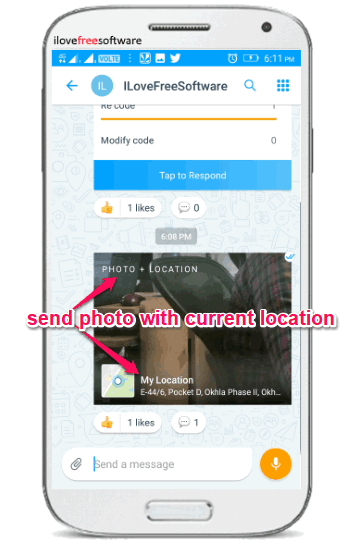
When you select the location, you can go ahead and send the location along with the photo to any user or group. The users will be able to download the photo and see your location on a map. They can also like and comment on the card.
How to Create and Send Survey on Microsoft Kaizala:
Even though “Quick Poll” is the best option to get people’s opinion on questions, but it can only be done for a single question at a time. But, if you would like to ask users a series of questions and get their opinions, then creating and sending a survey can help you do that.
To create a survey, you need to select the “Survey” option after tapping on the “Grid” button on the chat screen. When you do that, it will ask you to enter what the survey is about and a short description of it. After that, you will be able to add a cover image and add survey questions. You can add multiple choice questions, text response, numeric response, and image questions.
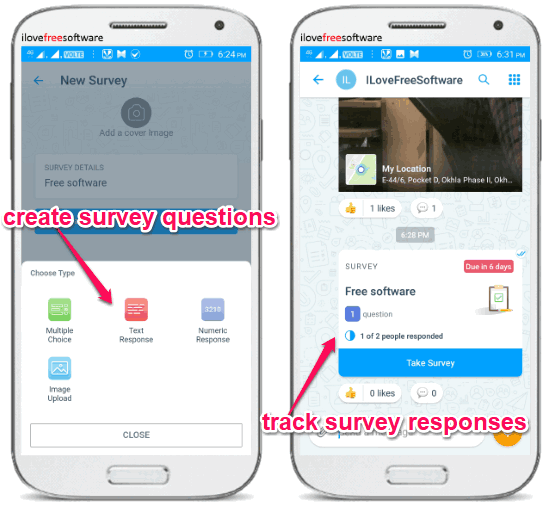
After you’re done adding questions, you can configure some settings like survey expiry date & time, allow multiple responses, response with location, etc. Then simply send the survey to any group or user. The users will be able to take the survey and give their opinion and also like and comment on the survey card. You can track the responses on your phone.
How to Create and Send To-Dos to Users on Microsoft Kaizala:
The “Checklist” action can be used to create and send to-dos to users or groups. Doing so, you will be able to track individual status of the users on tasks. To create a checklist, simply select the “Checklist” option and then enter a title, add items, and additional notes. After that, save and send the checklist.
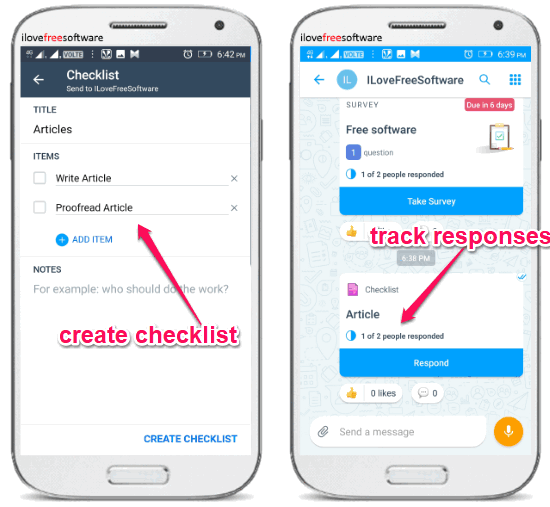
Now, the users will be able to see the checklist card and respond to the items by checking them as completed. If they want to say something about the checklist items, then they can comment on the card.
How to Share and Request Location of Users on Microsoft Kaizala:
There are actually 3 different location actions named, Share Location, Request Location, and Live Location. The “Share Location” action will allow you to share your location with any group or user. The “Request Location” action lets you ask for the location of users. The users have the control whether they want to share their location or not when you request for that.

The “Live Location” action is pretty interesting as it allows you to ask anyone for their live location and then you get a tracking option such that you can go to that particular location. When you request for the live location, the users can allow tracking for 15, 30, 60, or 90 minutes. After that, the tracking won’t work and the live location will stop working.
How to Submit a Bill of Any User on Microsoft Kaizala:
If you want to simply submit a bill of anything which you might have purchased for your business/organization, then you can do that using the “Submit Bill” action. To use it, simply select “Submit Bill” on the chat screen and then enter the bill amount and merchant name.
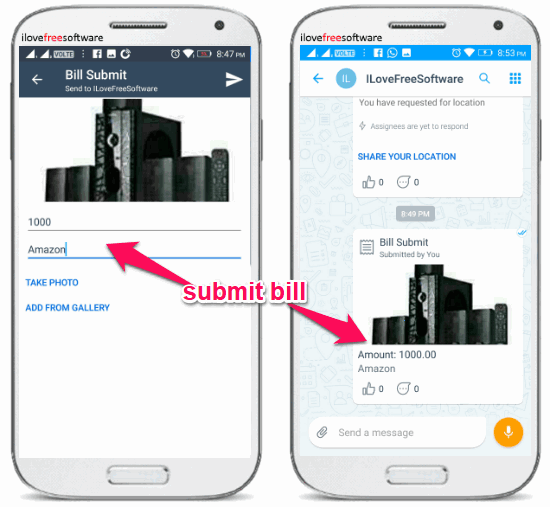
After that, you can also take a picture of the bill or product and attach it will the action. Once you’re done simply send it to your group or any user. The users can see the bill with details and download it if they want. They can also like or comment on the bill card.
Closing Words:
Microsoft Kaizala is no doubt one of the best apps for Android for team communication. All the actions make it pretty unique and useful. Personally, I liked it as soon as I started using it. It is like WhatsApp for businesses. So, go ahead and give it a try.