This tutorial explains how to rename a user profile folder in Windows 10. If you rename a user profile folder directly (like you would rename a normal folder), it will corrupt the user profile. But here is a simple trick that can help you rename any local user profile folder without corrupting its profile. You need to do a small change in Windows 10 Registry and then you can access user profile folder (C:\Users) and rename it.
I have covered all the necessary steps to help you change the name of a user profile folder in Windows 10 with ease. Before you start, note the following points:
- Do not try to rename a user profile folder name directly by accessing “C:\Users” list. It will rename the folder but corrupt your user profile. After that, when you will try to access that particular user on your Windows 10 PC, it will sign in with a temporary profile, and not the actual profile. As a result, you won’t be able to access Desktop items, downloads, and other items related to that user account.
- You must be signed in with administrator account to change the name of a user profile folder.
- You local user account, whose profile folder name you want to change, must be signed out.
- It works for local user only and not Microsoft account.
- You should also create a system restore point.
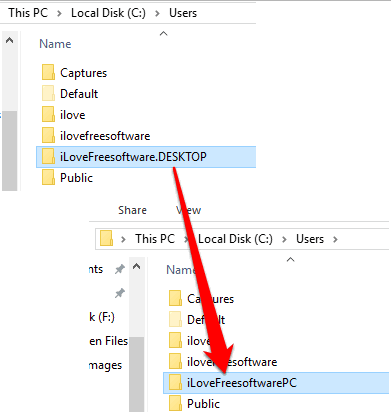
In the screenshot visible above, you can see a user profile renamed using this trick on my Windows 10 PC.
How To Rename User Profile Folder In Windows 10?
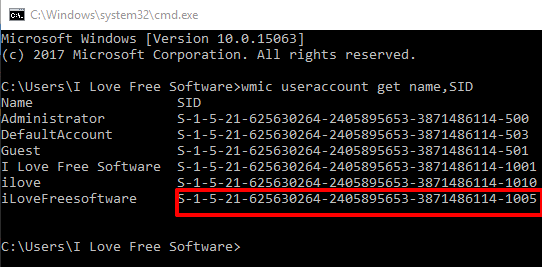
Step 1: First of all, you need to check the SID number of user profile whose folder you want to rename. SID number looks something like “S-1-5-21-123456789-123456789-1234”. To check SID number of a user profile, type cmd in Search box and then you can launch Command Prompt window.
Step 2: When CMD window is opened, execute this command: wmic useraccount get name,SID. It will show the name of user profiles along with their SID numbers. Copy the SID number of preferred user profile and then paste it in Sticky Notes or some text editor software.
Step 3: Use Search box and then type ‘regedit‘. This will help you start Registry Editor.

Step 4: Access ProfileList registry key. Follow this path to access that key: HKEY_LOCAL_MACHINE → SOFTWARE → Microsoft → Windows NT → CurrentVersion → ProfileList.
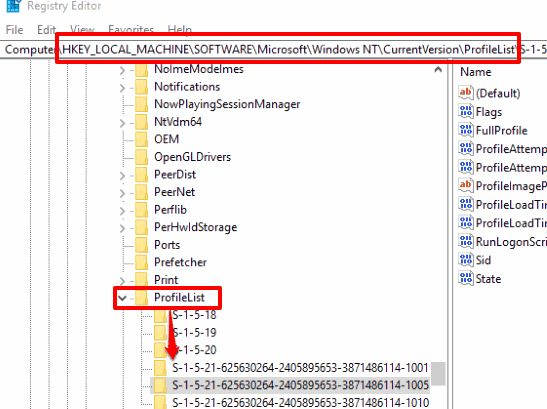
Step 5: Look for the SID number that you copied in step 2 related to the user profile. When you have found that SID number, select it. See the screenshot above.
Step 6: On the right side, you will see a Multi-String value “ProfileImagePath“. Double-click that value and you will see the full path of that particular user profile folder along with its name. Now change the name of user profile folder and save this registry change.
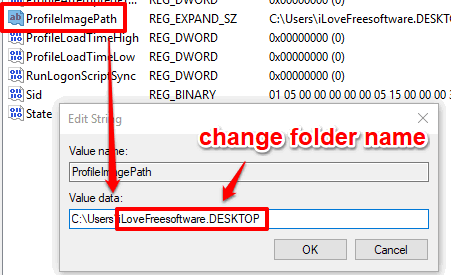
The work is not finished yet. You have to complete one more step.
Step 7: Go to C:\Users folder. You will see all user profile folders. Now select the same user profile folder whose name you changed in Multi-String value and then rename that folder. Remember, you need to enter the same name that you added in Value data under Registry.
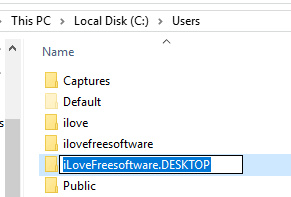
When the user profile folder is renamed, you work is done.
Now you can access that particular local user and you will see that everything is same, except the new name of user profile folder.
The Verdict:
Whenever you install Windows 10 and add new users, Windows automatically sets their profile folder names. If you don’t like it, then simply change user profile folder as per your wish. Carefully follow the above steps and renaming a user profile folder in Windows 10 will be very easy for you.