This tutorial explains how to disable pinning items in Jump Lists in Windows 10. I will talk about two methods to do this in Windows 10. You can disable pinning items in Jump Lists using Registry Editor and/or Group Policy window of Windows 10. Both the methods are covered in detail in this tutorial. Of course, you can always enable this back whenever you want.
Jump Lists feature is actually good as it shows most used and recently opened items for taskbar items and Start menu items and also provides pin option for each individual item. But if you are not interested in pinning items in Jump Lists, then you can disable this feature. Let’s see how.
![]()
Let’s start with first method, which is Group Policy.
Method 1: How To Disable Pinning Items In Jump Lists In Windows 10 Using Group Policy Editor
Step 1: Press Win+R hotkey to open Run Command box and then write gpedit.msc in Run box. Press Enter and then it will open Group Policy.
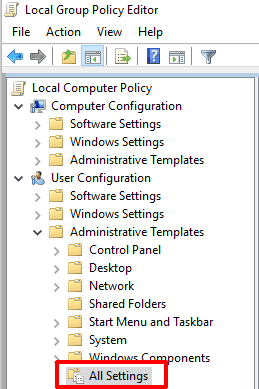
Step 2: In this step, you have to explore Group Policy and access All Settings folder. To go to this folder easily, you can use this path: User Configuration → then explore the Administrative Templates → and All Settings folder will visible. Click this folder.
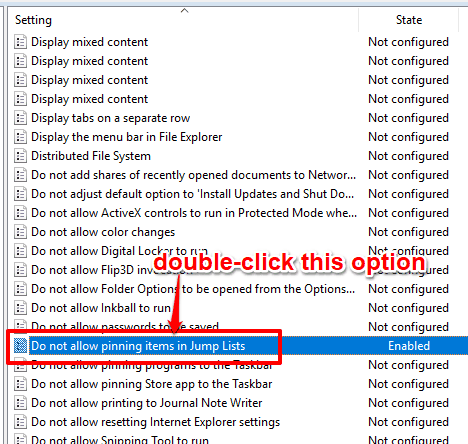
Step 3: Tons of options will visible in the right pane. In that list, find “Do not allow pinning items in Jump Lists” option and double-click that option.
Step 4: You will see a new window that has three options. You can see those options on the top left side. Options are: Not Configured, Disabled, and Enabled. For removing pin feature in Jump Lists, click on Enabled option.
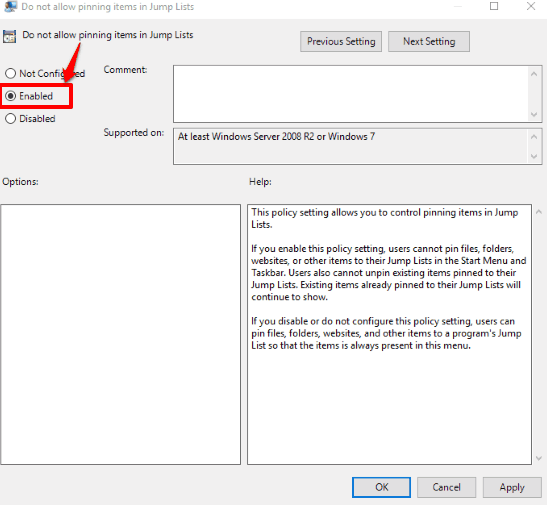
Save settings and that’s it! Now pin icon won’t come for items available in Jump Lists.
To get back pin option for items present in Jump Lists, use Not Configured option.
Method 2: How To Disable Pinning Items In Jump Lists In Windows 10 Using Registry Editor
Step 1: Click on the Search box and type regedit. Press Enter key and then Registry window will open.
Step 2: When Registry Editor window is opened, go to the Explorer key. This path will help you access this key easily: HKEY_CURRENT_USER → Software → Policies → Microsoft → Windows → Explorer.
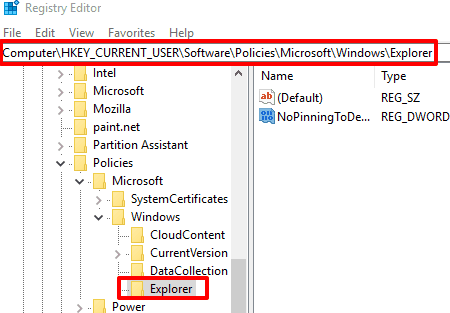
Step 3: Right-click on Explorer key, select New, and click DWORD (32-bit) Value option. This will create a new DWORD at the right pane. When it is created, rename it with “NoPinningToDestinations“. After you have done this, it’s time to change value data of that DWORD. Double-click on NoPinningToDestinations DWORD and then write ‘1‘ in Value data box.
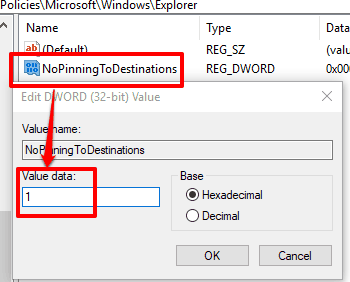
Save it and restart File Explorer. This will immediately disable pinning items in Jump Lists in Windows 10.
To enable pinning items in Jump Lists again, simply add ‘0’ as Value data for NoPinningToDestinations and restart File Explorer.
You can also check How To Turn Off Jump Lists In Windows 10 and Remove Recent Files From Jump Lists In Windows 10.
The Verdict:
I haven’t used pin feature of Jump Lists in Windows 10 till now and probably I won’t use it ever because I don’t find it so useful for me. So, I personally prefer to disable this feature.