Alternate Directory is a nifty free disk cleaner software to delete junk files. It’s lightweight and easy to use. Alternate Directory can quickly scan a specified target location, such as a partition, or an entire partition for any traces of junk unnecessary files, and delete them to recover disk space. You can specify whether the junk files are straightaway deleted, or just moved to the Recycle Bin. Alternate Directory has a listing of standard junk file types (e.g. *.bak, *.001) which gets accumulated in the system with time. Apart from that, it can automatically scan and delete zero byte files, and even those that are write protected. You can also print the list of deleted files as a log file.
While there are already a bunch of disk cleaner software applications out there, such as Soft Cleaner, what sets Alternate Directory apart is the fact that it explicitly lets you control which file types are to be scanned and hence, deleted. And you can also specify custom file types to be scanned. Plus it’s lightweight. Sounds interesting? Let’s find out more.

How To Use This Free Disk Cleaner Software To Delete Junk Files?
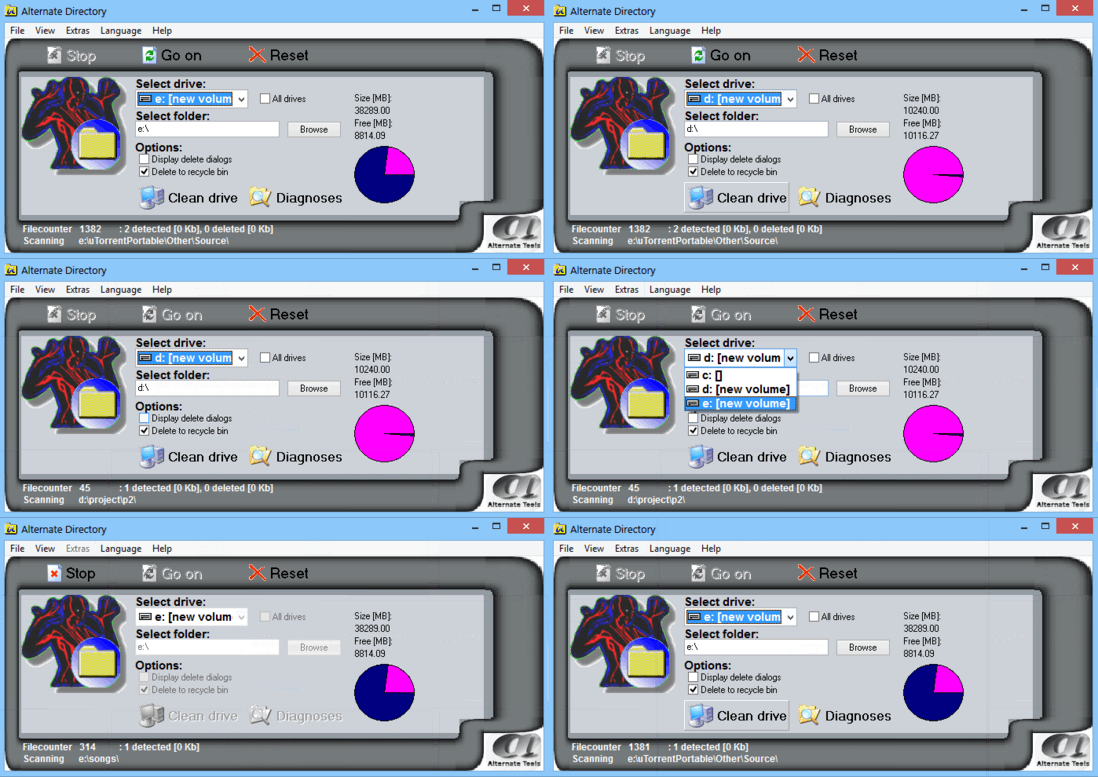
Before getting started with Alternate Directory, the first step is obviously to install it. Doing so is super simple. Simply download the lightweight (under 1 MB) installer from the homepage, install it, and you’re all set to roll. Once installed, Alternate Directory should automatically fire up. Here’s how it looks like:

As illustrated by the above screenshot, Alternate Directory features an ultra-simplistic (and maybe a bit too bland as well!) user interface, comprised just of a single pane. Primarily, there are two drop down options, that let you select the target partition, or the folder that you want to scan for junk files. Apart from that, there are some self-explanatory checkmark based options, and a pie chart that gives real-time size breakup (total and free) of the selected location. Below that, there are just two big options: Clean drive (for starting up the junk cleaning process), and Diagnosis (mis-spelled, and can be used to analyze what can be deleted). You can also use the Stop/Go-on/Reset buttons up top to pause/resume/start-over the cleaning process.
Using Alternate Directory to scan your system for junk files and have it delete them to reclaim disk space is quite simple. Essentially, all you have to do is analyze what can be deleted, and then delete it. Here’s a little step by step process anyway, illustrating how to get started with Alternate Directory.
Step 1: Use the drop down menus labeled Select Drive and Select Folder to specify where you want to search the junk files to delete. Obviously, the bigger the location, the longer it will take to scan/clean it up. Specify advanced options (denoted by checkmarks) if you want to be doubly sure about what gets deleted and what gets moved to recycle bin. Once done, hit the Diagnosis button.

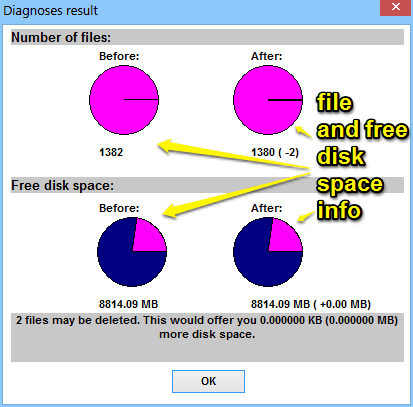
Step 2: Once Alternate Directory has scanned the junk files in the specified location to be deleted, it’ll generate a pop-up, letting you know how much space you can recover (If you want, you can also skip this option and directly get on with the cleaning process, as the result would be specified after that anyway).

Step 3: When you’ve reviewed everything, just hit the Clean Drive button, and let Alternate Directory handle the rest. It’s really that simple!
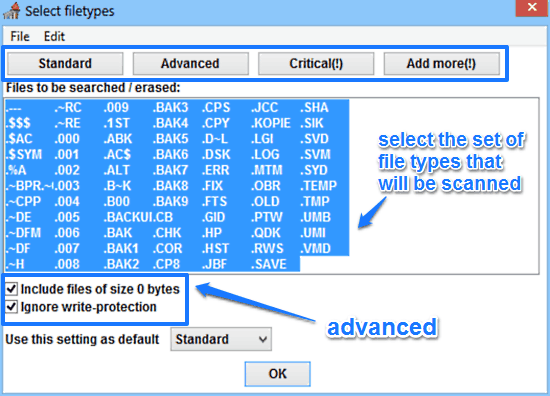
If you want to see what are the file types that are scanned and deleted by Alternate Directory, simply go to Extras > File Types. Here, you can also specify what group of file types is scanned and deleted by Alternate Directory. You can also add custom file types, as well as specify advanced options such as scanning of zero byte files. Check out the screenshot below:

Also See: Delete Junk Files And Fix Registry Errors Using Free Windows Cleanup
Conclusion
Alternate Directory is a useful free disk cleaner software to get rid of junk files. It’s a simple and easy to use method to remove unnecessary files from your computer. Features like light memory footprint, ease of use, and individual location selection make it quite a solid application. Then there’s also the ability to add custom file types to be scanned. What more could you ask for? Give this little software a try, and let me know your thoughts in the comments below.