This tutorial explains how to collaborate in MS Word in Windows, share documents. MS Office is already one of the most used Office suites in the world and Microsoft keeps bringing new features in it to make it even better. If you working in a team on a specific document, then you can collaborate with your teammates on it. You can all work on a single document with the help of collaboration feature of MS Word. Also, it allows you to directly share your document with others easily. The collaboration feature of MS Word works with the help of OneDrive. You can see all the changes your teammates have made in the document so far. And not only this, if they are editing the documents at the same time as you are, then the changes will appear in real-time.
Collaboration in MS Word takes one time setup of OneDrive and after that you are good to go. You can invite people using their email address and also specify what they can do. Either you can give them “edit” access or you can give them read only access “view”. You can always see what your other teammates are contributing to the document and you van revoke their access anytime.

How to Collaborate in MS Word on Windows, Share Documents?
To collaborate in MS Word, you will need 2013 or higher version. And once you have it open, follow these simple steps.
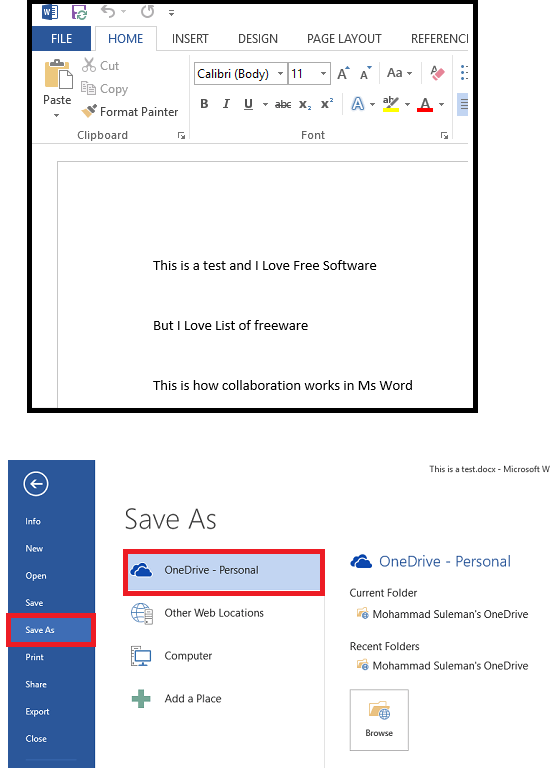
Step 1: Create a document, type some text, and save it. Now, in order to share it with others for the sake of collaboration, you will have to save on OneDrive instead of your local disk. To do this, you will have to first sign in to your OneDrive account.

Step 2: Open “Save As” pane and add sign in to OneDrive using your Microsoft account. After successful sign in, simply save your file in OneDrive.
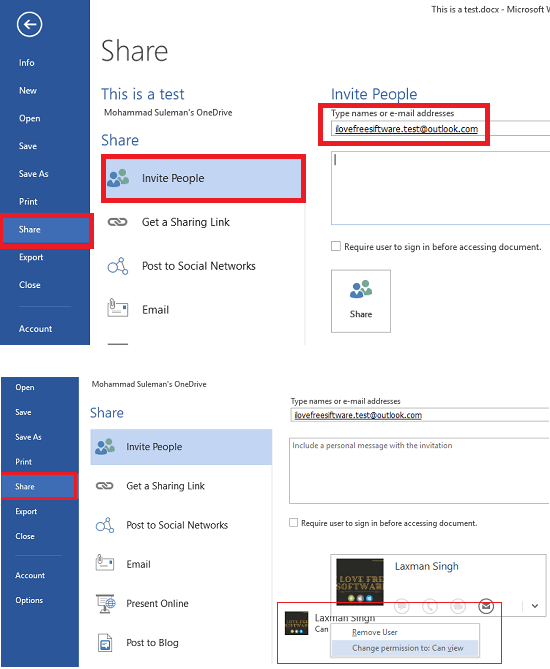
Step 3: After saving your file on OneDrive, it’s time to invite people to share and collaborate with your document. To invite people for collaboration, click on File and then Share option. From there, you can type the email addresses of the people you want to collaborate with.
After you have sent the invite to people you want to collaborate with you can set their access rights. You can either give them full editing rights from the Share section. Or, you can also give them rights to view only.

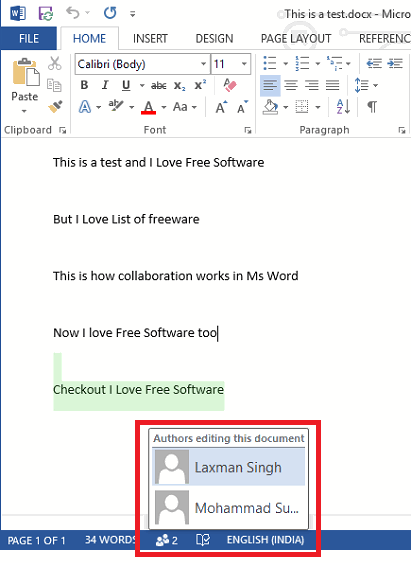
Step 4: Now after saving your files and inviting your friends, you are ready for the collaboration. Just type anything and save it and wait for the other participants to accept your invite and start editing the document. From the bottom side you can see who is editing the document right now.

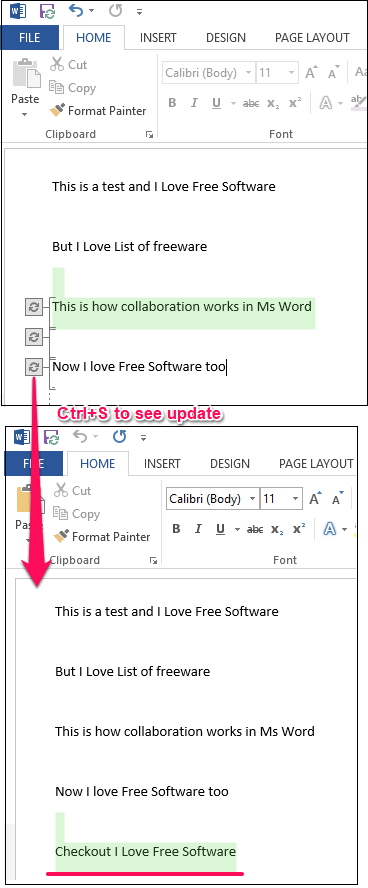
Step 5: When someone is editing the documents, there is an update sign which will appear on MS Word. That means someone has made a change in the document. To see what change has some made, simply save your document by pressing Ctrl+S. After that, MS Word will highlight the edited part for you. You can see that in the following screenshot.

In this way you can collaborate in MS Word. And you can do that without any third-party software. And if you like collaboration feature in applications, then you can try a code editor with collaboration, online file manager with collaboration, online services for documents collaboration.
Closing Words
At first I didn’t know that collaboration feature has finally arrived for office. But when I read about it, I found it to be worth sharing. And because of that I have done this tutorial to spread the knowledge for good. If you still didn’t know about the collaboration feature of MS Word, then it’s time to start using it.