This tutorial covers how to disable Windows key in Windows 10. This will be helpful when you accidentally press Windows key or Win key while playing games in Windows 10 or typing in some application. When Win key is disabled, it won’t distract you from your current work.
I have covered 3 different methods here including Registry Editor and free software to disable win key in Windows 10. Registry Editor method disables Win key as well as Win key related hotkeys (such as Win+E, Win+I, etc.). The rest of the methods disable only Win key. These methods also help to enable Windows key anytime in your Windows 10 PC. You can check all these methods and then select the best one for you.
Let’s start with the built-in Registry Editor method.
Method 1: Disable Windows Key in Windows 10 Using Registry Editor
This is a very effective method as it disables Windows key as well as shortcuts associated with Windows key (like Win+R, Win+E, Win+I, etc.).
Step 1: Use Run box (Win+R), type ‘regedit‘ in its text box, and press the Enter key. This will help you start Registry Editor.
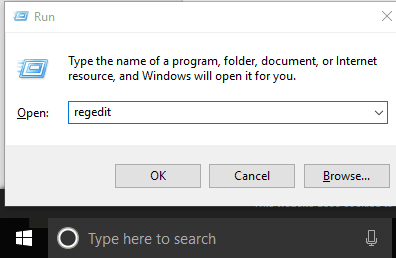
You can also open Registry Editor using the Search box.
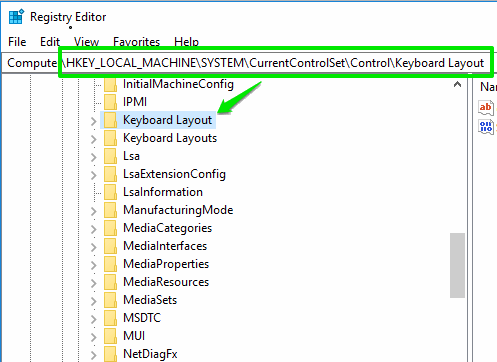
Step 2: In Registry Editor, look for “Keyboard Layout” key. You can follow this path to find that key: HKEY_LOCAL_MACHINE → SYSTEM → CurrentControlSet → Control → Keyboard Layout.
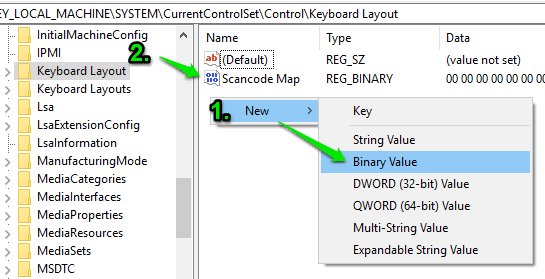
Step 3: On the right side of Keyboard Layout, right click on the empty area, select “New” menu, and then click on “Binary Value” option. This will create a new Binary Value on the right section of Keyboard Layout. After that, rename that value to “Scancode Map“. See the screenshot below.
Step 4: Now double-click on Scancode Map Binary Value and a box will open. In that box, you need to enter “00000000000000000300000000005BE000005CE000000000” value in the value data field. It will look like visible in the screenshot below.
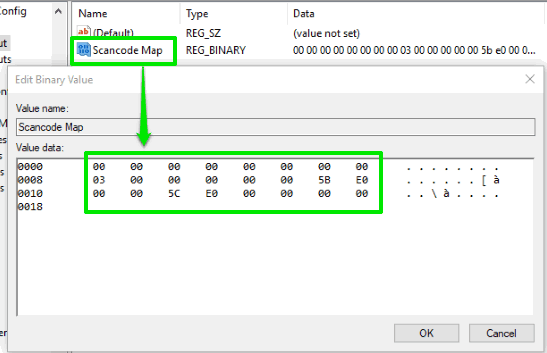
Press OK.
Step 5: Now you can close the Registry Editor window and then restart your PC. If you will restart File Explorer, then changes won’t work. So, you have to restart your PC.
When PC is restarted, press “Win” key. You will notice that it is not working anymore as you have disabled Windows key.
Step 6: To enable Windows key again on your Windows 10 PC, you need to simply delete Scancode Map key and then restart PC.
This will undo all the changes and then you can use Win key again.
Method 2: Disable Windows Key in Windows 10 Using A Free AutoHotkey Software
AutoHotkey is a very popular software that lets you create custom scripts and run those scripts for different purposes. We can use this software and create a simple script to disable Windows key in Windows 10. This software won’t prevent Windows key related shortcuts (like Win+E, Win+R, etc.). It only disables Win key.
Step 1: Get the setup of AutoHotkey software and install it.
Step 2: Right-click on the desktop to open the context menu, access “New” menu, and select “AutoHotkey Script” option. You won’t see this option if AutoHotkey is not installed in your PC.

Step 3: After selecting AutoHotkey Script option, a new script file will be added to your desktop. Right-click on that script and select “Edit Script” option. The script will open in notepad. There you will see some preset text. You don’t need to remove that text. Simply press enter and paste these two codes in separate lines:
~LWin Up:: return
~RWin Up:: return
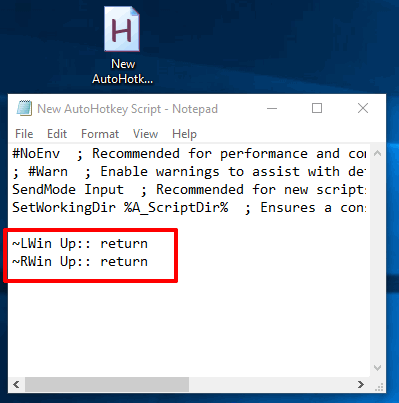
After that, you can save the script.
Step 4: Double-click on Script to run it. The script will start running in the system tray with the help of AutoHotkey software.
That’s it! Now press Windows key. You will notice that Win key is not working as it is disabled.
Step 5: To enable Win key in Windows 10 again, you can right-click on the AutoHotkey icon and press “Exit” option.
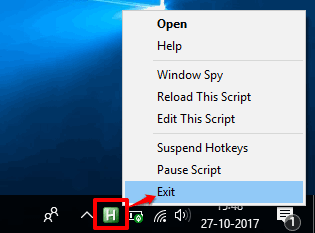
This will enable Win key again in Windows 10.
Method 3: Disable Turn Off Windows Key In Windows 10 Using A Free Portable Software
This is the simplest method in this list to turn off Windows key in Windows 10. If you want to avoid Registry changes manually or not interested to create some script to disable Win key, then you should give it a try.
Step 1: Download the zip file of WinKill software. Extract that file and then you will see “WinKill” name portable application file. Execute that application and it will silently sit in the system tray.
Step 2: Now you can click on its system tray icon and it will disable Windows key immediately. Win key related shortcut keys will work but Win key will be disabled.
![]()
Step 3: To enable Windows key again, you can again click on the system tray icon of this software. It will immediately enable Win key.
You may also check how to disable Action Center and how to disable Windows Features in Windows 10.
The Conclusion:
I like all these methods to disable Windows key in Windows 10. But, the most preferred and easiest is the 3rd method. The best thing about this method is you don’t have to restart PC or File Explorer to enable or disable Windows key. Only a click is all you need to disable/enable Win key in Windows 10 using this method. The rest of the two methods are also good. Try these methods and share your experience using the Comments section.