This tutorial explains how to remove OneDrive in Windows 10 PC.
We can’t remove OneDrive using Control Panel or by accessing Apps & Features section in Windows 10. However, there are some really simple methods that I have covered in this tutorial to remove OneDrive in Windows 10 PC. Whether you want to remove OneDrive from Windows 10 File Explorer or need to completely remove it from Windows 10 PC, this tutorial has the solution.
OneDrive comes pre-installed in Windows 10 to help you sync files between your OneDrive account and Windows 10 PC. However, if you always prefer a web browser to access your OneDrive files, then probably you don’t want to keep OneDrive on your Windows 10 PC.
So, let’s start with the first method to remove OneDrive in Windows 10 PC.
Remove OneDrive from Windows 10 File Explorer:
This method is useful when you want to remove or hide OneDrive from the navigation pane of Windows 10 File Explorer. This won’t completely uninstall OneDrive from Windows 10 PC. Steps are as follows:
Step 1: Use Run Command (Winkey+R) or Search box (Winkey+S) to launch Registry Editor.
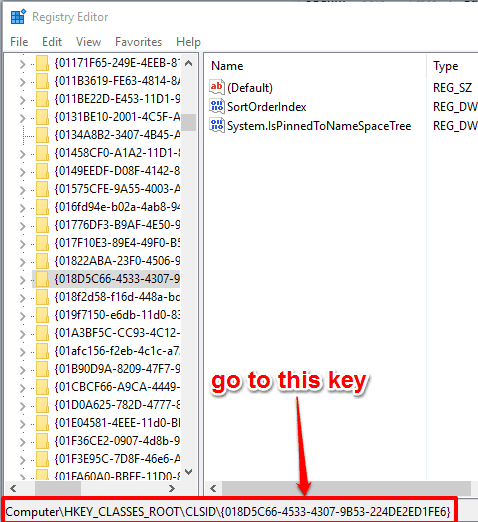
Step 2: Go to: “HKEY_CLASSES_ROOT\CLSID\{018D5C66-4533-4307-9B53-224DE2ED1FE6“.
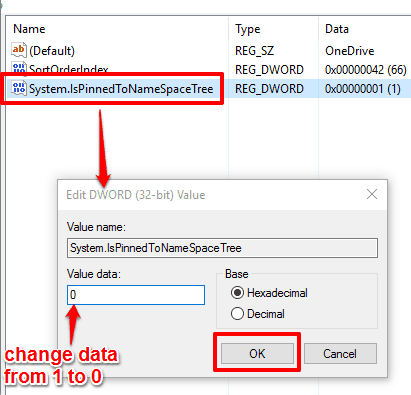
Step 3: That key contains a “System.IsPinnedToNameSpaceTree” key. Double-click that key to edit its Value data. The default data is set to ‘1’. Change this value with ‘0’ and save the changes.
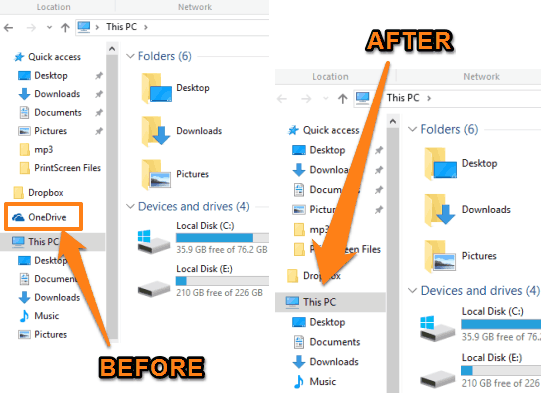
Open File Explorer and you will notice that OneDrive is not visible in the navigation pane of Windows 10 File Explorer anymore.
Whenever you want to bring back OneDrive icon, change the value data of that value back to ‘1’.
Completely Remove OneDrive In Windows 10 Using Command Prompt:
There is an option to use PowerShell to remove some pre-installed apps from Windows 10 PC, but it is not helpful to remove OneDrive. So, we will take the help of Command Prompt window. This action will completely uninstall OneDrive in Windows 10. However, you can also bring back OneDrive, whenever you want. Follow these steps:
Step 1: Run Command Prompt as administrator.
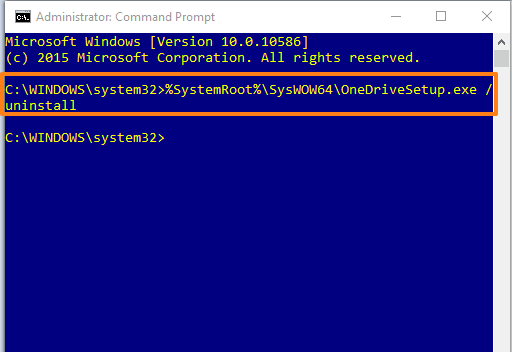
Step 2: Type the command: “%SystemRoot%\SysWOW64\OneDriveSetup.exe /uninstall” and execute it. Replace SysWOW64 with SysWOW32 in case you are running 32-bit version PC and then execute the command. Without any warning, it will silently remove OneDrive from Windows 10 PC.
You can type in Search box, but you won’t be able to find OneDrive because it is gone. However, it will keep the OneDrive folder and your files.
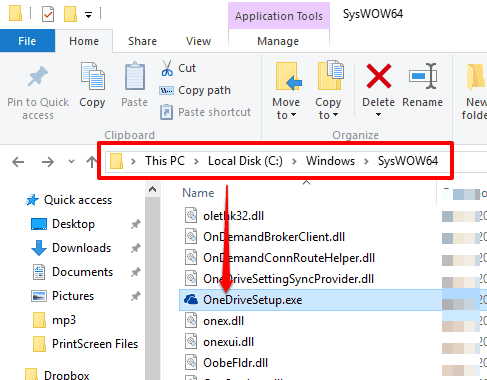
Step 3: When you want to bring back OneDrive, go to “C:\Windows\SysWOW64“, and search for OneDriveSetup.exe. Launch that EXE and you will be able to install it again in your Windows 10 PC.
Completely Uninstall OneDrive In Windows 10 Using A Free OneDrive Uninstaller Tool:
There is a free tool (or a Windows Command Script), named OneDrive Uninstaller, that can completely remove OneDrive in Windows 10 PC. After using this tool, you can’t even access OneDrive folder or icon available in File Explorer.
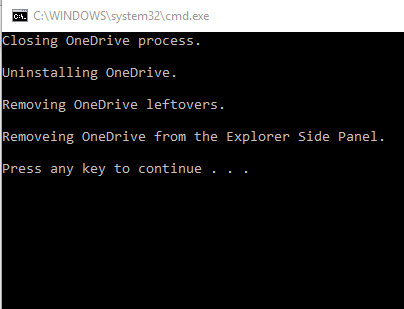
All you need to do is download this tool and execute it. That’s it! It will first close OneDrive processes, remove it from File Explorer, remove leftovers, and finally uninstall OneDrive completely.
If you have to get back OneDrive, you can go to “C:\Windows\SysWOW64” location and execute OneDriveSetup.exe file.
The Verdict:
I have tested all these methods and was successfully able to remove OneDrive in my Windows 10 PC. Which method you will use if you have to remove OneDrive in Windows 10 PC? Probably, the second one is the simplest method to help you remove OneDrive from Windows 10.
Here are some other interesting tutorials related to OneDrive:
