Here are 5 free video denoise software for Windows. Using these software, you can reduce noise from videos with ease. You can simply import a video to these software and manually set the denoising strength to reduce and minimize the noise from the video. They are very effective and can convert those grainy and noisy videos into something smooth and clear. Some of these software are open-source video editors and include other editing features like trimming, cropping, cutting, etc. along with denoising videos.
The videos recorded using smartphone cameras, digital cameras, etc. sometimes contain noise like grain, hiss, compression artifacts, etc. These noises make the visual quality of the video look dull and unprofessional. So, if you’re looking for free software to remove noise from videos, then using any of these video denoise software is probably the best option for you.
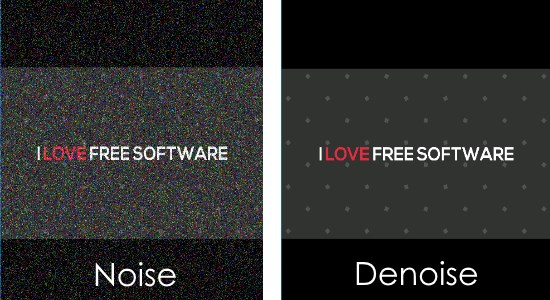
Let us get started with the video denoise software and see how to use them for reducing noise from videos.
Shotcut:
Shotcut is probably one of the best free video denoise software for Windows. This software is a typical video editor with tools like trim, cut, crop, color correction, etc. Apart from these tools, it also comes with a simple tool which can help you reduce noise from videos.
How to Denoise Video using Shotcut:
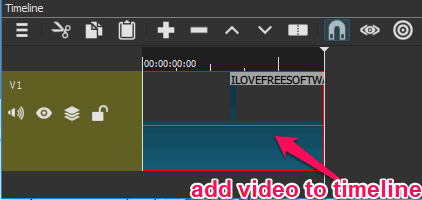
Step 1: Simply open “Shotcut” on your PC and import the video to denoise. You can import a video (like WMV, MP4, AVI, etc.) by clicking on the “Open File” button. Then select the video on the preview window and drag and drop it on the timeline at the bottom.
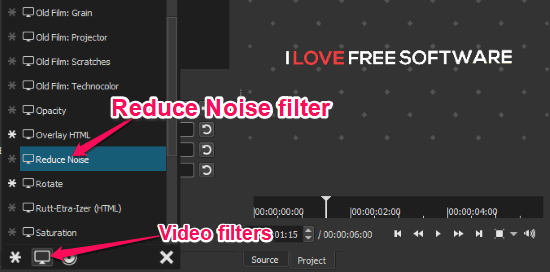
Step 2: Now, select the tab named, “Filters”, just above the timeline and press the “+” button. After that, you would need to select the “Video Filters” option and then choose the “Reduce Noise” filter from the filters list.
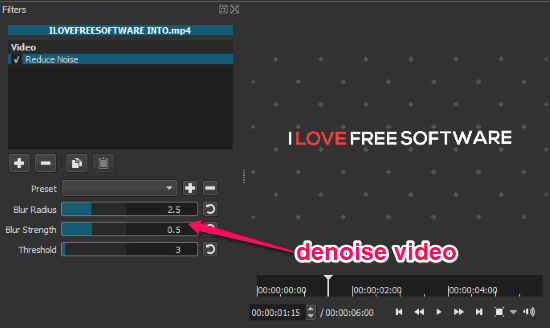
Step 3: As soon as you do that, you will be able to see the options to denoise the video. It will allow you to manually set the value for Blur Radius, Blur Strength, and Threshold to reduce noise from the video. When you’re done entering these values, you can go ahead and save the video with reduced noise.
VSDC Free Video Editor:
VSDC Free Video Editor is another free video denoise software which can be used to easily reduce noise from videos. Along with some of the useful video editing features like cropping, trimming, splitting, etc., it has a simple option to denoise video.
How to Denoise Video with VSDC Free Video Editor:
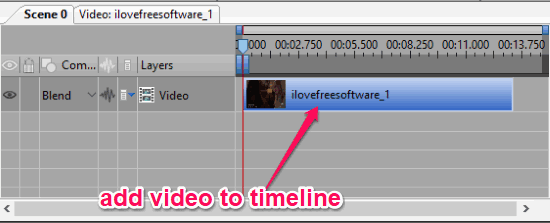
Step 1: After you open up VSDC Free Video Editor, simply select the “Import Content” option on the main window. Then you can select the video (like FLV, MP4, WMV, etc.) from which you want to reduce noise. When you select the video, it will be added to the timeline at the bottom of the editor.
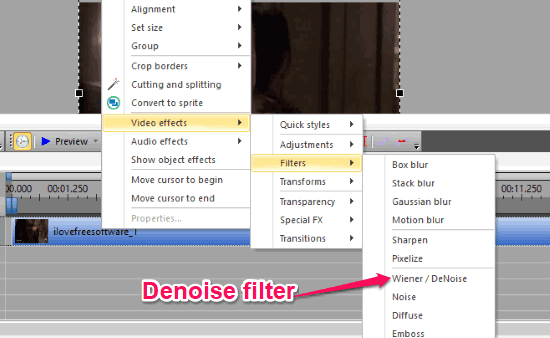
Step 2: After that, right-click on the video and select “Video Effects → Filters”. Then from the list of filters, you gotta select the “Weiner/DeNoise” filter, as shown below. When you do that, it will open up the “Object Position Settings” window where you can choose a specific duration of the video from which you want to reduce noise or select the entire video.
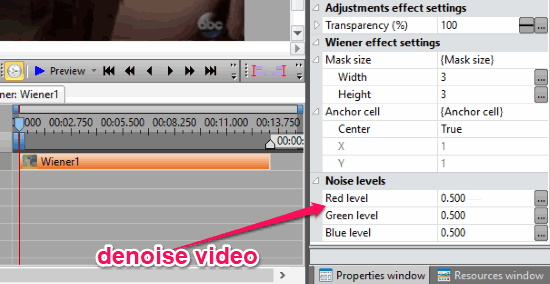
Step 3: Then you will see a “Noise Level” section under the “Properties” window on the right of the editor. Here, you can enter the values of all the noise levels (red, green, and blue) manually to denoise the video. After that, you can simply export the video and see the noise reduction as per the values entered by you.
Avidemux:
Avidemux is a free open-source video editor with interesting features like post processing, edge sharpening, video decoder, cutting, and so on. In addition to these features, it also bundles dozens of filters which can be used to transform, interlace, sharpen, and most importantly reduce noise from videos.
How to Reduce Noise from Video using Avidemux:
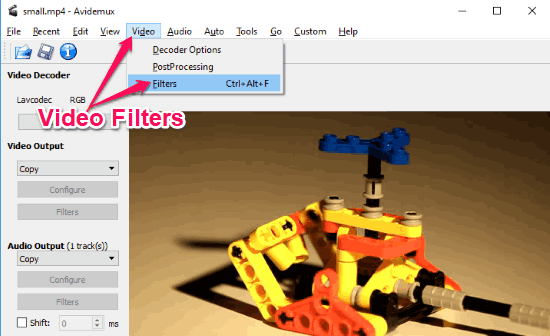
Step 1: To get started, simply launch Avidemux and select “File → Open” at the top menu to import the source video. You can import different video files like MPEG, AVI, MP4, MKV, etc. for denoising. After importing the video, simply click on the “Video” menu and select “Filters” from the list.
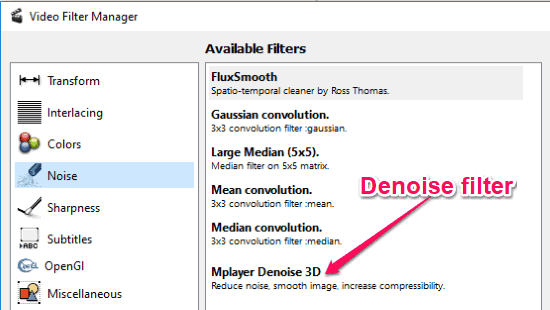
Step 2: When you do that, a popup window will open up with all the supported filters. Now, select “Noise” on the left of the window and then you will see the denoise filter named, “Mplayer Denoise 3D” on the right.
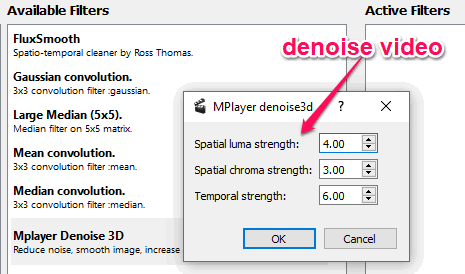
Step 3: Now, to denoise the video, simply double-click on the denoise filter. Then it will ask you to enter the values for Spatial Luma Strength, Spatial Chroma Strength, and Temporal Strength. You can enter any value you want to reduce noise from the video. After adding the denoise filter, you can export your video with minimal noise.
VirtualDub:
VirtualDub is actually a video capturing and editing software with basic yet useful features such as compression, audio filters, cutting, interleaving, and more. Apart from these features, it also comes with dozens of video filters which you can use to edit your videos. Unfortunately, it doesn’t have any direct video filter to denoise videos. But, do not worry as there are many plugins available which you can integrate with VirtualDub to denoise videos.
How to Reduce Noise from Video with VirtualDub:
Step 1: To start, you would need to integrate a denoise filter with VirtualDub for reducing noise from videos. There are many filters available for that, but I would recommend you to use “MSU Denoiser Filter” as it is very effective. You can simply download this filter, extract the file, and copy/paste the files inside the “plugins” folder in the installation directory of VirtualDub.
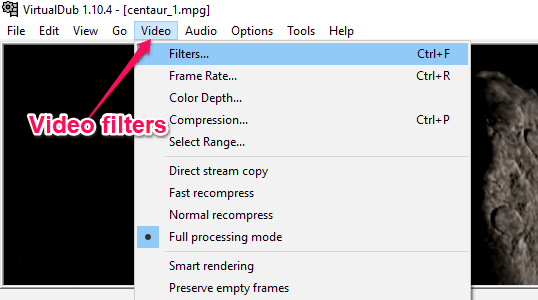
Step 2: Once you’re done with that, simply open VirtualDub and select “File → Open Video File”. Then you can choose the video (AVI, MPEG, DAT, etc.) which you want to denoise. After that, click on “Video” at the top and the select “Filters” to open up the video filters.
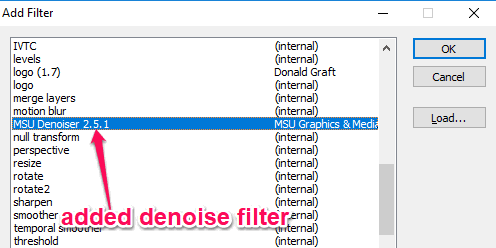
Step 3: Now, on the “Filters” window, click on the “Add” button and this will open up all the supported video filters. You can simply scroll down the filter’s list and you will be able to see the denoise filter which you have added to VirtualDub.
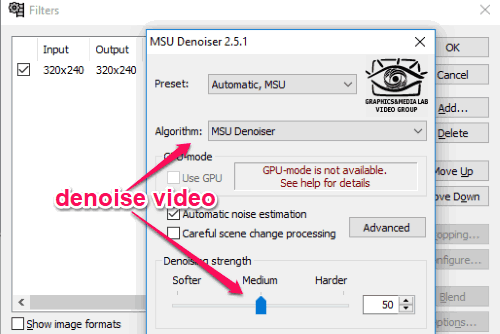
Step 4: Suppose, you have also integrated “MSU Denoiser Filter”, then to denoise the video you would need to double-click on it. After that, you will be able to choose any of the predefined “Presets” and “Algorithms” to reduce noise from the video. It also allows you to manually define the denoising strength by dragging the “Strength” slider.
FFmpeg:
Apart from the typical video editors, which I have mentioned above in this post, you can also use “FFmpeg” to denoise video. It is a powerful command line (encoder) tool which you can use to do different types of video editing operations like batch rotate videos, batch watermark videos, etc. So, there is also a simple command of FFmpeg that can help you reduce noise from videos with ease.
How to Use FFmpeg to Denoise Video:
To get started, let us take a look at the FFmpeg command to denoise video. The command will look like below:
ffmpeg -i [input file] -vcodec libx264 -preset slow -vf “hqdn3d=4.0:3.0:6.0:4.5” -acodec aac -strict experimental -ab 128k [output file]
Now, you can simply open up “FFmpeg” command line tool and enter the above code. In this code, you would need to manually define the video file which you want to denoise and the output file name. The denoising strength will mostly depend on the “hqdn3d” value. That means you can also change the “hqdn3d” value in the command to reduce noise of the video as required.

When you’re done with the FFmpeg command, simply hit Enter and the noise will automatically reduce from the video. The video will also be exported to the defined output file directory.
Closing Words:
These are some of the best free video denoise software available for you to remove noise from videos. All of these software are pretty effective in terms of reducing noise from videos. Personally, I have tested all these video denoise software and I liked “Shotcut” the most. This is because the amount of noise which it can remove from videos without compromising the video quality is very impressive.
So, try these software to denoise videos with ease.