This tutorial shows how to mute audio for specific sites in Chrome browser. You can do this with the built-in feature of Chrome. Once a website is blocked from playing audio, it will always remain muted, unless you enable audio for that particular website again. This feature is different than tab mute feature of Chrome. While muting a tab in Chrome disables audio only for that particular tab, this feature to mute audio for a website/webpage affects all its tabs that you will open.
Currently, muting audio for specific sites in Chrome browser is available in test mode. That means you can’t use this feature on the stable version of Chrome browser. You need to use Chrome Canary browser to use this feature and mute audio for specific sites.

Once a website is blocked from playing audio, clicking on the volume icon visible on the tab of that particular site won’t unmute it. But don’t worry, you can unmute a website anytime easily. I have covered all the steps in this tutorial.
How To Mute Audio for Specific Sites In Google Chrome?
As I mentioned in starting, this feature to mute audio for particular websites in Chrome is available in Chrome Canary. So, if you want to use this feature now, you should install Chrome Canary.
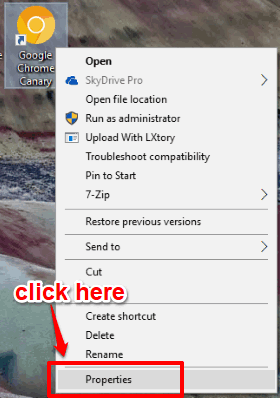
Step 1: Right-click on the desktop shortcut of Chrome Canary browser and click on its “Properties” window.
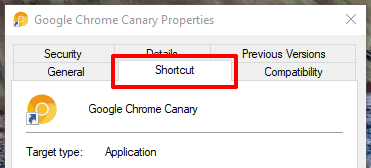
Step 2: When Properties window opens, click on its “Shortcut” tab.
Step 3: In Target field, you will see the path of Chrome Canary. You need to press ‘space‘ just next to the path of Chrome Canary browser and write “–enable-features=SoundContentSetting“. So, the whole path would be: "C:\Users\I Love Free Software\AppData\Local\Google\Chrome SxS\Application\chrome.exe" --enable-features=SoundContentSetting
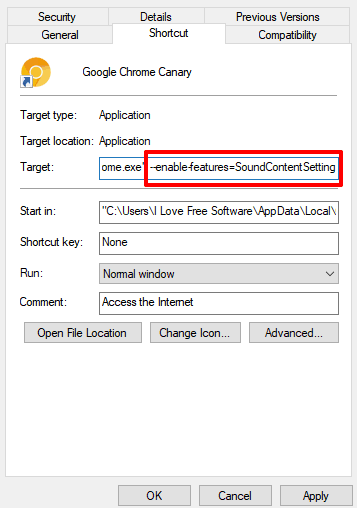
Step 4: Press the Apply and OK buttons.
Step 5: Close the Chrome Canary browser completely. If it is running in the system tray, you need to exit it. Also, you can open Task Manager and check if any of its processes are running. If yes, close those processes.
Step 6: Launch Chrome Canary browser and then open a website that you want to mute. Click on “browse content setting” (or you can say View site information icon) and a pop-up will open. There you will see a new “Sound” category. For this category, you will see a drop down menu (like rest of the available categories) with three options: Allow (default), Always allow on this site, and Always block on this site. By default, allow option is selected for all websites. That means all sites can play audio. To disable audio for the current website, select “Always block on this site” option.
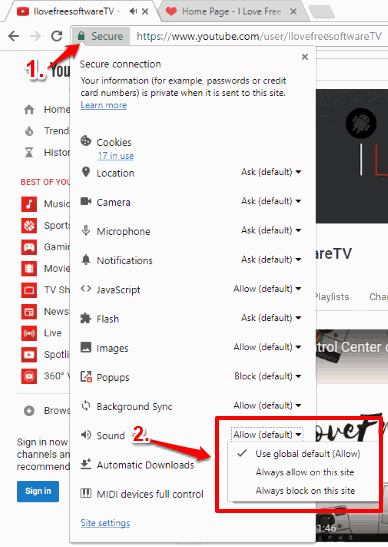
That’s it! Now that particular site is blocked from playing audio. You will see that volume icon visible on the tab of that site is muted. Even if you click on that mute icon, it won’t unmute the tab. And same applies for all the tabs related to that particular website.
Step 7: To unmute the muted site, open that site or its webpage in a tab. After that, use the same browser content setting and select “Always allow on this site” available in the Sound category. Or else, you can also right-click on the volume icon visible on the tab of that particular website, and select Unmute site option.
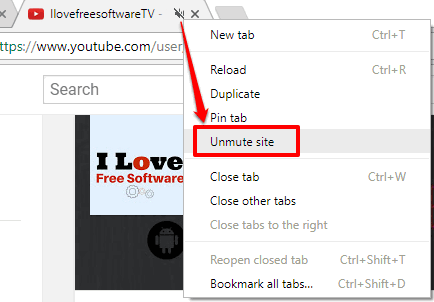
After that, the site will play audio. To mute the site again, you can again right-click on the volume icon visible on the tab and then select ‘Mute site‘ option.
Other interesting Chrome tutorials for you: How To Enable Distraction Free Reading Mode In Chrome On Desktop and How To Control Volume of Individual Tabs Separately In Google Chrome.
The Conclusion:
There are some sites that automatically start playing audio, because of some ad or embedded video. For such sites, disabling audio using Chrome browser is a nice feature. Many users will get benefit with this feature. If you can’t wait, use Chrome Canary browser, and disable audio for specific sites.